
The Post-Production Workflow
The post-production phase begins with the raw source footage and ends with a
completed movie, ready for making distribution copies. As technology evolves,
post-production continues to proliferate into an increasing variety of jobs and tasks.
Where there was once a single editor who was responsible for the majority of the
post-production process, there may now be a whole special effects team, an audio
department, a colorist (responsible for color correction), and a number of assistant
editors keeping track of all the footage. Final Cut Pro is at the heart of the
post-production pipeline, allowing you to organize and assemble media from
multiple sources into a finished product.
Here is an overview of the basic Final Cut Pro post-production workflow. As you begin
your project, remember that there are no hard and fast rules for editing. Different
editors have different working styles and, given the same source material, no two
editors will cut the same finished program. The workflow described here offers just one
example of how you might approach a typical project.
Chapter 1
About the Post-Production Workflow
17
I
Step 1:
Planning
Planning is where you choose your basic workflow, such as offline and online editing
(for projects with a lot of media) or editing the uncompressed footage (for shorter
projects with quick turnaround times), choose input and output formats, and plan for
equipment requirements (such as hard disk space), timecode and sync requirements,
special effects shots and color correction, audio mixing requirements, and so on.
Planning for post-production primarily means preparing for each of the upcoming
post-production phases: choosing input and output formats; acquiring your original
footage, music, and graphics; deciding on a logging and capturing method; choosing
an editing strategy; and planning the scope of effects you will be adding so you can
determine how much time and support you will need to dedicate to them.
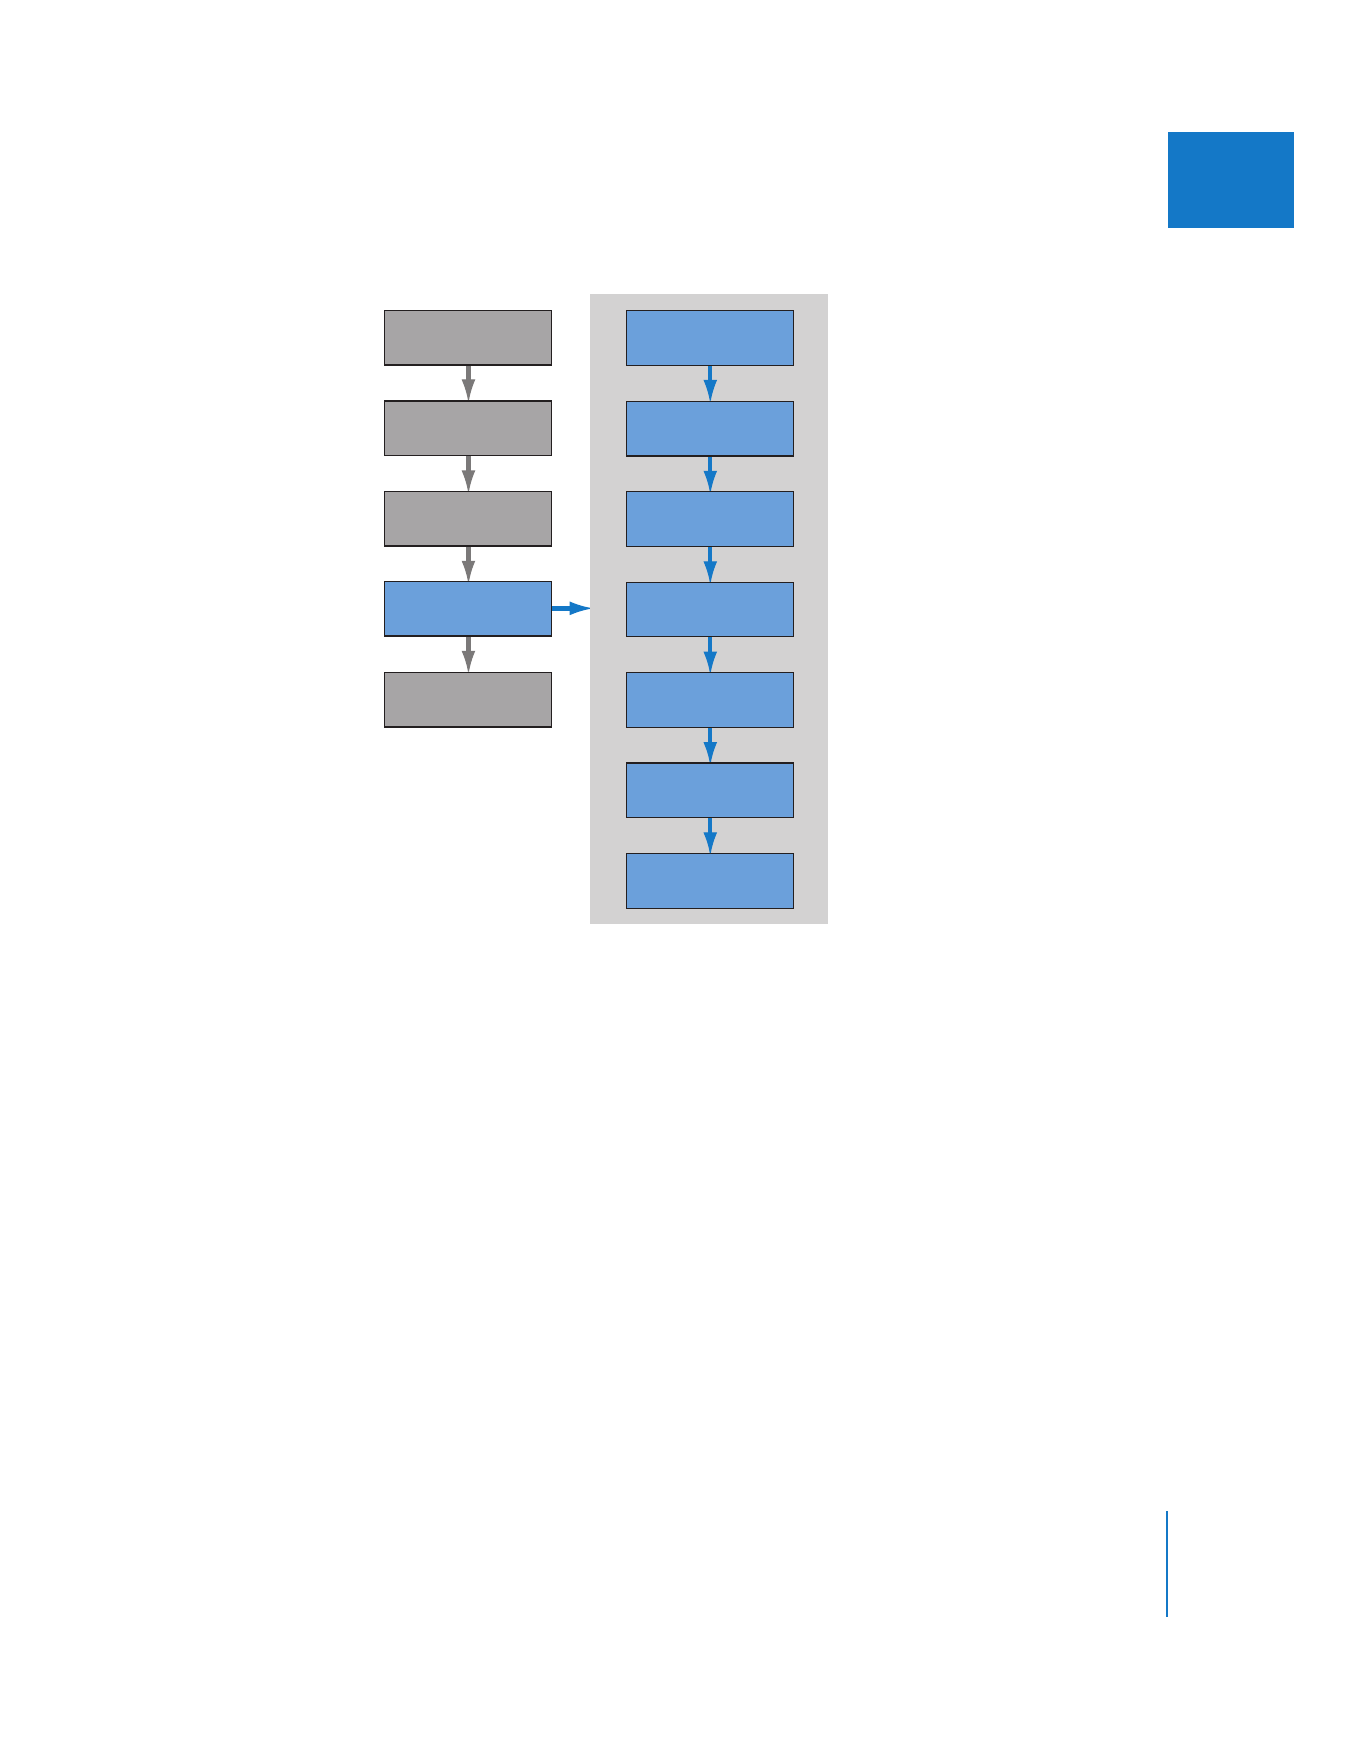
Outputting
Industry Workflow
Final Cut Pro
Post-Production Workflow
Distribution
Preproduction
Production
Post-Production
Scripting
Adding Effects
Mixing Audio
Editing
Logging
and Capturing
Setting Up
Planning
Production
Post-Production
Scripting

18
Part I
An Introduction to Final Cut Pro
Step 2:
Setting up
In this phase, you set up your editing system by installing and connecting the
hardware you need, as well as configuring your software. For example, before logging
and capturing, you need to connect the video and audio from your camcorder or
VTR (video tape recorder) to your computer. You also need to make sure that the
correct presets are chosen within Final Cut Pro, so that Final Cut Pro knows what video
and audio formats you are capturing and what kind of device control you’re using.
(Device control allows Final Cut Pro to remotely control video and audio devices.)
Depending on the format and device you are using, setup can be fairly simple
(as it is with DV formats) or more complex. For example, if you are working with an
uncompressed video format, you need to install a third-party video interface in your
computer, as well as a serial port adapter to communicate with the deck.
For more information, see the various chapters on setup, starting with Chapter 11,
“
Connecting DV Video Equipment
,” on page 161.
Step 3:
Logging and capturing
Logging is the process of identifying which shots on tape you want to capture to your
hard disk for editing. While you log, you can add scene and shot descriptions, logging
notes, and markers. Logging also helps you become familiar with your footage before
you begin editing.
Capturing means transferring source media from your video camcorder or deck to your
computer’s hard disk, which creates media files. You can capture media files at any time,
although most footage should be captured before you start editing.
The order in which you log and capture your footage is up to you. There are several
possible workflows, depending upon your work style, the needs of your project, and
the availability of footage. You can log all or most clips before batch capturing them (in
an automated way), or log and then capture each clip individually. You can also log
clips after capturing your footage to a hard disk.
Final Cut Pro allows you to capture video and audio from a wide variety of sources, if
you have the appropriate hardware. See Chapter 15, “
Overview of Logging
and Capturing
,” on page 235 for more information.

Chapter 1
About the Post-Production Workflow
19
I
Step 4:
Editing
The editing process involves taking the video and audio you’ve captured, along with
any music or graphics you’ve imported, and arranging these raw materials into a final
edited sequence of clips. Most editors start with a rough cut, where they quickly
arrange all of the clips for a movie in sequence. Once that’s finished, they work on
fine-tuning, subtly adjusting the edit points between clips and refining the pacing of
each cut. Basic audio editing and synchronizing are also part of this process, as well as
adding transitions, such as fades and dissolves.
Often, the type of project you’re working on determines your method of editing. For
example, documentary editing, in which the script often evolves in parallel with the
editing, is quite different from commercial television and film editing, in which there is
already a finished script to provide an order for clips.
Step 5:
Mixing audio
Once your movie is edited and the picture is “locked,” meaning the duration of the
movie is fixed and you no longer intend to change any of the edits, you can begin
working more extensively on your audio. This involves:
 Cleaning up the dialogue with more detailed audio editing, balancing audio levels,
and applying equalization
 Adding sound effects, music, and voiceover on additional audio tracks in the
sequence
 Mixing the levels of all the different clips together to create a balanced sound mix
You can use Final Cut Pro for each of these processes. For more information, see
Volume III, Part I, “Audio Mixing.”
Note: You can also sweeten your audio with another audio application, perhaps even
at another facility. To export your movie audio, see Volume IV, Chapter 11, “Exporting
Audio for Mixing in Other Applications.”

20
Part I
An Introduction to Final Cut Pro
Step 6:
Adding effects
Creating effects tends to be more time-consuming than cuts-only editing, so it’s good
to focus on basic edits first and work on effects when the timing of your project is
finalized. Effects are any enhancements you want to make to your footage, such as
color correction, special transitions, animation, still or motion graphics, multilayered
images (compositing), and titles. Final Cut Pro has a wide variety of video and audio
filters, each with parameters that you can keyframe to adjust over time in your
sequence, as described below.
Step 7:
Outputting
Once editing is finished, effects are added, and the final audio mix is complete, you can
output your movie to videotape or film. You can also export to a QuickTime format for
web delivery or use in a DVD-authoring application, such as DVD Studio Pro.
If you need to finish your project on a different editing workstation, you can export your
project to an interchange file format such as EDL or Final Cut Pro XML Interchange
Format. You may need to output on another system if you work with uncompressed
video, do lots of real-time effects processing, or require specialized video monitoring. For
more information, see Volume IV, Chapter 11, “Using Final Cut Pro XML and QuickTime
Metadata.” You can also refer to Volume IV, Chapter 5, “Offline and Online Editing.”

2
21
2