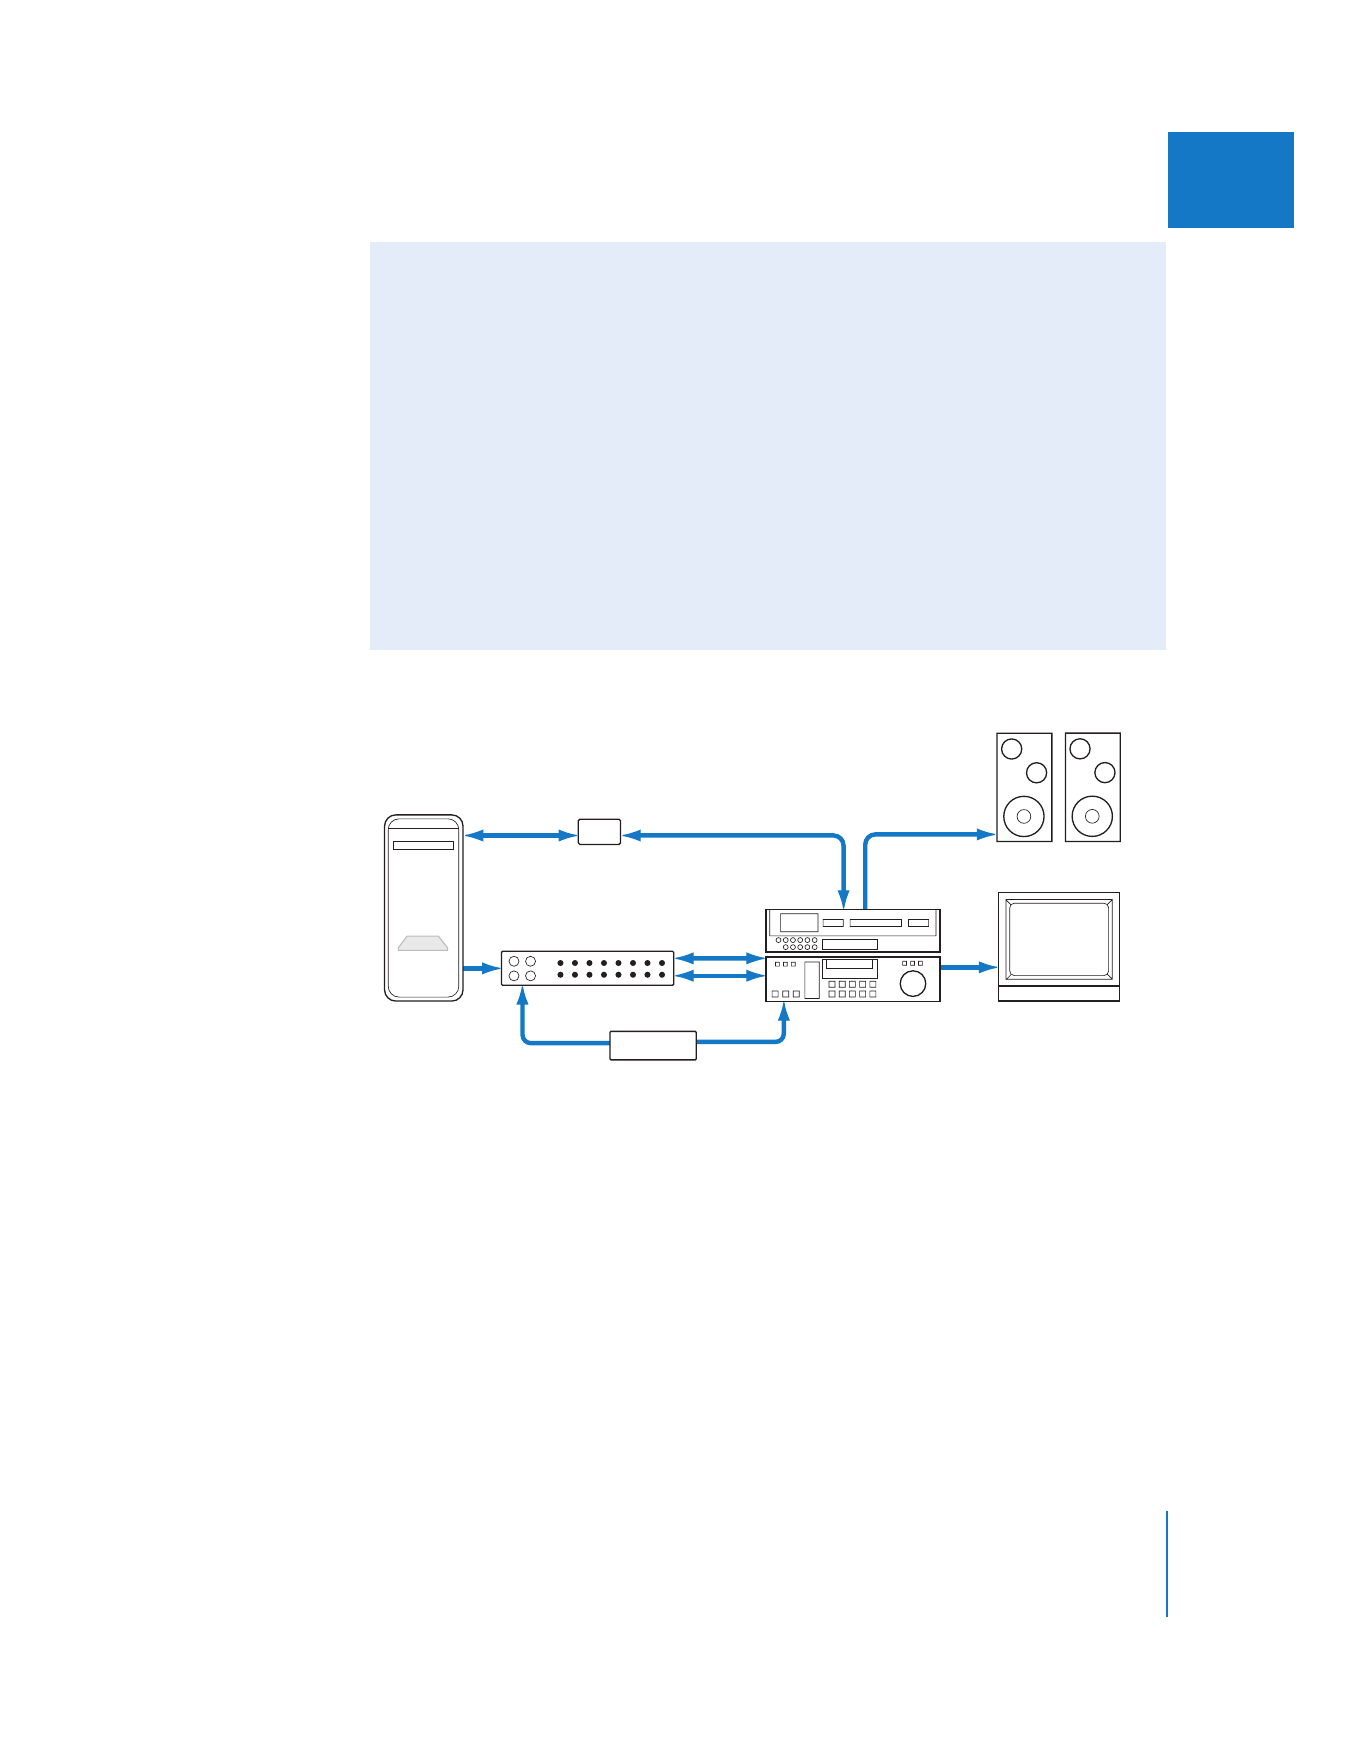
A Recommended System Using a Third-Party Video Interface
To set up a system using a third-party video interface, you need the following equipment:
 Your computer and display
 A non-DV format video device (a camcorder or deck)
 Audio and video cables for your system
 A third-party capture interface installed in or connected to your computer
Note: Some third-party video interfaces have a breakout box connected to the card
with a special cable, which is included.
 A USB-to-serial adapter or internal modem serial port adapter
 An RS-422 video deck control cable
 A blackburst generator, with the appropriate cables to connect it to both your
third-party video interface and your video and audio devices
Computer
PCI card
USB-to-serial
adapter
Video
Reference video
Breakout box
Video
Audio
USB
RS-422 serial
Amplified speakers
Audio
Blackburst
generator
Reference video
Analog
or digital VTR
Standard definition
monitor

184
Part III
Setting Up Your Editing System
To connect your VTR to your third-party video interface:
1
Install a supported third-party PCI video interface in your computer or connect a
FireWire or USB video interface.
For detailed information, see the documentation that came with your video interface
and your computer.
2
If you are using a PCI card video interface that came with a breakout box, connect the
breakout box to the PCI card using the cables provided.
3
Connect the video output of your VTR or camcorder to the video input of your
video interface.
4
Connect the audio outputs of your VTR or camcorder to the audio inputs of your video
or audio interface.
5
Connect the 9-pin remote device control cable to your deck, and to your breakout box
or serial port adapter.
For details, see “
Connecting Remote Device Control
” on page 202.
6
To genlock your video interface with your camcorder or deck:
a
Connect one of the blackburst generator’s outputs (there should be several) to the
genlock or external sync input on your deck (usually you use a cable with a
BNC connector).
b
Connect another of the blackburst generator’s outputs to the genlock or external
sync connector on your video interface.
For more information, see “
Synchronizing Equipment with a Blackburst Generator
” on
page 200.
7
Plug in and turn on your blackburst generator.
8
Turn on your deck.
9
If you’re using Final Cut Pro to control your camcorder or deck, make sure that the
device control switch on your VTR is set to Remote.
For more information, see “
Confirming Remote Device Control Between Final Cut Pro
and Your Video Device
” on page 203.

Chapter 12
Connecting Professional Video and Audio Equipment
185
III
To configure Final Cut Pro to work with your video deck, do one of the following:
m
Choose Final Cut Pro > Easy Setup, then choose an Easy Setup that corresponds to the
video format and device control protocol of the device you connected. For more
information, see “
Opening Final Cut Pro and Choosing Your Initial Settings
” on
page 163.
m
Choose Final Cut Pro > Audio/Video Settings, then individually select capture, device
control, and sequence presets that correspond to your video device and format.
For details about customizing settings to work with your video device:
 For more information about capture settings and presets, see Volume IV, Chapter 25,
“Capture Settings and Presets.”
 For more information about device control settings and presets, see Volume IV,
Chapter 26, “Device Control Settings and Presets.”
 For more information about sequence settings and presets, see Volume IV,
Chapter 27, “Sequence Settings and Presets.”