
Choosing Playback and Edit to Tape Output Settings
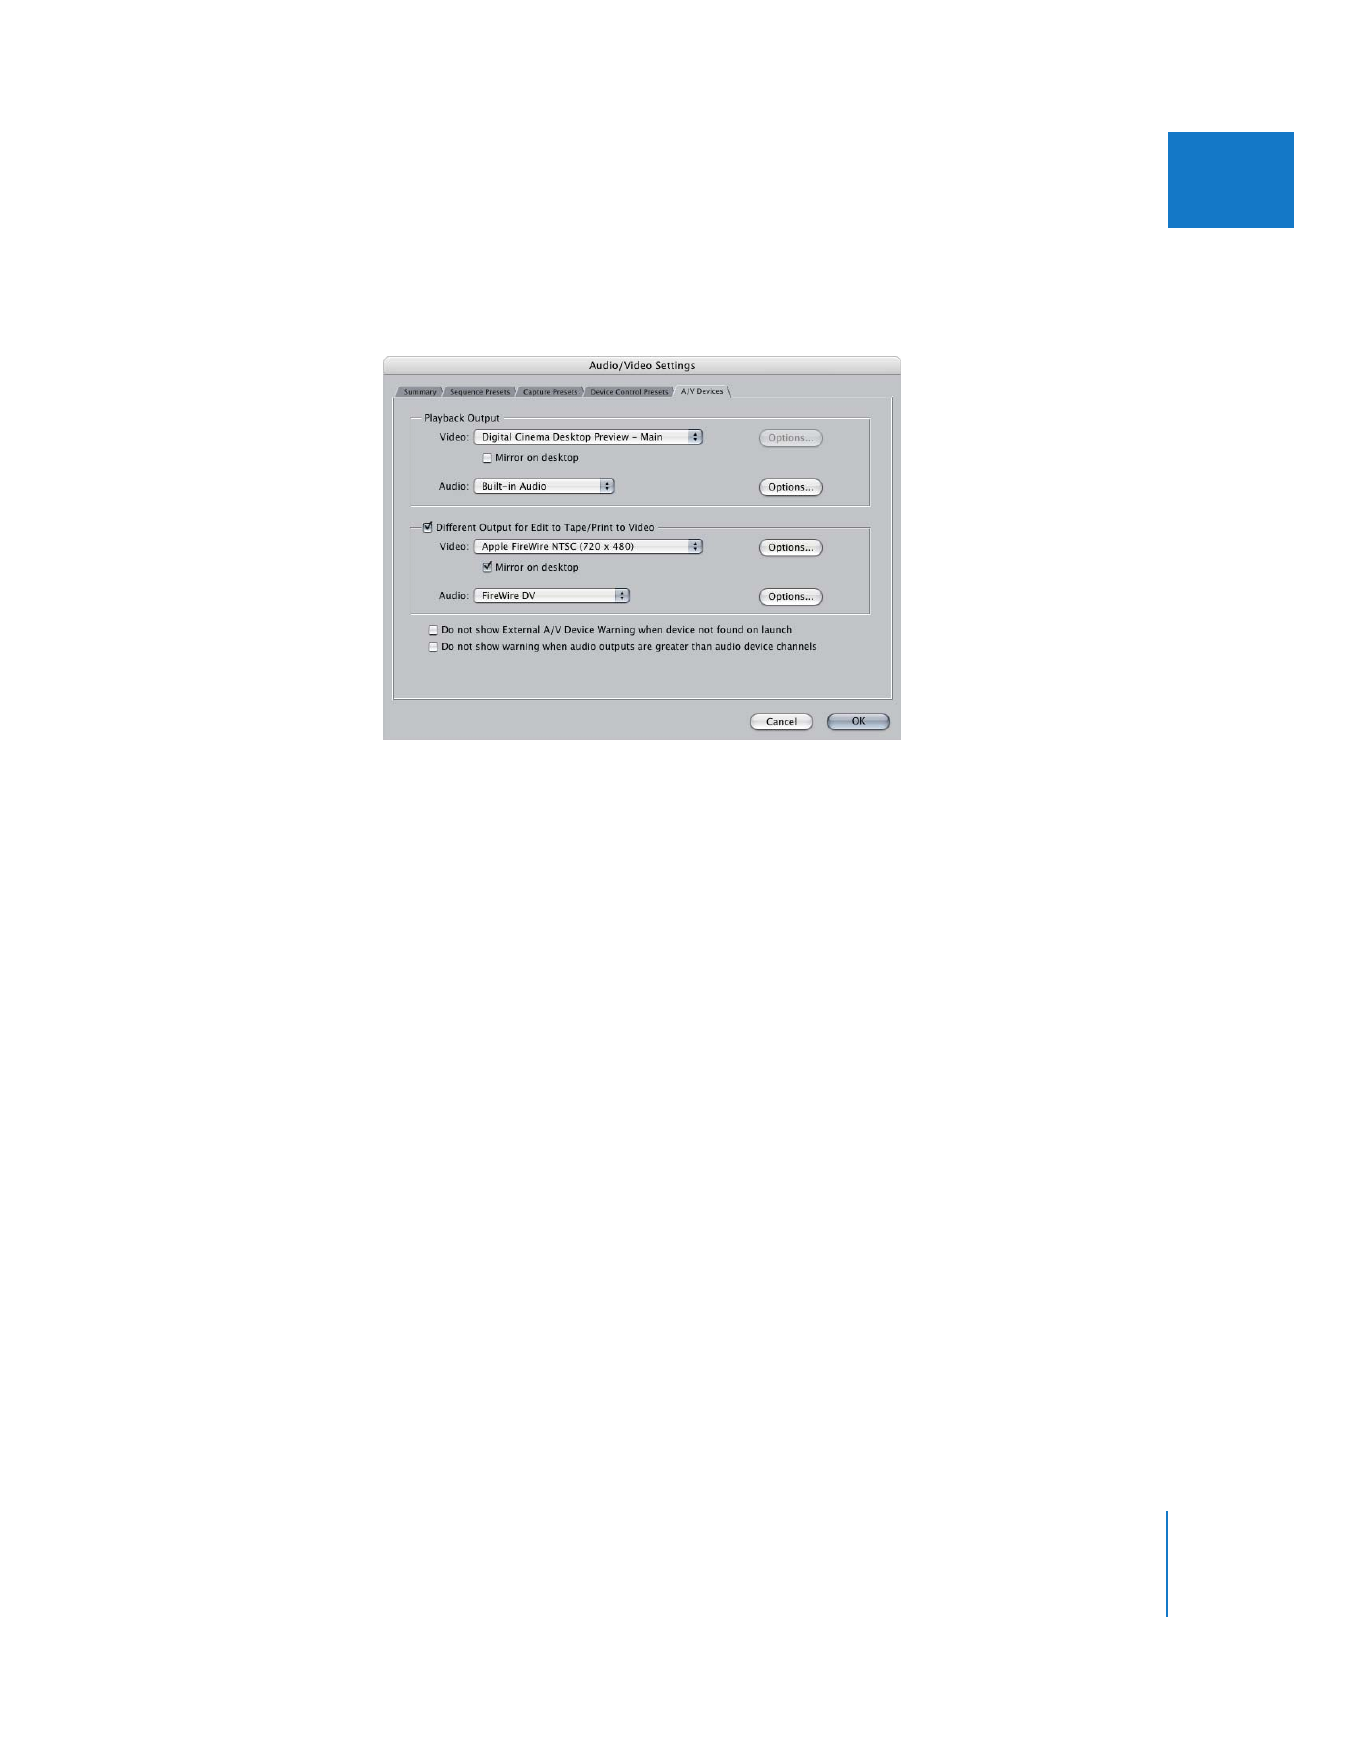
The settings in the A/V Devices tab of the Audio/Video Settings window determine
which video interface you use to externally monitor your video. You can choose to view
external video via FireWire (DV), a computer display (using Digital Cinema Desktop
Preview), or a third-party video interface. You can also specify a different output
interface for editing to tape versus playback while editing.
Although these settings reside in the A/V Devices tab of the Audio/Video Settings
window, you can choose a video interface from several other locations in Final Cut Pro:
 Summary tab in the Audio/Video Settings window: In this tab, you can choose video
and audio output interfaces from the corresponding pop-up menus.
 View menu: Instead of going to the Audio/Video Settings window, you can select
video and audio interfaces for external monitoring by choosing:
 View > Video Playback, and then choosing the name of the video interface
 View > Audio Playback, and then choosing the name of the audio interface
Note: When you choose an Easy Setup, the external video and audio playback settings
are automatically set for you because audio/video device settings are stored in an Easy
Setup. For more information about Easy Setups, see Volume IV, Chapter 24, “Audio/
Video Settings and Easy Setups.”
Chapter 14
External Video Monitoring
223
III
To choose a video interface for external monitoring:
1
Choose Final Cut Pro > Audio/Video Settings, then click the A/V Devices tab.
2
Choose the settings you want, then click OK.
Playback Output Area
 Video pop-up menu: Choose a device to output video to.
 None: This turns off external video output. If you play clips or sequences in
Final Cut Pro, you can’t view them on your camcorder, deck, or NTSC or PAL monitor.
 Digital Cinema Desktop Preview: Depending on the number of computer displays
you have connected, there are several options. For details, see “
Using Digital
Cinema Desktop Preview
” on page 226.
 Apple FireWire NTSC (720 x 480): If you’re using a computer with built-in FireWire
and an NTSC device is properly connected to your computer and turned on, this
option appears. If you choose this option and you have a video monitor connected
to your DV device, your video will be displayed on it.
 Apple FireWire PAL (720 x 576): If you’re using a computer with built-in FireWire and
a PAL device is properly connected to your computer and turned on, this option
appears. If you choose this option and you have a video monitor connected to
your DV device, your video will be displayed on it.
 DVCPRO HD: If a DVCPRO HD device is connected, you can choose the DVCPRO HD
device here. The name displayed depends on the Easy Setup you currently
have selected.

224
Part III
Setting Up Your Editing System
 Other available video interface: If you have a third-party video interface installed, it
appears in this list. Choose the video interface to view video on a monitor that’s
connected to the interface.
 Options button: Depending on your video interface and its associated codec, the
video frames may need to be decompressed when viewing video on an external
monitor. Click Options, then select the “Decompress after compress” checkbox.
This option is not available when using FireWire. If you’re using a third-party
video interface, check the documentation that came with it to see if you should
use this option.
 Mirror on desktop: Select this checkbox to simultaneously show video on both your
computer’s display (in the Canvas or Viewer) and an external video monitor. Some
third-party video interfaces may override this setting.
 Audio pop-up menu: Choose an audio device to output audio to. For information
about choosing audio output settings, see Chapter 12, “
Connecting Professional
Video and Audio Equipment
,” on page 171.
 Rendered Frames: This option may only appear when certain output devices are
selected. If you choose this option, rendered frames will be displayed on your
external monitor, as well as video that doesn’t require rendering.
Separate Output Options for Edit to Tape and Print to Video
 Different Output for Edit to Tape/Print to Video: Selecting this checkbox allows you to
redirect your program’s output to the specified video and audio interfaces whenever
the Edit to Tape or Print to Video command is used. For example, if you’re using a
video interface, you may want to preview your video using the interface’s analog
outputs during editing but output your final movie to tape using the digital
SDI output.
When this option is selected, all the controls in this section become available. All
controls in this section are identical to, but independent of, those appearing in the
Playback Output area, above.
Note: If this option is not selected, your sequence video and audio are always sent to
the video and audio interfaces specified in the Playback Output area—even when
the Edit to Tape and Print to Video commands are used.

Chapter 14
External Video Monitoring
225
III
Disabling Warning Controls
 Do not show External A/V Device Warning when device not found on launch: When
selected, this option disables the “Unable to locate the external video device” dialog that
appears when Final Cut Pro is opened without a camcorder, deck, or video interface
connected or installed. Instead, Final Cut Pro finishes opening, and External Video is
automatically set to Off in the View menu. When this checkbox is selected, Final Cut Pro
continues to attempt to locate an installed video device each time it is opened, but does
not display a warning requiring user input if a video device is not found.
If the Don’t Show Again checkbox is selected in the “Unable to locate the external
video device” dialog, it is also selected in the A/V Devices tab of the Audio/Video
Settings window.
If no video device is connected when Final Cut Pro opens, but you connect one while
Final Cut Pro is open, you will not be able to use it immediately. If the video device
does not appear in the Video Playback submenu of the View menu, make sure the
device is connected and turned on, then choose View > Refresh A/V Devices.
 Do not show warning when audio outputs are greater than audio device channels: This
option affects the Audio Outputs tab of the Sequence Settings window. If this option
is not selected, you will see a warning every time you choose more audio outputs
than are available from the currently selected audio device.
For example, if your audio device has only two audio outputs, and you configure
your sequence to have six audio outputs, a warning dialog appears when you click
OK to close the Sequence Settings window. To prevent this warning from appearing,
select this option.