Learning About the Audio Controls in the Viewer
When you click an audio tab in the Viewer, the controls at the bottom of the window
are the same as those in the Video tab. These controls allow you to navigate through
your clip, set In and Out points and markers, create split edits, and so on. The In and
Out points that you see in an audio tab are the same as the In and Out points shown in
the Video tab. Similarly, the two timecode fields in the top area of the window are the
same as those in the Video tab. For more information on those controls and fields, see
Volume I, Chapter 6, “Viewer Basics.”
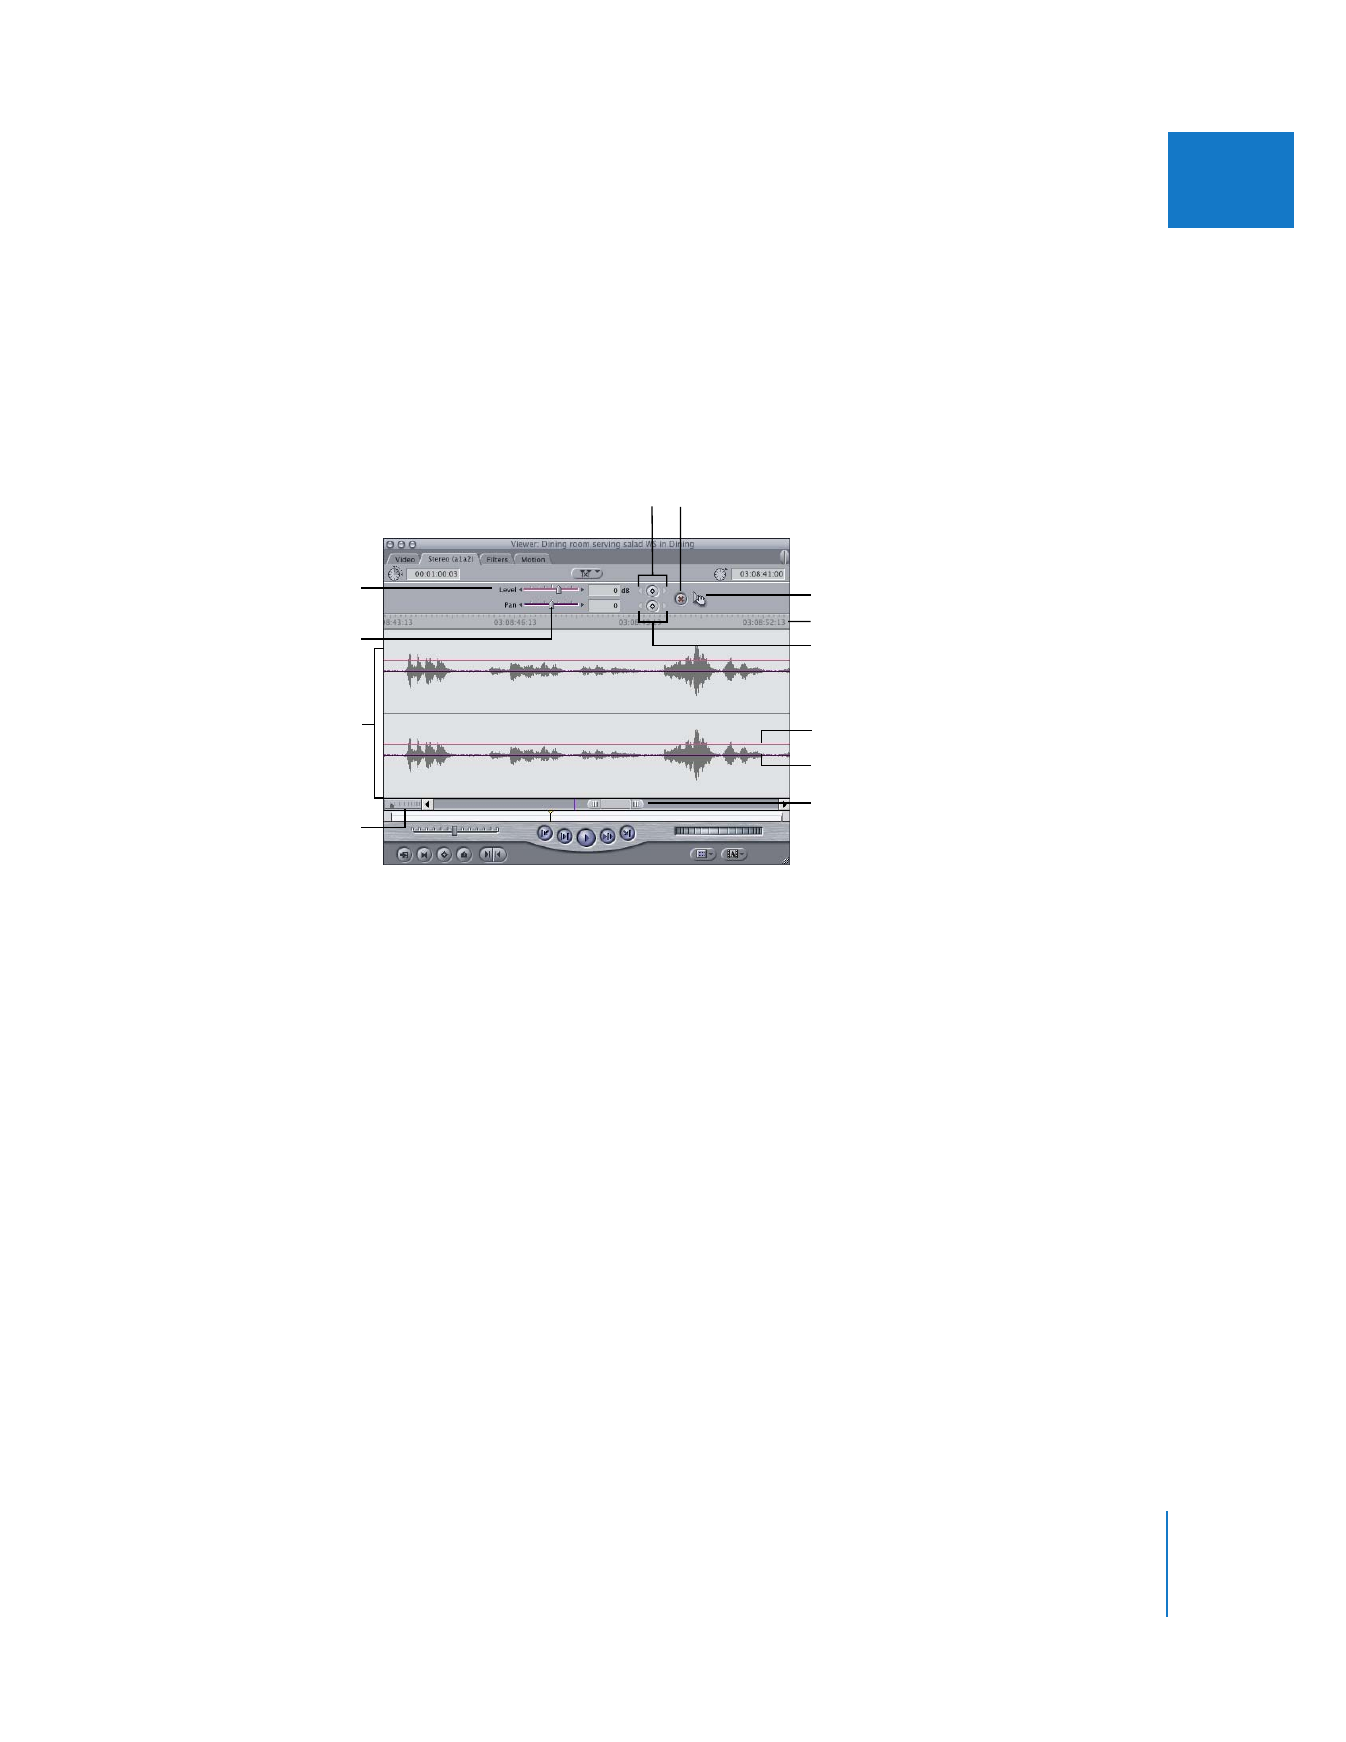
The following controls are found only in audio tabs:
 Waveform display area: Displays a graphical representation of the audio clip, showing
the sample values of your audio over time. If you zoom in on the waveform display,
you can see progressively more detail in your waveform. Clicking anywhere in the
waveform area moves the playhead to that frame, and dragging scrubs through
the clip.
 Pan overlay line: Drag this line up or down to change the pan for this clip. If you add
keyframes to the overlay, you can create changes in pan over time.
 Level overlay line: Drag this line up or down to change the sound level. If you add
keyframes to the overlay, you can create changes in level over time.
Zoom slider
Reset button
Level slider adjusts
volume.
Waveform display area
Pan slider adjusts stereo
sound placement.
Level Keyframe buttons
Ruler
Level overlay line
Pan overlay line
Drag hand
Pan Keyframe buttons
Zoom control

290
Part II
Rough Editing
 Level slider: This slider adjusts the amplitude, or volume, of the currently selected
audio clip between +12 and –inf dB. As you drag the slider, the number in the dB
field and the level overlay line are both updated.
You can also adjust the volume by typing a number in the dB field to the right of the
Level slider. The number you enter can include a decimal value, such as 6.23.
If there are no level keyframes in the current clip, adjusting the Level slider affects the
level of the entire clip. If there are level keyframes, using this slider will either:
 Adjust the level of a keyframe at the current position of the playhead.
 Add a new keyframe to the level overlay and adjust it to the new level.
A change in level between any two keyframes appears as a slope on the level overlay
line in the Audio tab of the Viewer. Changes to the level overlay in the Viewer are
mirrored by the level overlay on that clip in the Timeline.
∏
Tip: Hold down the Command key while dragging the Level slider to adjust the audio
level with more precision.
 Level Keyframe button: The keyframe button to the right of the Level slider places a
keyframe at the current playhead location on the level overlay. You can use
keyframes to adjust the audio level of your clip over time.
 Level keyframe navigation buttons: These buttons, to the left and right of the Level
Keyframe button, allow you to move the playhead forward or backward from one
keyframe on the level overlay to the next. You can also press Shift-K or Option-K,
respectively.
 Pan slider: This slider works in two ways, depending on what kind of audio you’ve
opened in the Viewer:
 If the clip items in the audio tab are a stereo pair, this slider simultaneously adjusts the
left and right stereo placement of both tracks. The default setting of –1 sends the left
track to the left channel output and the right track to the right channel output.
A setting of 0 outputs the left and right tracks equally to both speakers, essentially
creating a mono mix. A setting of +1 swaps the channels, outputting the left track
to the right output channel and the right track to the left output channel.
 If the clip items in an audio tab are single, mono tracks, this slider lets you pan the
audio track in the current audio tab between the left and right output channels.
As with the Level slider, if there are no pan keyframes in the current clip, adjusting
the Pan slider affects the pan of the entire clip. If there are pan keyframes, using this
slider will either:
 Adjust the pan of a keyframe at the current position of the playhead.
 Add a new keyframe to the pan overlay and adjust it between the left and right
output channels.
A change in pan settings between any two keyframes appears as a slope on the pan
overlay in the audio tab of the Viewer.

Chapter 17
Audio Editing Basics
291
II
 Pan Keyframe button: The keyframe button to the right of the Pan slider places a
keyframe at the current playhead location on the pan overlay. You can add keyframes
to change pan settings over time.
 Pan keyframe navigation buttons: These buttons, to the left and right of the Pan
Keyframe button, allow you to move the playhead forward or backward from one
keyframe on the pan overlay to the next. The left button moves the playhead to the
next keyframe to the left of the playhead’s current position, and the right button
moves the playhead to the next keyframe to the right.
 Reset button: This button deletes all marked keyframes on both the level overlay and
the pan overlay of the currently selected audio track, and resets the level and pan
values to their original captured states (0 dB for the audio level, and –1 for the
pan level).
 Drag hand: Use this to drag the current audio clip to the Canvas, the Timeline, or the
Browser. This control is necessary because clicking the waveform itself moves the
playhead to the frame on which you clicked.
 Ruler: When you’re looking at the contents of an audio tab in the Viewer, you’ll see
two playheads, both of which are locked together. The normal Viewer playhead is
located in the scrubber bar below the waveform display area, but there’s also a
second playhead within the waveform display area.
The ruler above the waveform display area shows the currently displayed range of
your clip. If you zoom all the way out (press Shift-Z), this ruler shows the clip from its
start point to its end point, and the movement of the Viewer playhead in the
scrubber bar matches that of the playhead in the waveform display area.
The playhead in the waveform display area lets you move around in an audio clip
with more precision, using the waveform itself for reference as you perform edits or
set keyframes for level and pan (down to 1/100th of a frame, if necessary). Clicking
anywhere on the ruler or in the waveform display area moves the playhead to that
frame in your audio clip. You can also drag the playhead to scrub through the clip, or
shuttle through the clip using the shuttle control or the J, K, and L keys. If you hold
down the Shift key while dragging the playhead in the waveform display area, you
can move the playhead in increments of 1/100th of a frame, which lets you trim edits
at a subframe level.
The playhead in the scrubber bar works the same way it does in the Video tab of the
Viewer. The whole length of the scrubber bar represents the entire length of the
audio clip opened in the Viewer, and clicking or dragging the playhead in the
scrubber bar immediately takes you to that part of your clip.
The markers and In and Out points for your clip also appear in the ruler.
 Zoom control: Using this control, you can expand or contract the ruler, decreasing or
increasing the amount of the clip’s waveform that is displayed.

292
Part II
Rough Editing
 Zoom slider: This slider lets you zoom in and out of the waveform displayed by
dragging the thumb tabs on either side, which adjusts both thumb tabs and leaves the
visible area of the keyframe graph centered. Pressing the Shift key and dragging one of
the thumb tabs zooms in or out of the waveform, locking the opposite thumb tab and
moving the visible area of the waveform in the direction in which you’re dragging.
More detailed instructions on using these controls and adjusting levels and pan are
described in Volume III, Chapter 6, “Mixing Audio in the Timeline and Viewer.”