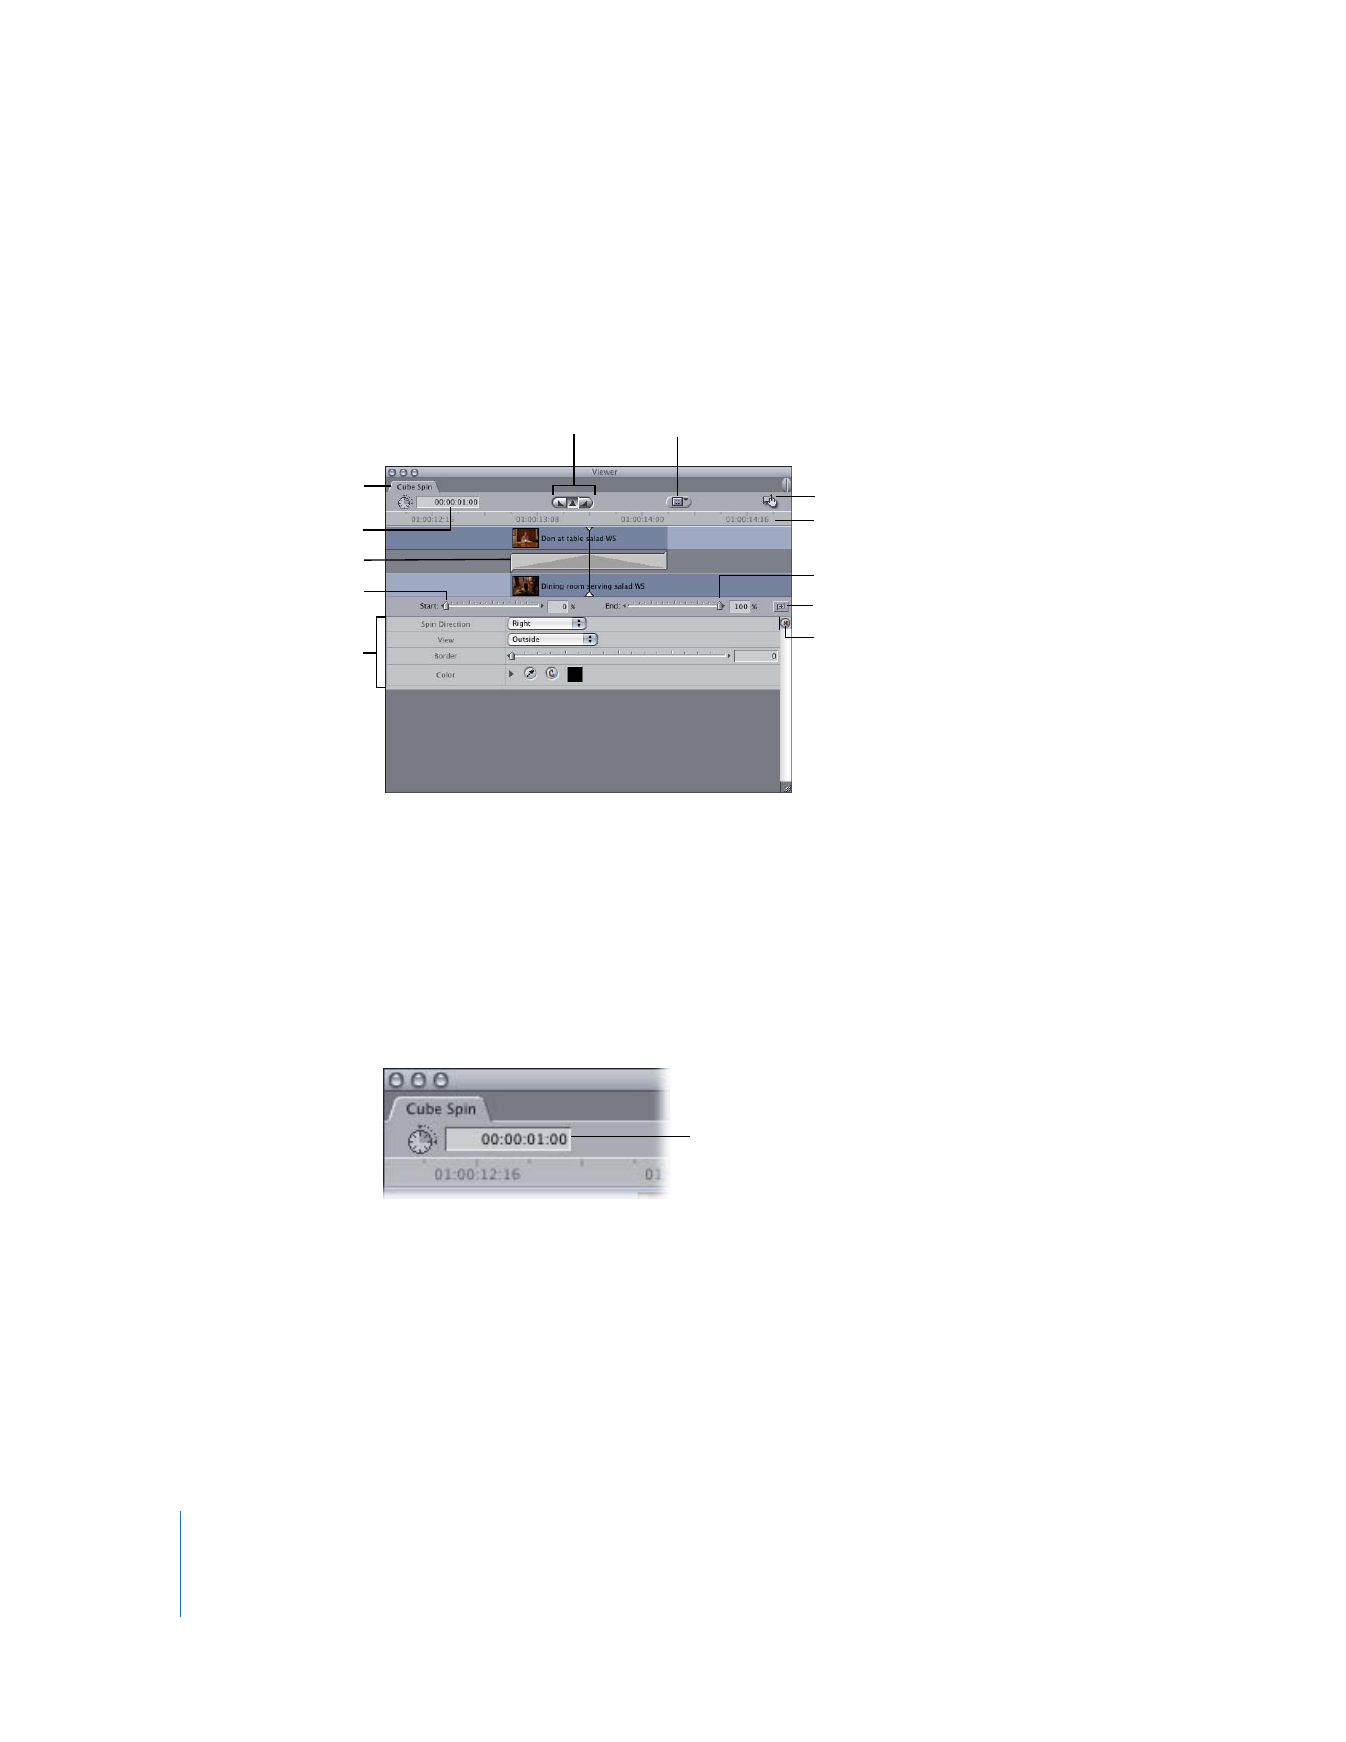
Controls in the Transition Editor
When you double-click a transition in the Timeline or the Effects tab of the Browser, a
special tab for the transition opens in the Viewer. This Transition Editor window
indicates that the transition is “loaded,” or opened, so you can view and modify the
transition’s settings.
The following are property and edit point controls common to all transitions.
Timecode Duration Field
This timecode field displays the current duration of your transition. Changing the value
in this field shortens or lengthens the duration of the applied transition up to the
maximum amount of overlapping frames available at the edit point. (To change the
duration in the Timeline, see “
Changing the Duration of a Transition in the Timeline
” on
page 382.)
How the duration will change depends on the alignment of the transition. If the
transition occurs before the edit point, the duration affects the clip to the left of this
point, or the outgoing clip. If the transition is centered on the edit point, changes in
duration extend in both directions. If the transition occurs after the edit point, the
duration affects the clip to the right of this point, or the incoming clip.
Recent Clips
pop-up menu
Alignment buttons
Tab with the name
of the transition
Start slider (with
percentage to the right)
Effects (specific to
each transition)
Timecode Duration field
Drag hand
End slider (with
percentage to the right)
Reset button
Reverse Transition button
Ruler
Transition
Timecode Duration field
Chapter 22
Refining Transitions Using the Transition Editor
397
III
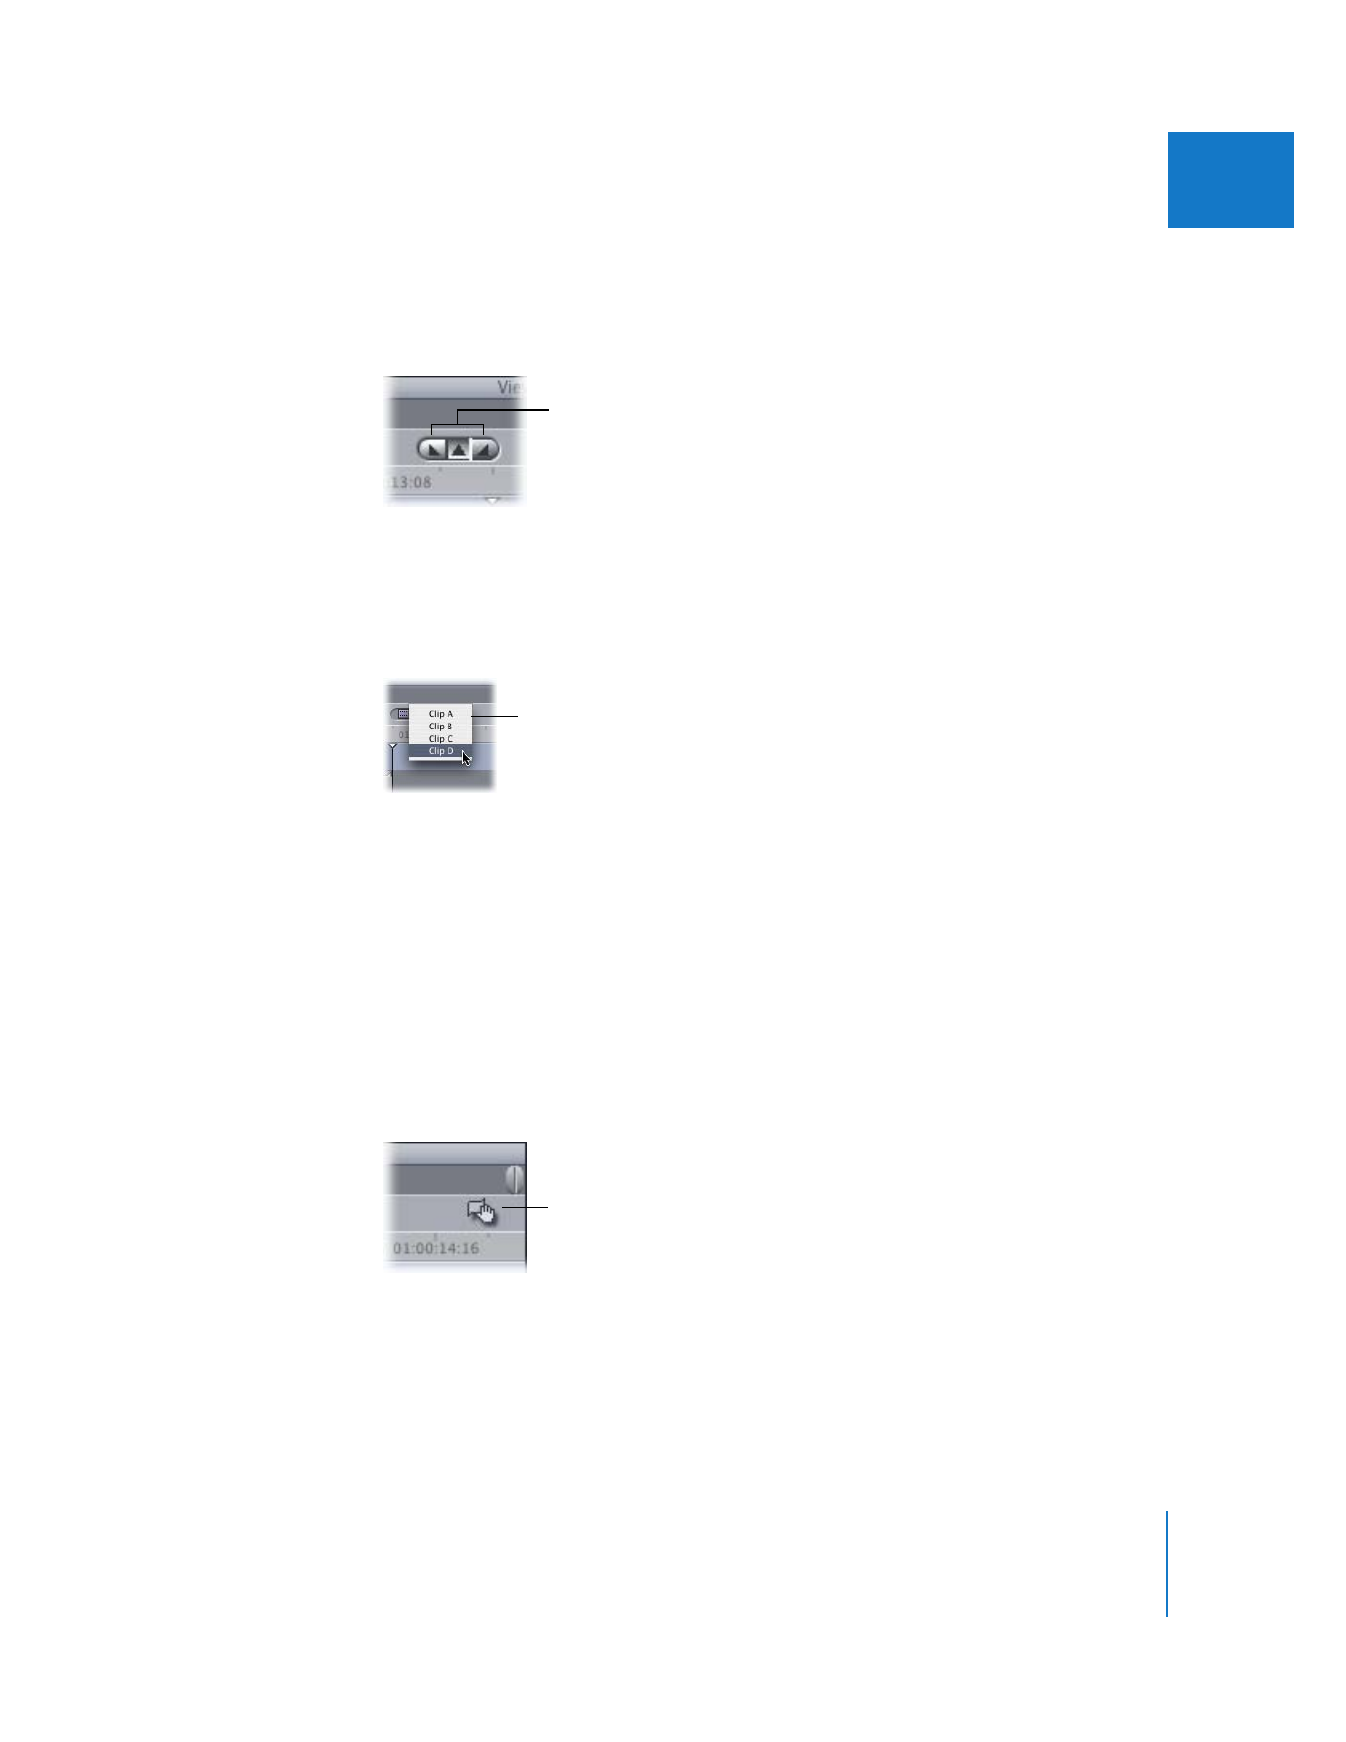
Alignment Buttons
The selected button indicates the current alignment of your transition. You can change
the alignment of a transition by clicking a button (if there are enough overlapping
frames in the direction in which you want to realign the transition).
Recent Clips Pop-Up Menu
This control lets you choose from a list of recently used clips. A clip is added to this list
when another clip replaces it in the Viewer (not when the clip is opened in the Viewer).
The last clip that was replaced in the Viewer appears at the top of the list.
By default, the maximum number of clips shown in this list is 10; you can change this
number in the General tab of the User Preferences window. For more information, see
Volume IV, Chapter 23, “Choosing Settings and Preferences.”
Once the maximum number of entries is reached, a clip is removed from the bottom of
the list each time another clip is replaced in the Viewer.
Drag Hand
If you want to apply the current transition to another edit point in your sequence in the
Timeline, you can drag this to the desired location in your sequence. This is true for
transitions opened from the Browser and from a sequence in the Timeline.
Alignment buttons
Recent Clips
pop-up menu
Drag hand
398
Part III
Fine-Tuning Your Edit
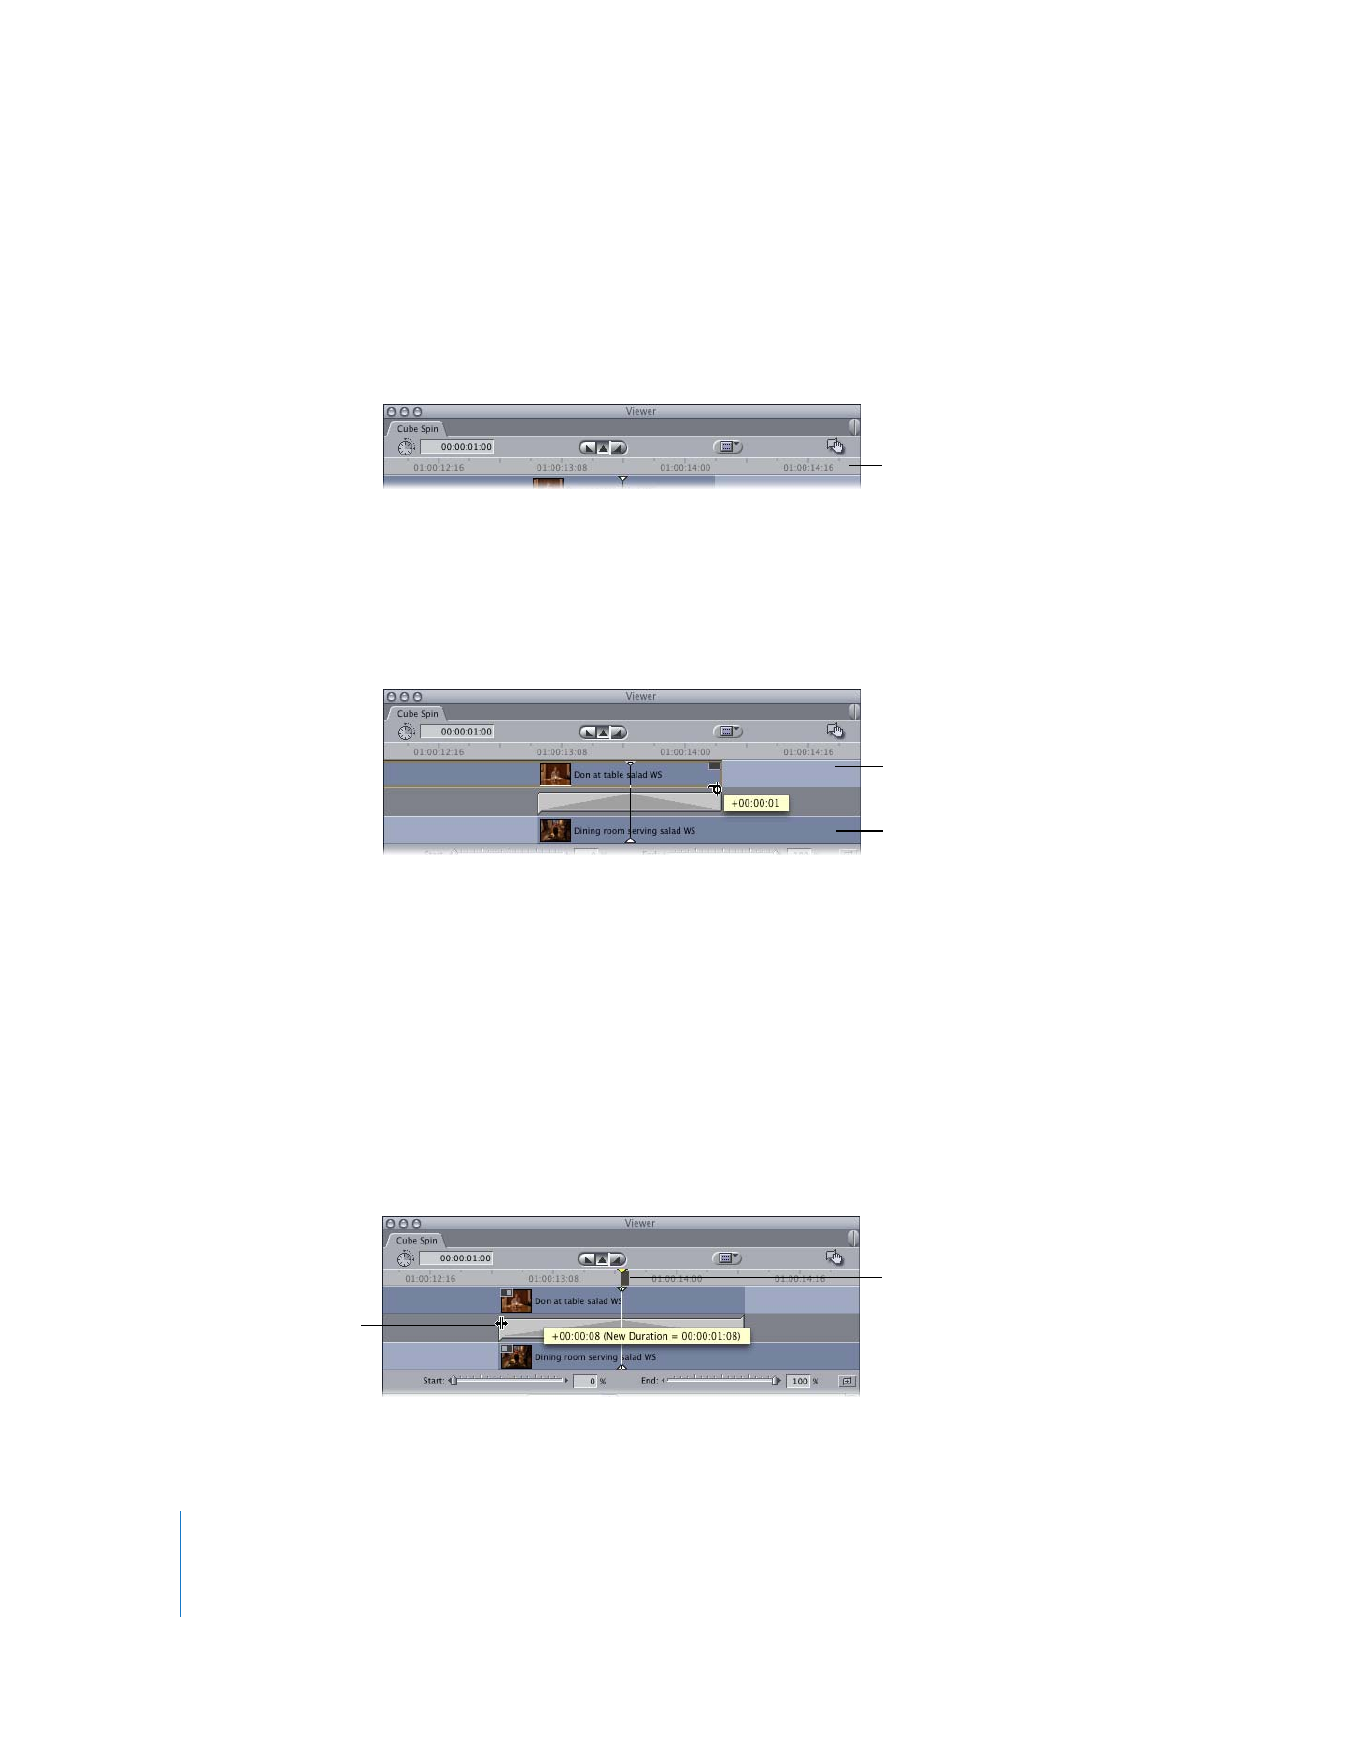
Ruler
The ruler displays a close-up view of the frames surrounding the transition in your
sequence. The ruler and playhead in the Transition Editor are locked to those in the
Timeline. The time scale of the ruler can be changed by using the Zoom In and Zoom
Out tools or pressing Command-+ (plus) or Command-– (minus).
Outgoing and Incoming Clip Handles
A transition that appears as two overlapping clips on the same track in the Timeline is
represented differently in the Transition Editor. The outgoing clip and its Out point
appear on the top track, the incoming clip and its In point appear on the bottom track,
and the transition itself appears on a track between the two.
Both the Out point of the outgoing clip and the In point of the incoming clip are
handles that you can drag to perform ripple edits, modifying the edit points of these
clips in your sequence in the Timeline. (A ripple edit adjusts the length of a clip by
changing the In or Out point of the clip. Ripple edits do not cause gaps in your edited
sequence. For more information, see “
Doing a Ripple Edit to Adjust the Length of a Clip
in a Transition
” on page 407.)
Transition Bar with Start, Stop, and Edit Handles
The transition appears as a bar with start and end points that you can drag. Depending
on the alignment of your transition, the edit point appears to the right, in the center, or
to the left of this bar.
Ruler
Outgoing clip
Incoming clip
Edit point in the center
of the transition bar
Transition bar with the
start point being moved
Chapter 22
Refining Transitions Using the Transition Editor
399
III
Dragging the transition bar from the middle results in a roll edit, which moves the edit
point between two clips in a sequence. Dragging either of the transition edges
shortens or extends the transition.
Note: A roll edit adjusts the location of an edit point shared by two clips; the Out point
of the first clip and the In point of the second clip are moved simultaneously, or rolled.
This changes the location of the edit point in the sequence, as well as the duration of
each clip. For more information, see “
Using the Roll Tool to Change Where a Cut
Occurs
” on page 334.
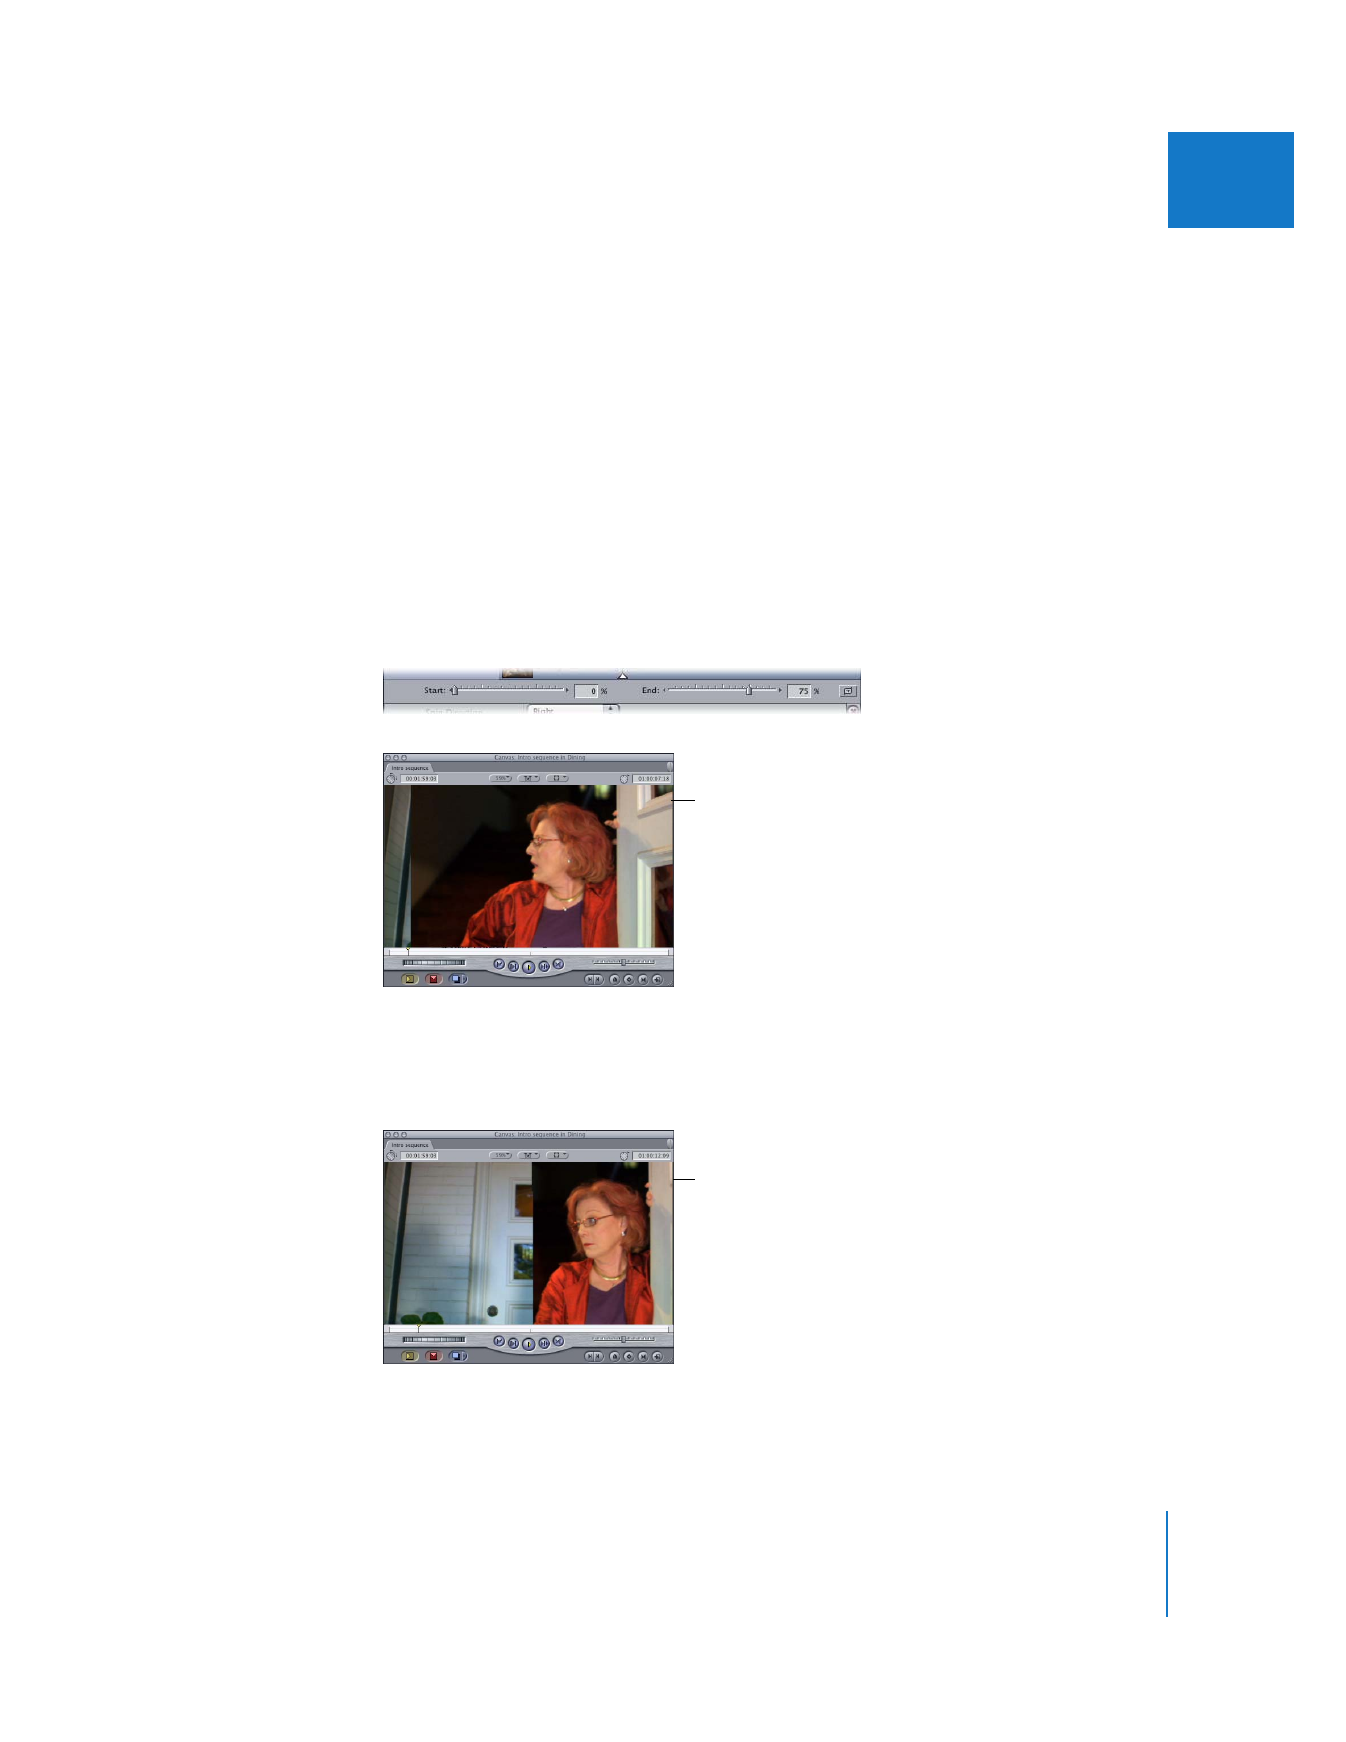
Start and End Percentages of Transition
These sliders allow you to set the starting and ending percentages of the transition’s
visual effect. For example, if you are using an edge wipe, the default starting
percentage of 0 percent places the border of the wipe all the way to the left of the
image, essentially revealing all of the outgoing clip.
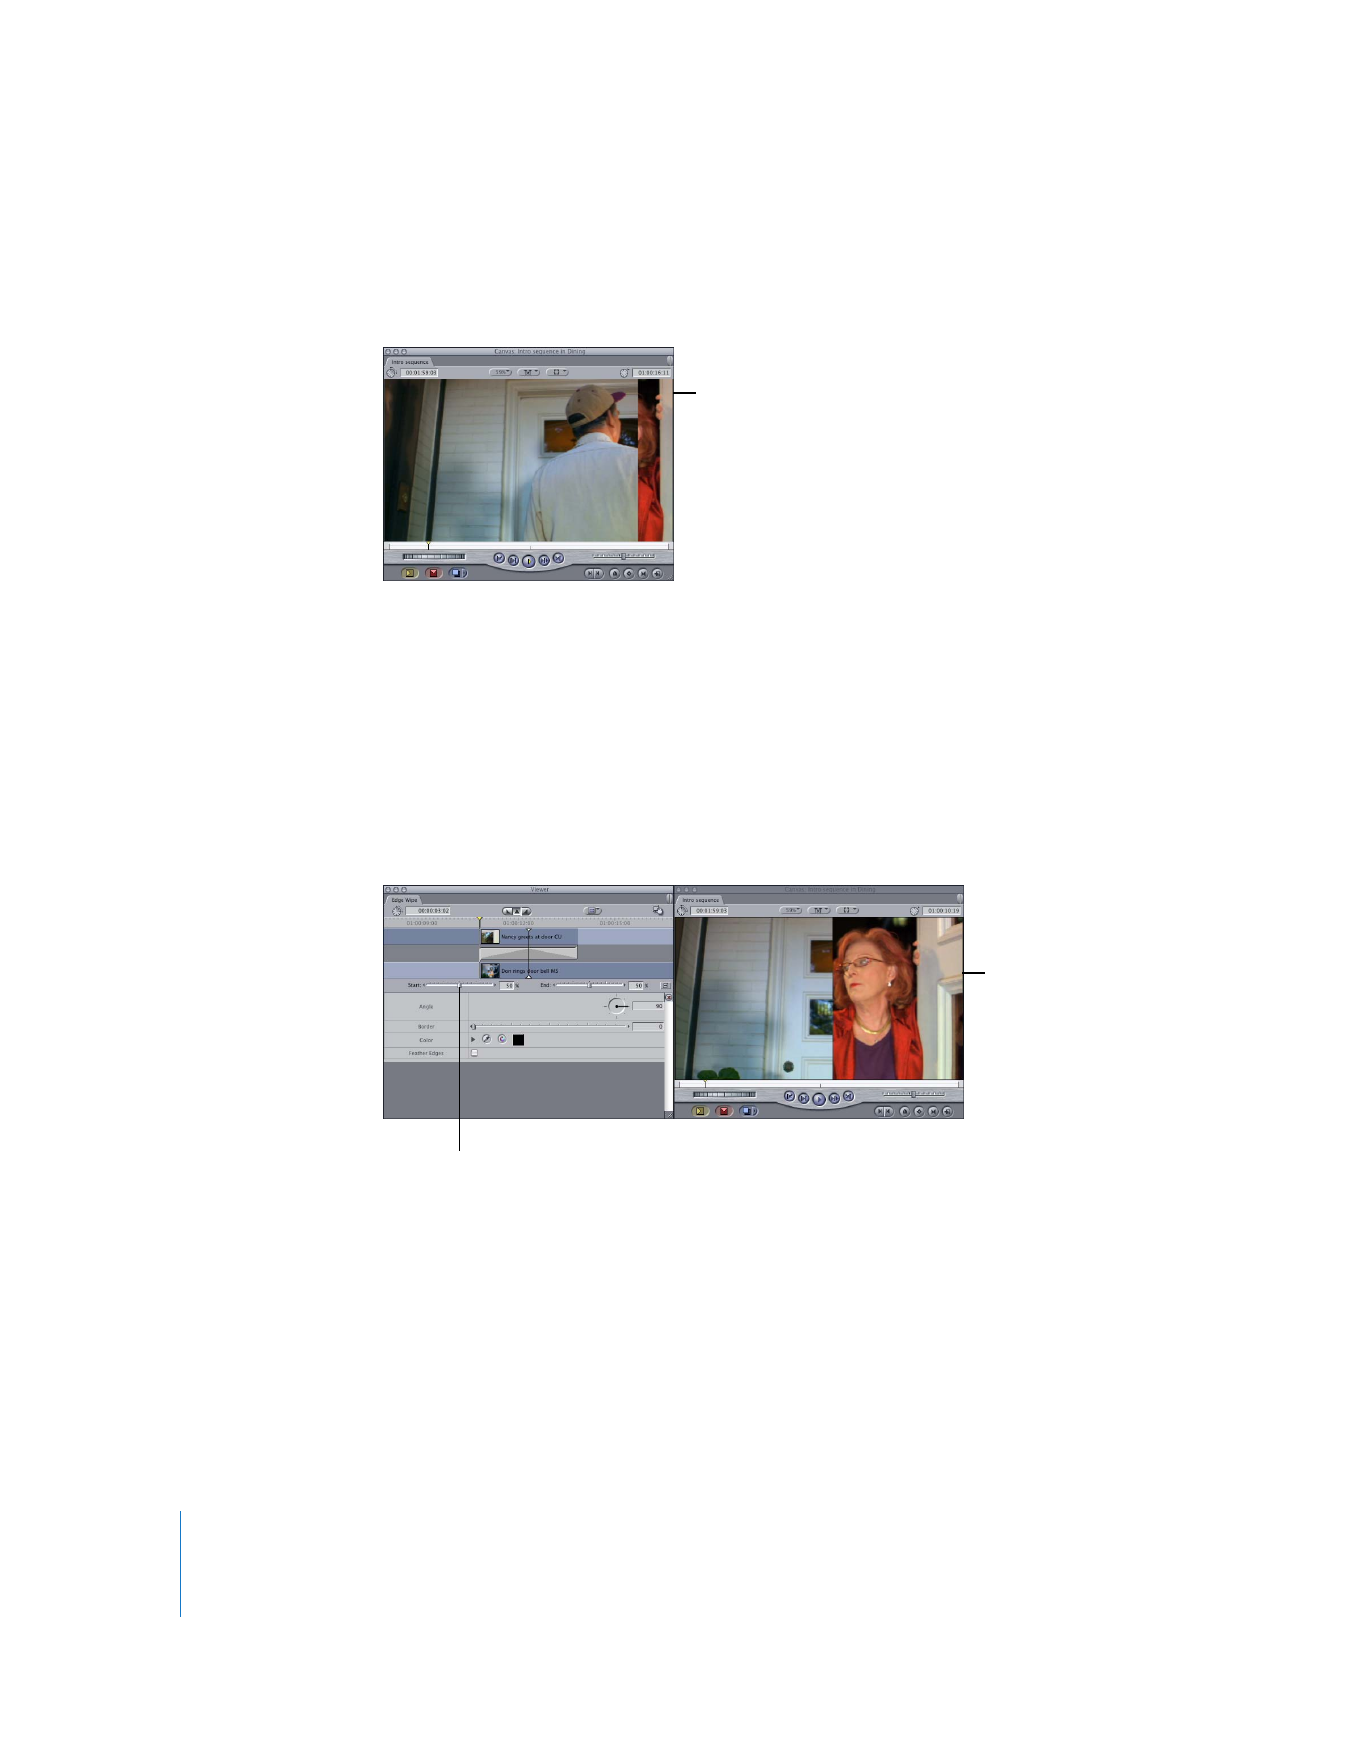
Halfway through the wipe, at the edit point, the wipe is at 50 percent, placing the
border of the wipe in the middle of the picture. You can now see half of the incoming
clip to the left and half of the outgoing clip to the right.
The start of an edge
wipe transition
The middle of an edge
wipe transition
400
Part III
Fine-Tuning Your Edit
At the end of the edit, with the transition finished and the default ending percentage
of 100%, the border of the wipe is all the way to the right, revealing the entire
incoming clip.
You can change the starting and ending percentages for the transition. This is an
excellent way of creating split-screen effects if you plan to export your sequence as an
EDL for import into another editing system. For more information on exporting EDLs,
see Volume IV, Chapter 10, “Importing and Exporting EDLs.”
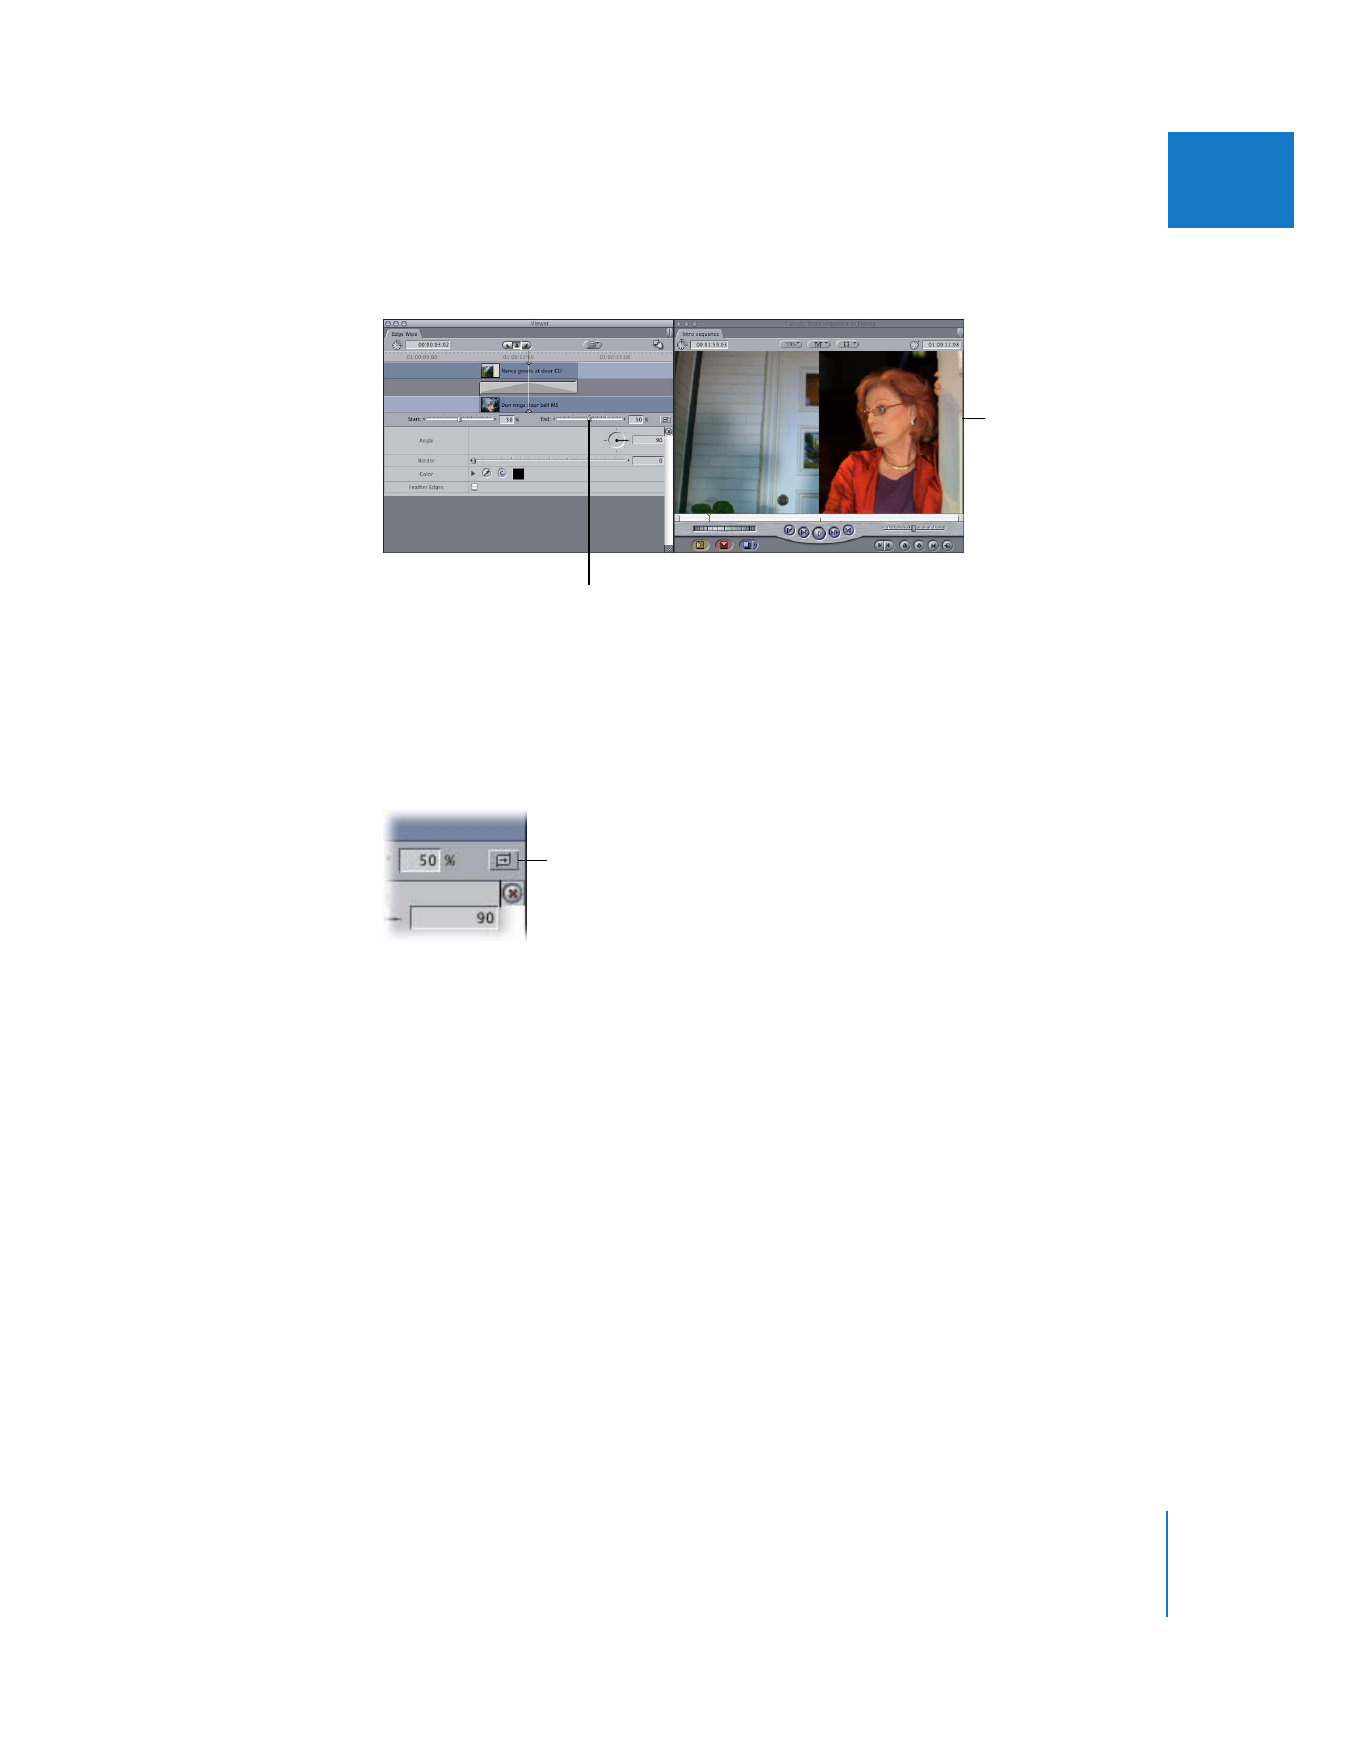
For example, you can set both the starting and ending percentages to 50 percent. At
the start of the transition, a split-screen effect is created; half of the outgoing clip and
half of the incoming clip are revealed simultaneously and throughout the duration of
the transition.
Near the end of an
edge wipe transition
The start of an edge wipe
transition, where the start
percentage is 50%
The start of the
transition in the Canvas
Chapter 22
Refining Transitions Using the Transition Editor
401
III
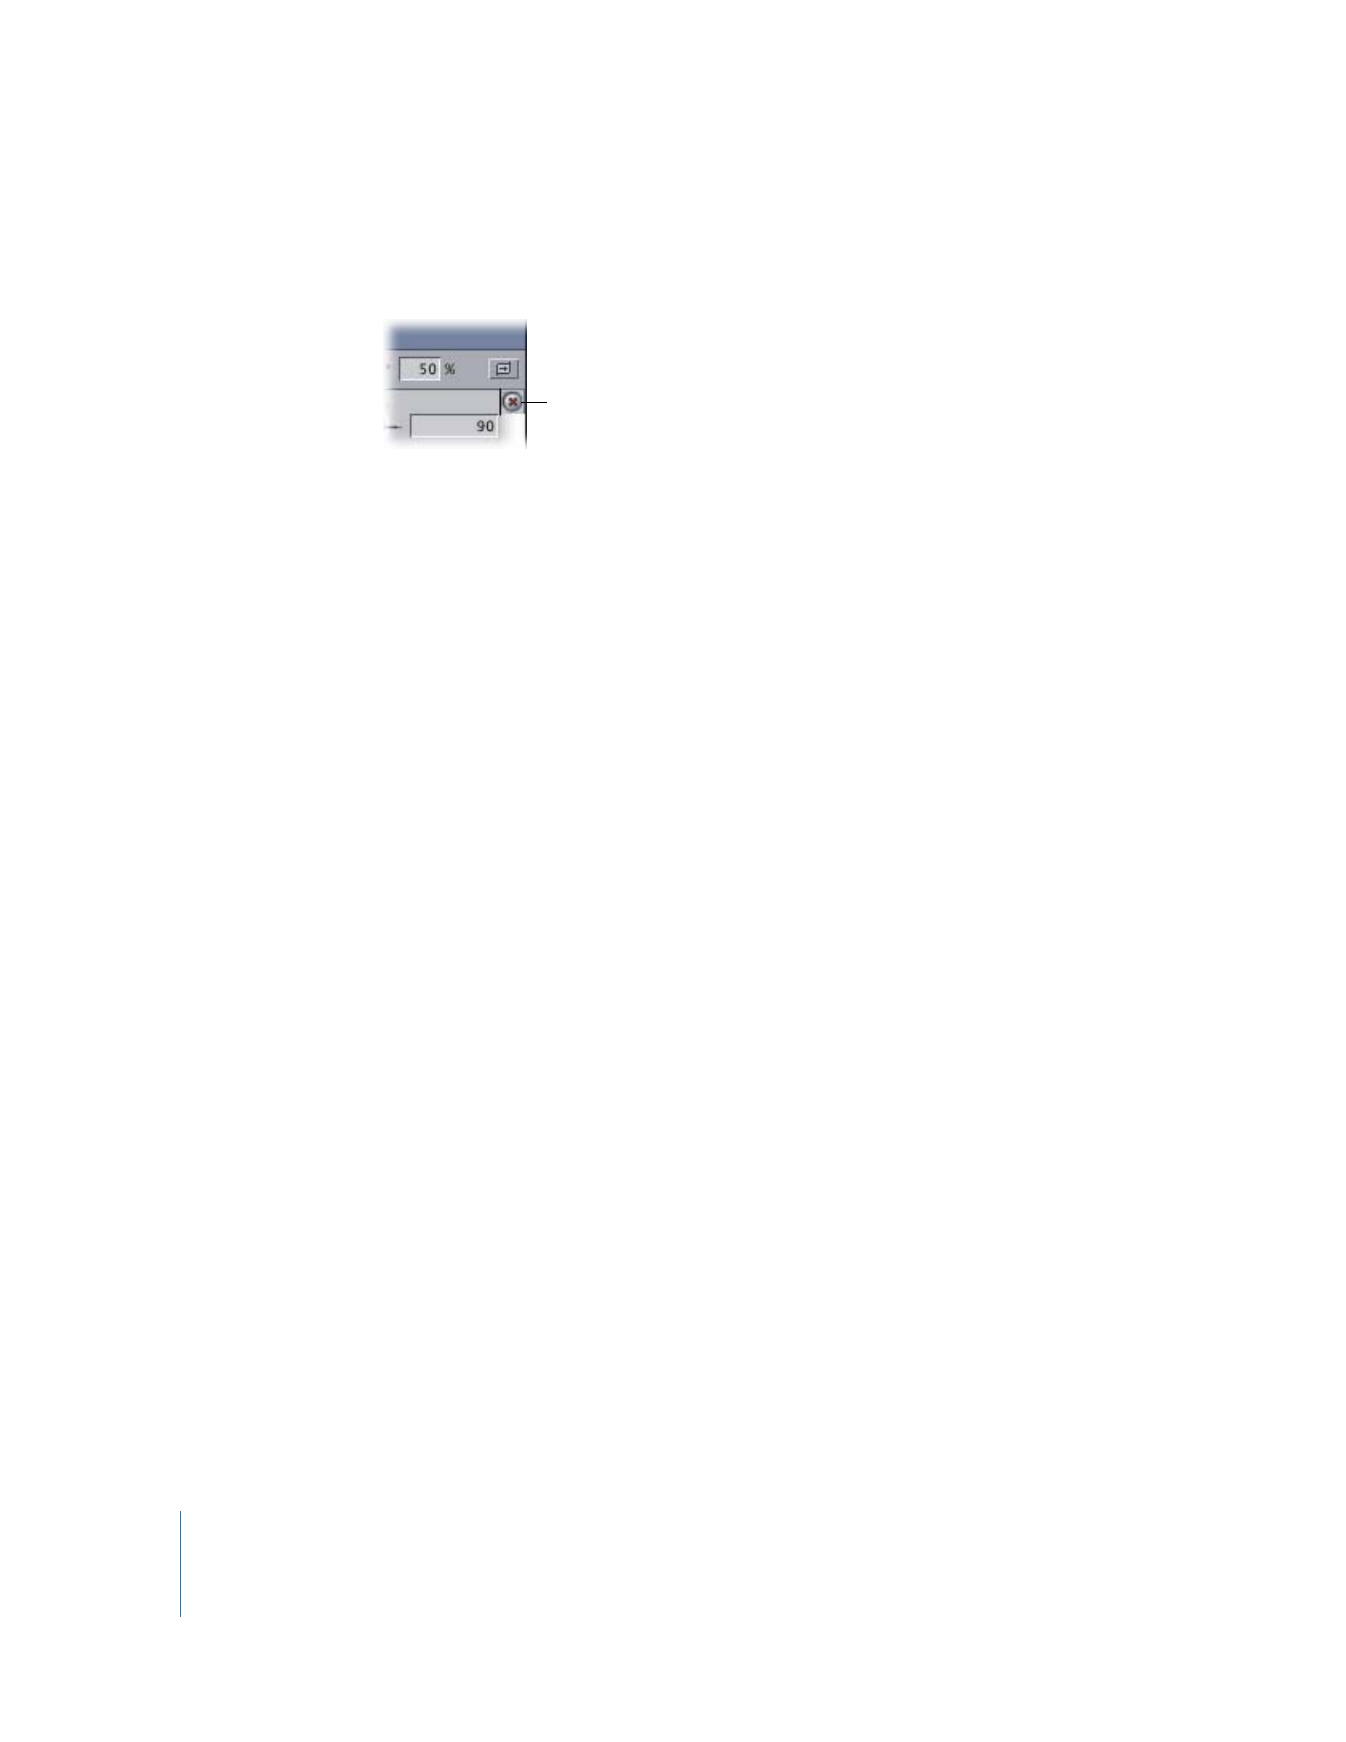
When the transition is complete, the image becomes the full-screen picture of the
incoming clip.
Reverse Transition Button
Some transition effects have a default direction. For example, a wipe goes from the left
to the right, a clock wipe’s border travels in a clockwise direction, and the spin 3D
transition spins the outgoing clip out to the right.
To reverse the direction of an effect, click the Reverse Transition button. If you reverse
the direction for the above examples, the wipe moves from right to left, the clock wipe
moves in a counter-clockwise direction, and the spin 3D transition spins the incoming
clip in to the left.
The end of an edge wipe
transition, where the end
percentage is 50%
The end of the transition
in the Canvas; the split-
screen effect is
maintained throughout
the transition.
Reverse Transition button
402
Part III
Fine-Tuning Your Edit
Reset Button
Click this to reset all of a transition’s parameters to the default values.
Custom Parameters
Many transitions have additional parameters that you can use to further customize
their effect. These parameters appear below the controls for the properties and may
include such visual effects as the center point of the effect, the width of the transition
border, and the color and feathering of this border. More complex transitions have
more elaborate effects.