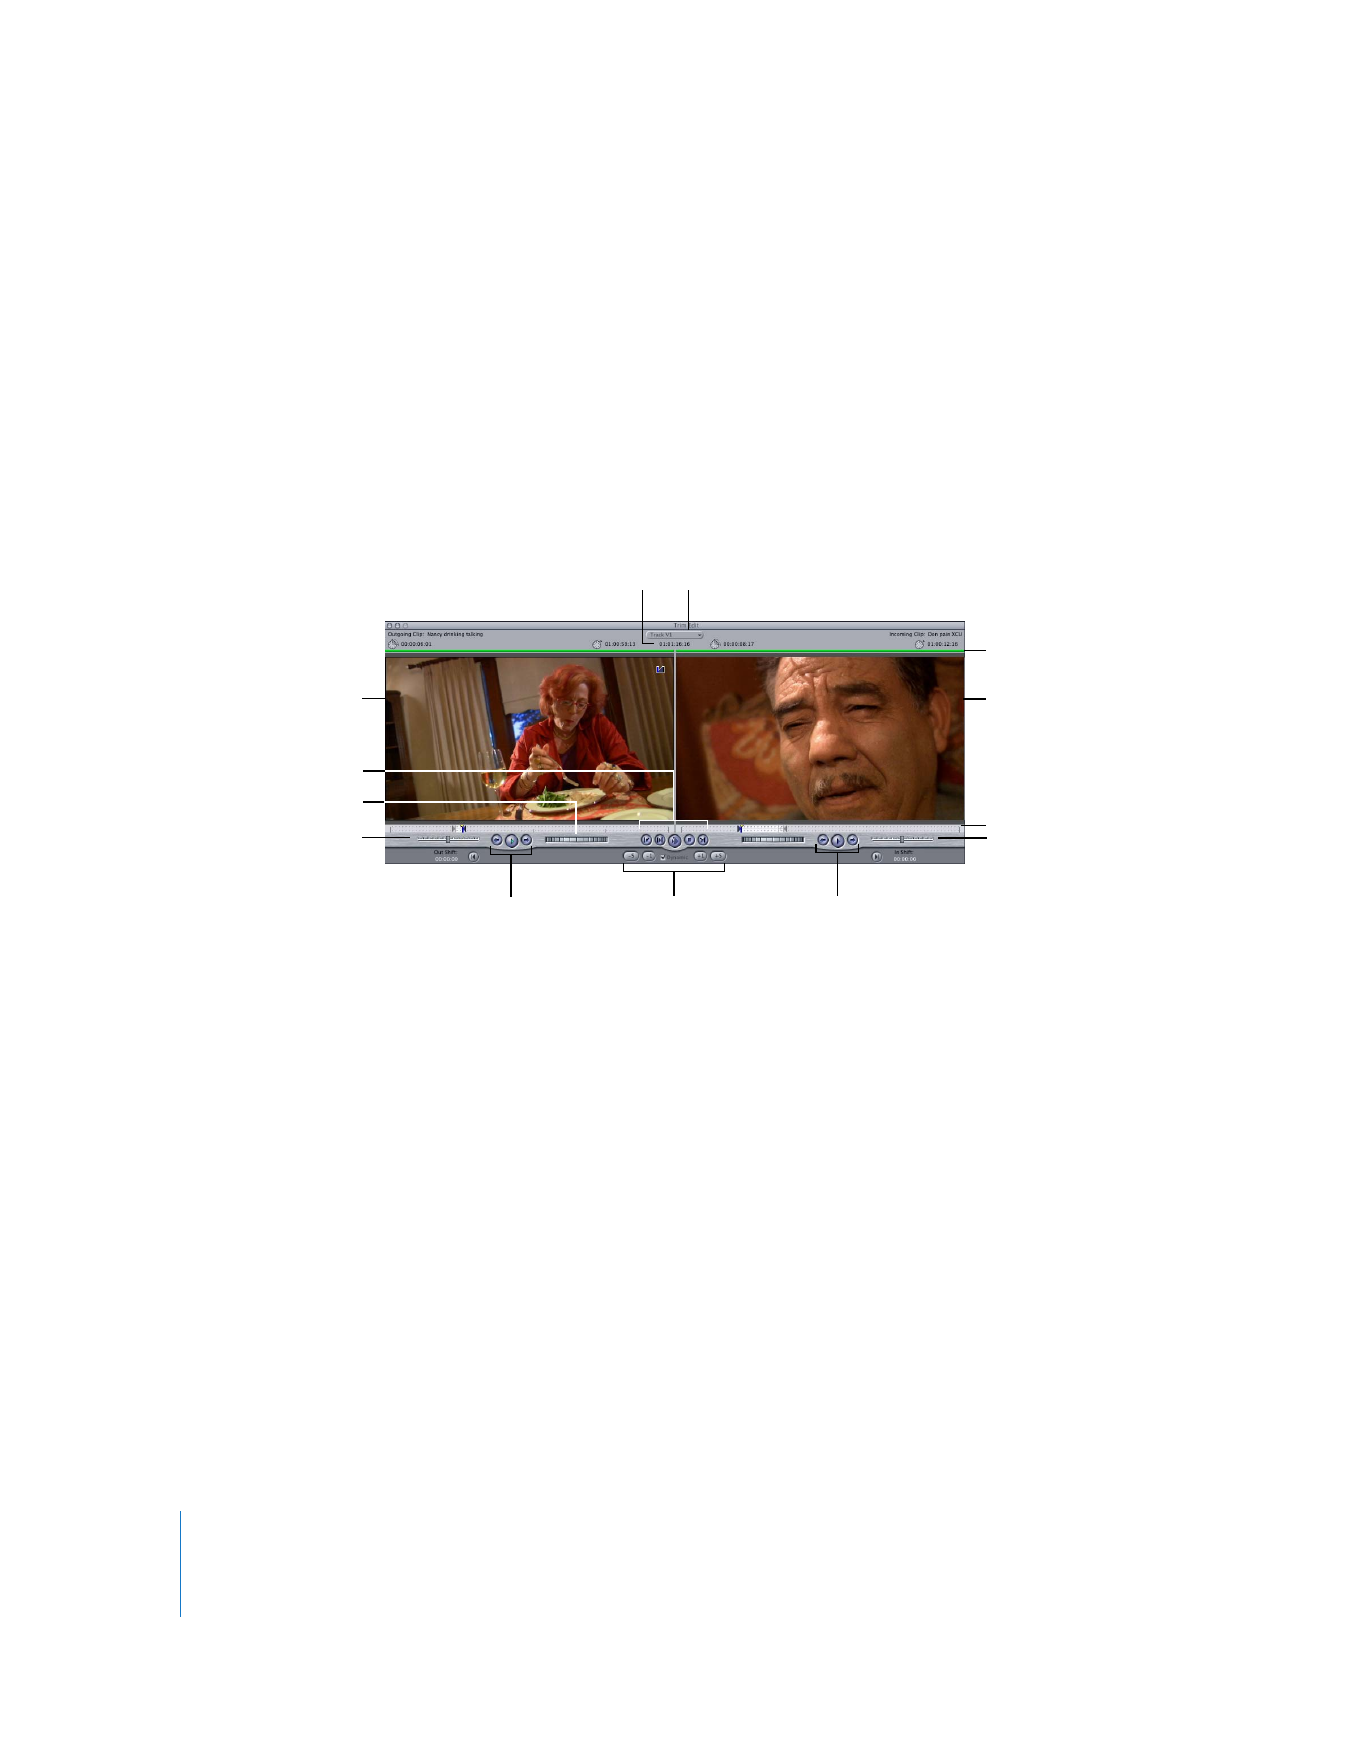
Controls in the Trim Edit Window
Before you begin using the Trim Edit window, you may want to familiarize yourself with
the controls.
 Current sequence timecode: Shows the timecode number of the currently viewed edit
point in the sequence. You can type + (plus) or – (minus) and a timecode duration to
adjust the edit forward or backward using the current mode (ripple or roll).
 Track pop-up menu: If you’ve selected multiple edit points, this lets you choose the
track that you want to view in the Trim Edit window. You can change the track you’re
viewing at any time.
 Green bar: Indicates what kind of trimming operation you’re about to perform:
 On the left side (over the outgoing clip): A ripple edit to the outgoing clip’s Out point
 On the right side (over the incoming clip): A ripple edit to the incoming clip’s
In point
 Over both: A roll edit to the edit point between both clips
You can switch between these operations by pressing U or by clicking the relevant
part of the Trim Edit window (as described in “
Trimming an Edit in the Trim Edit
Window
” on page 365).
Transport controls
Track pop-up menu
Playback
controls for the
incoming clip
Playback
controls for the
outgoing clip
Outgoing clip
Incoming clip
Green bar
Trim buttons
Current sequence timecode
Shuttle control
Shuttle control
Scrubber bar
Jog control
Chapter 20
Trimming Clips Using the Trim Edit Window
361
III
 Scrubber bar: The scrubber bar runs along the entire width of each of the two viewer
areas in the Trim Edit window, below the video image. To scrub, or move, through a
clip or sequence, drag the playhead across the scrubber bar. You can also click
anywhere in the scrubber bar to instantly move the playhead to that location.
 Jog control: The jog control allows you to move the playhead as if you were actually
moving it with your hand, with a one-to-one correspondence between the motion of
your mouse and the playhead’s motion. For more information, see Volume I,
Chapter 6, “Viewer Basics.” You can also refer to Volume I, Chapter 7, “Canvas Basics.”
 Shuttle control: This control lets you quickly play through clips and sequences at
different speeds, in fast and slow motion. Drag the slider to the right to fast-forward
and to the left to rewind. Playback speed varies depending on the distance of the
slider from the center of the control. For more information, see Volume I, Chapter 6,
“Viewer Basics.” You can also refer to Volume I, Chapter 7, “Canvas Basics.”
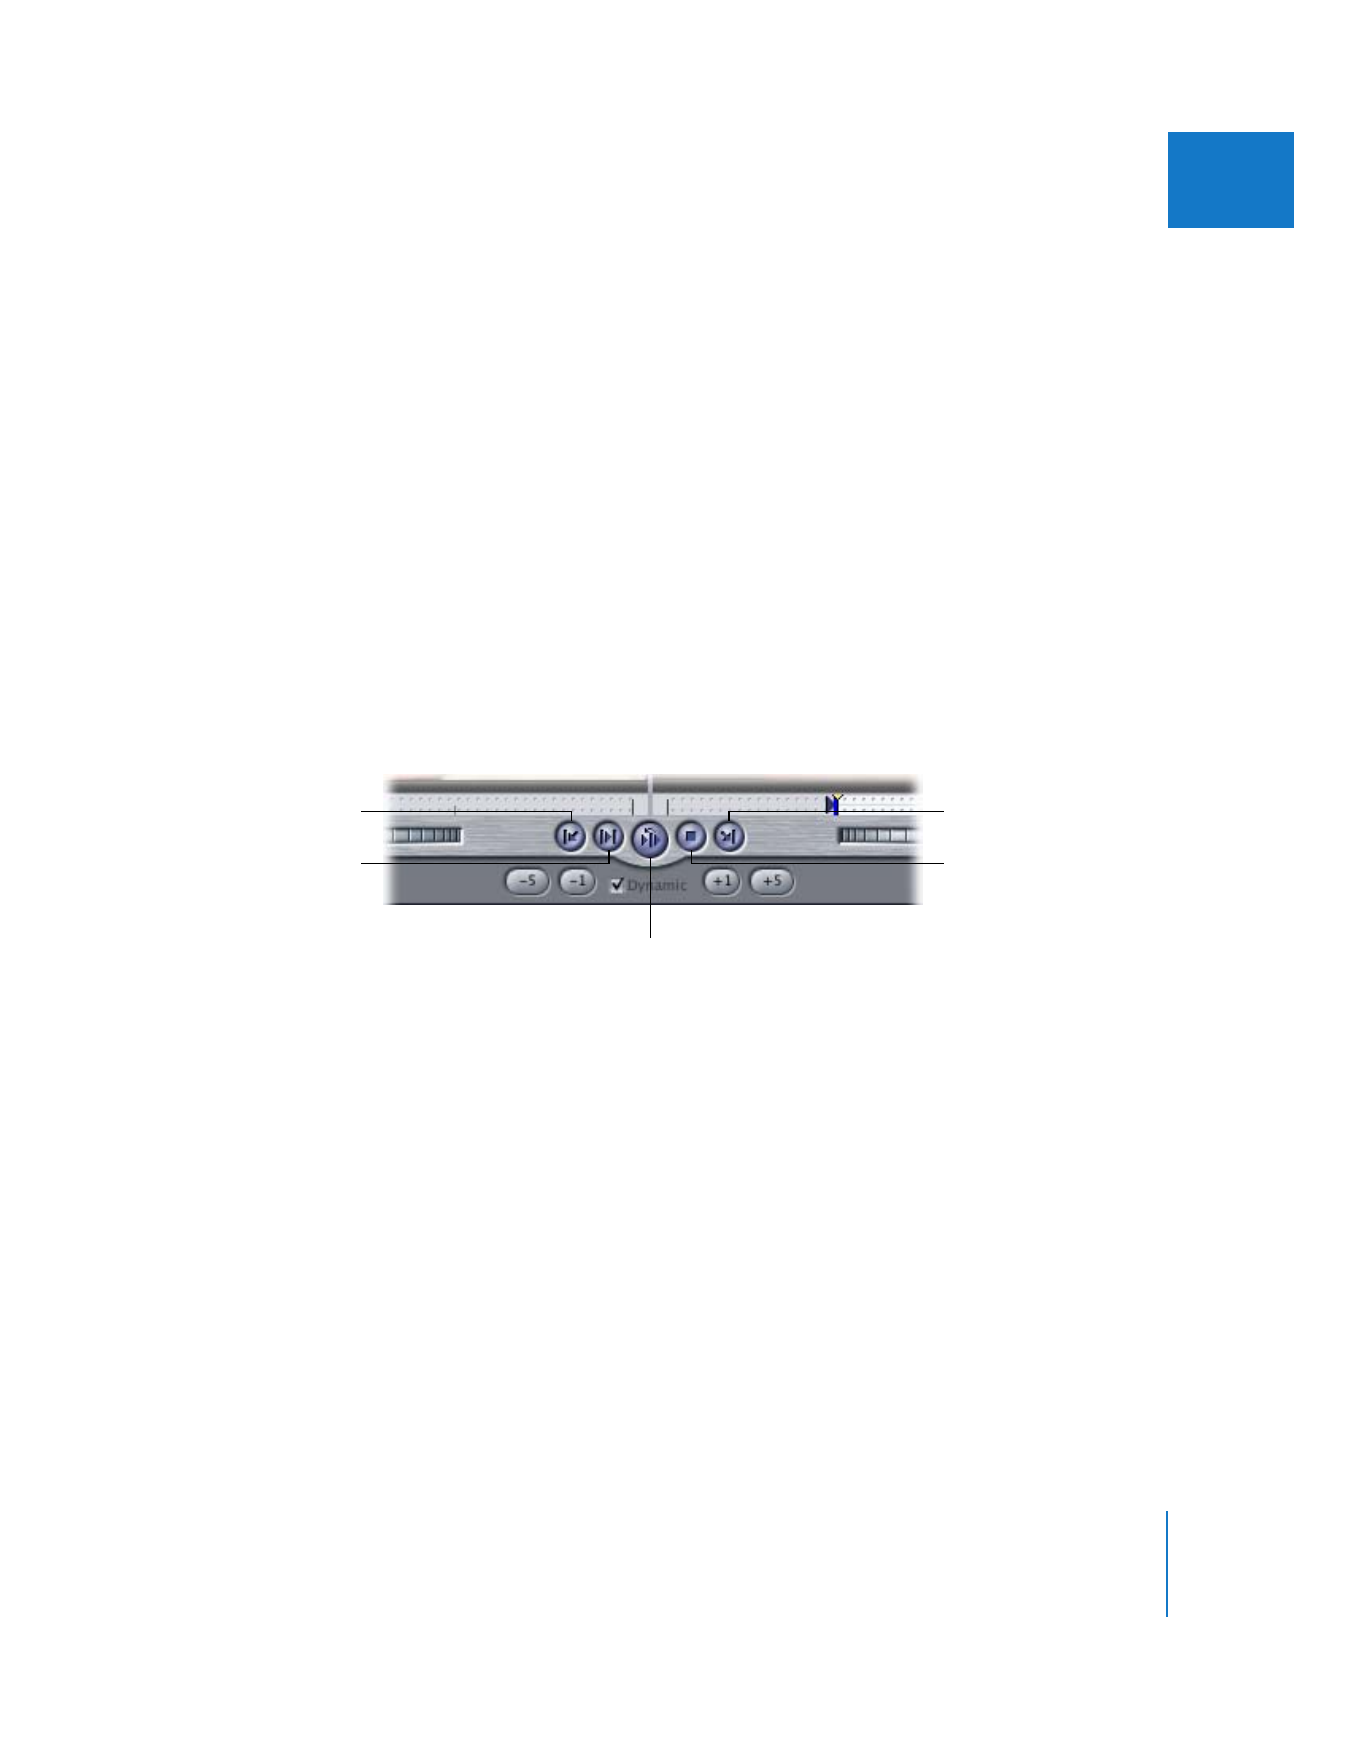
Transport Controls
The Go to Previous Edit and Go to Next Edit buttons allow you to change which edit
point in your sequence is shown in the Trim Edit window. Other controls allow you to
play back only the edit you’re trimming to see how it works.
 Go to Previous Edit: Click to move the previous edit point in your sequence into the
active area of the Trim Edit window.
 Play In to Out: Click to play from the beginning of the first clip to the end of the
second clip.
 Play Around Edit Loop: Click to play from a point before the current playhead position
to a point following. The time intervals before and after the playhead position are
determined by the preview pre-roll and post-roll settings in the Editing tab of the
User Preferences window. (For more information, see Volume IV, Chapter 23,
“Choosing Settings and Preferences.”)
 Stop: Click to stop playback and position the playhead on the edit point.
 Go to Next Edit: Click to move the next edit point in your sequence into the active
area of the Trim Edit window.
Go to Previous Edit
Go to Next Edit
Play Around Edit Loop
Play In to Out
Stop
362
Part III
Fine-Tuning Your Edit
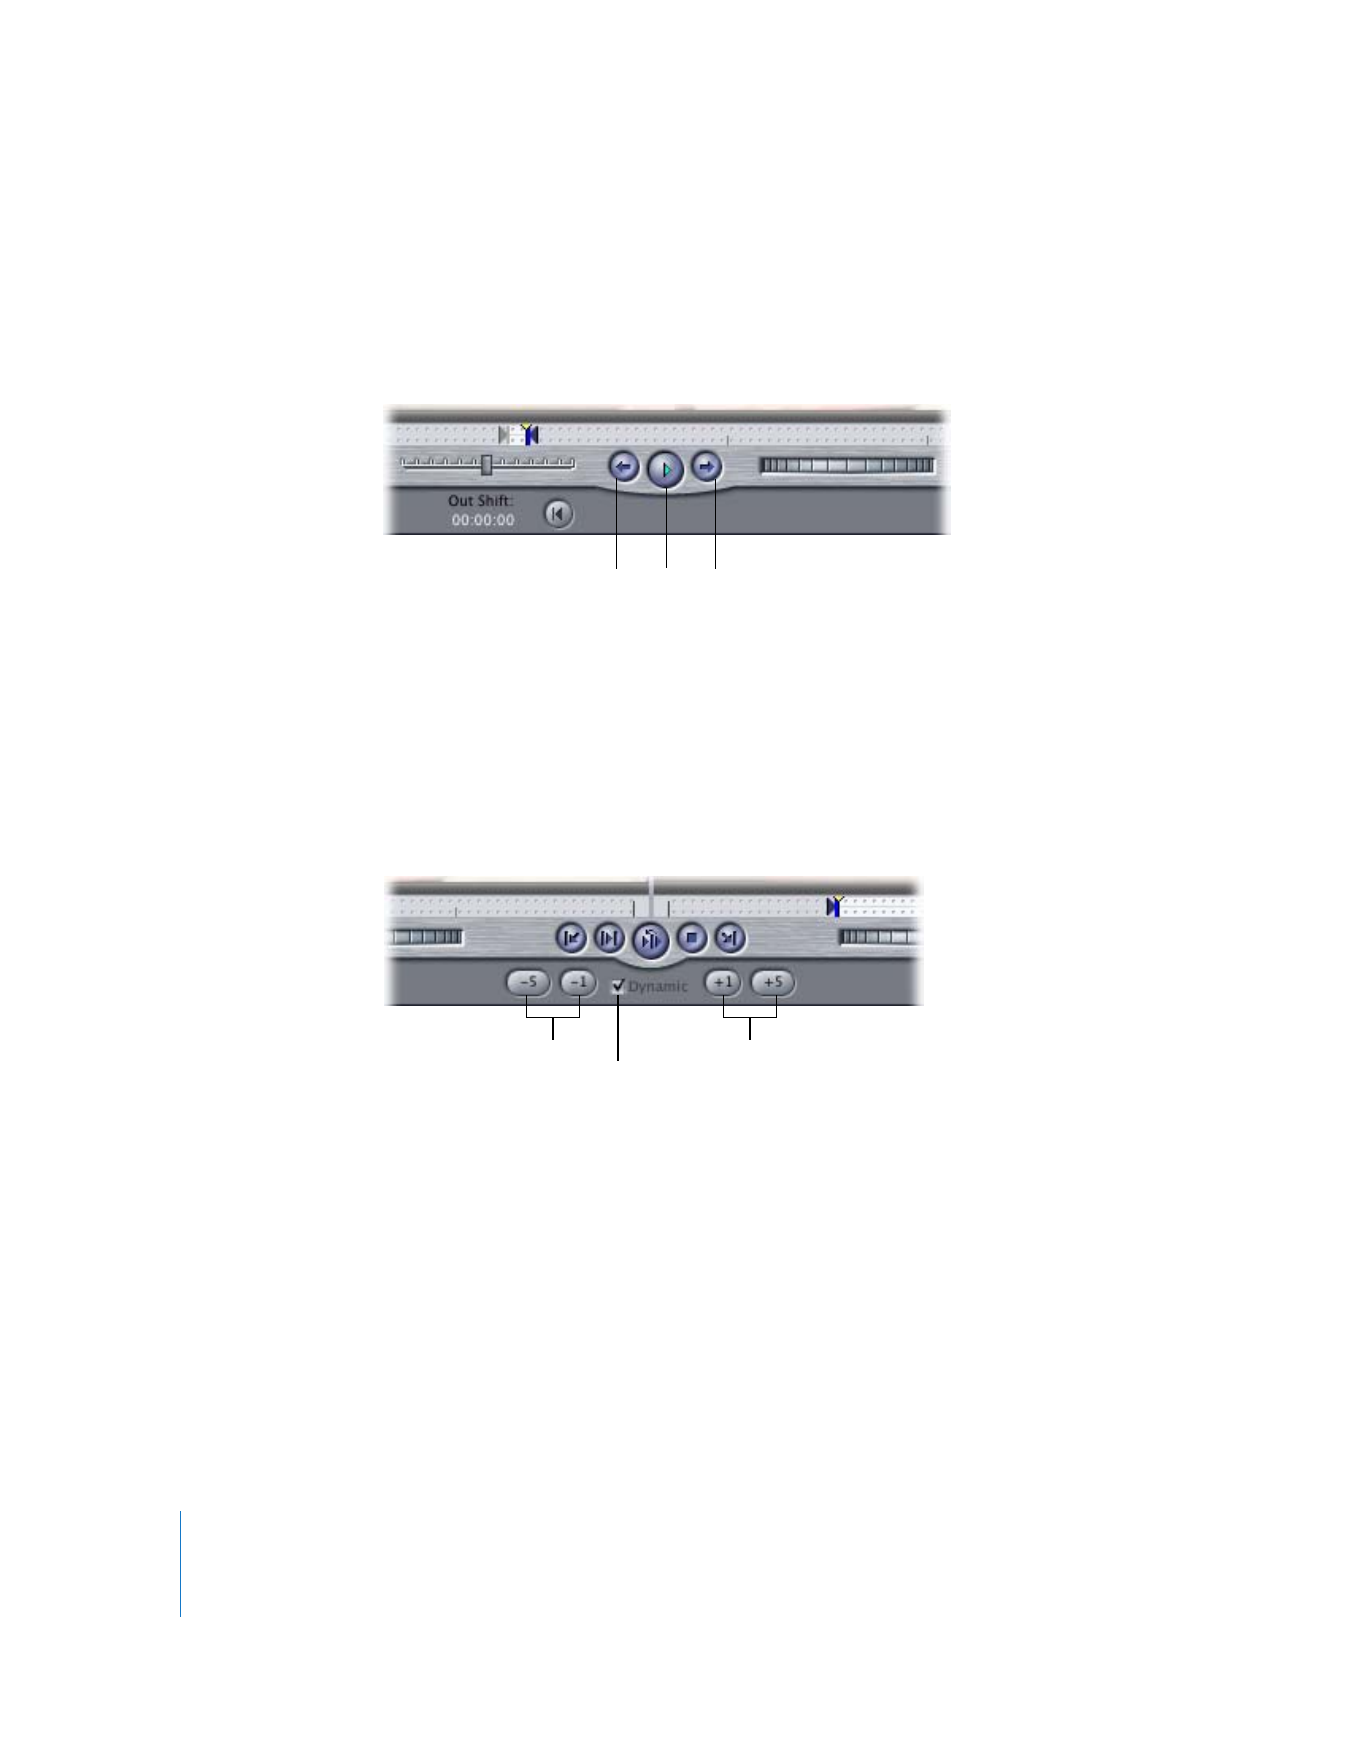
Playback Controls for Individual Clips
These controls allow you to move the playhead on either side of the edit point without
modifying the edit point itself. The outgoing and incoming clips have separate
playback controls, which can also be controlled by the J, K, and L keys. The playback
controls are for viewing only; they don’t change the position of an edit point.
 Previous Frame and Next Frame: Use these controls to jog the clip backward or
forward, one frame at a time.
 Play: Use this control to play the clip at normal speed.
Important:
The Space bar plays around the selected edit point in the Timeline; it does
not control playback in either side of the Trim Edit window. For more information, see
“
Playing Incoming and Outgoing Clips in the Trim Edit Window
” on page 365.
Trim Buttons
 Trim Forward and Trim Backward: Click these buttons to add or subtract frames from
the duration between the In and Out points.
You can set the –5 and +5 buttons to trim a different number of frames by changing
the Multi-Frame Trim Size setting in the Editing tab of the User Preferences window.
The number of frames to trim can be set from 1 to 99. For more information, see
Volume IV, Chapter 23, “Choosing Settings and Preferences.”
 Dynamic Trimming: Select this checkbox to toggle dynamic trimming on and off,
without having to go to the User Preferences window. For more information, see
“
Dynamic Trimming
” on page 365.
Next Frame
Previous Frame
Play
Dynamic Trimming
checkbox
Trim Backward buttons
Trim Forward buttons
Chapter 20
Trimming Clips Using the Trim Edit Window
363
III
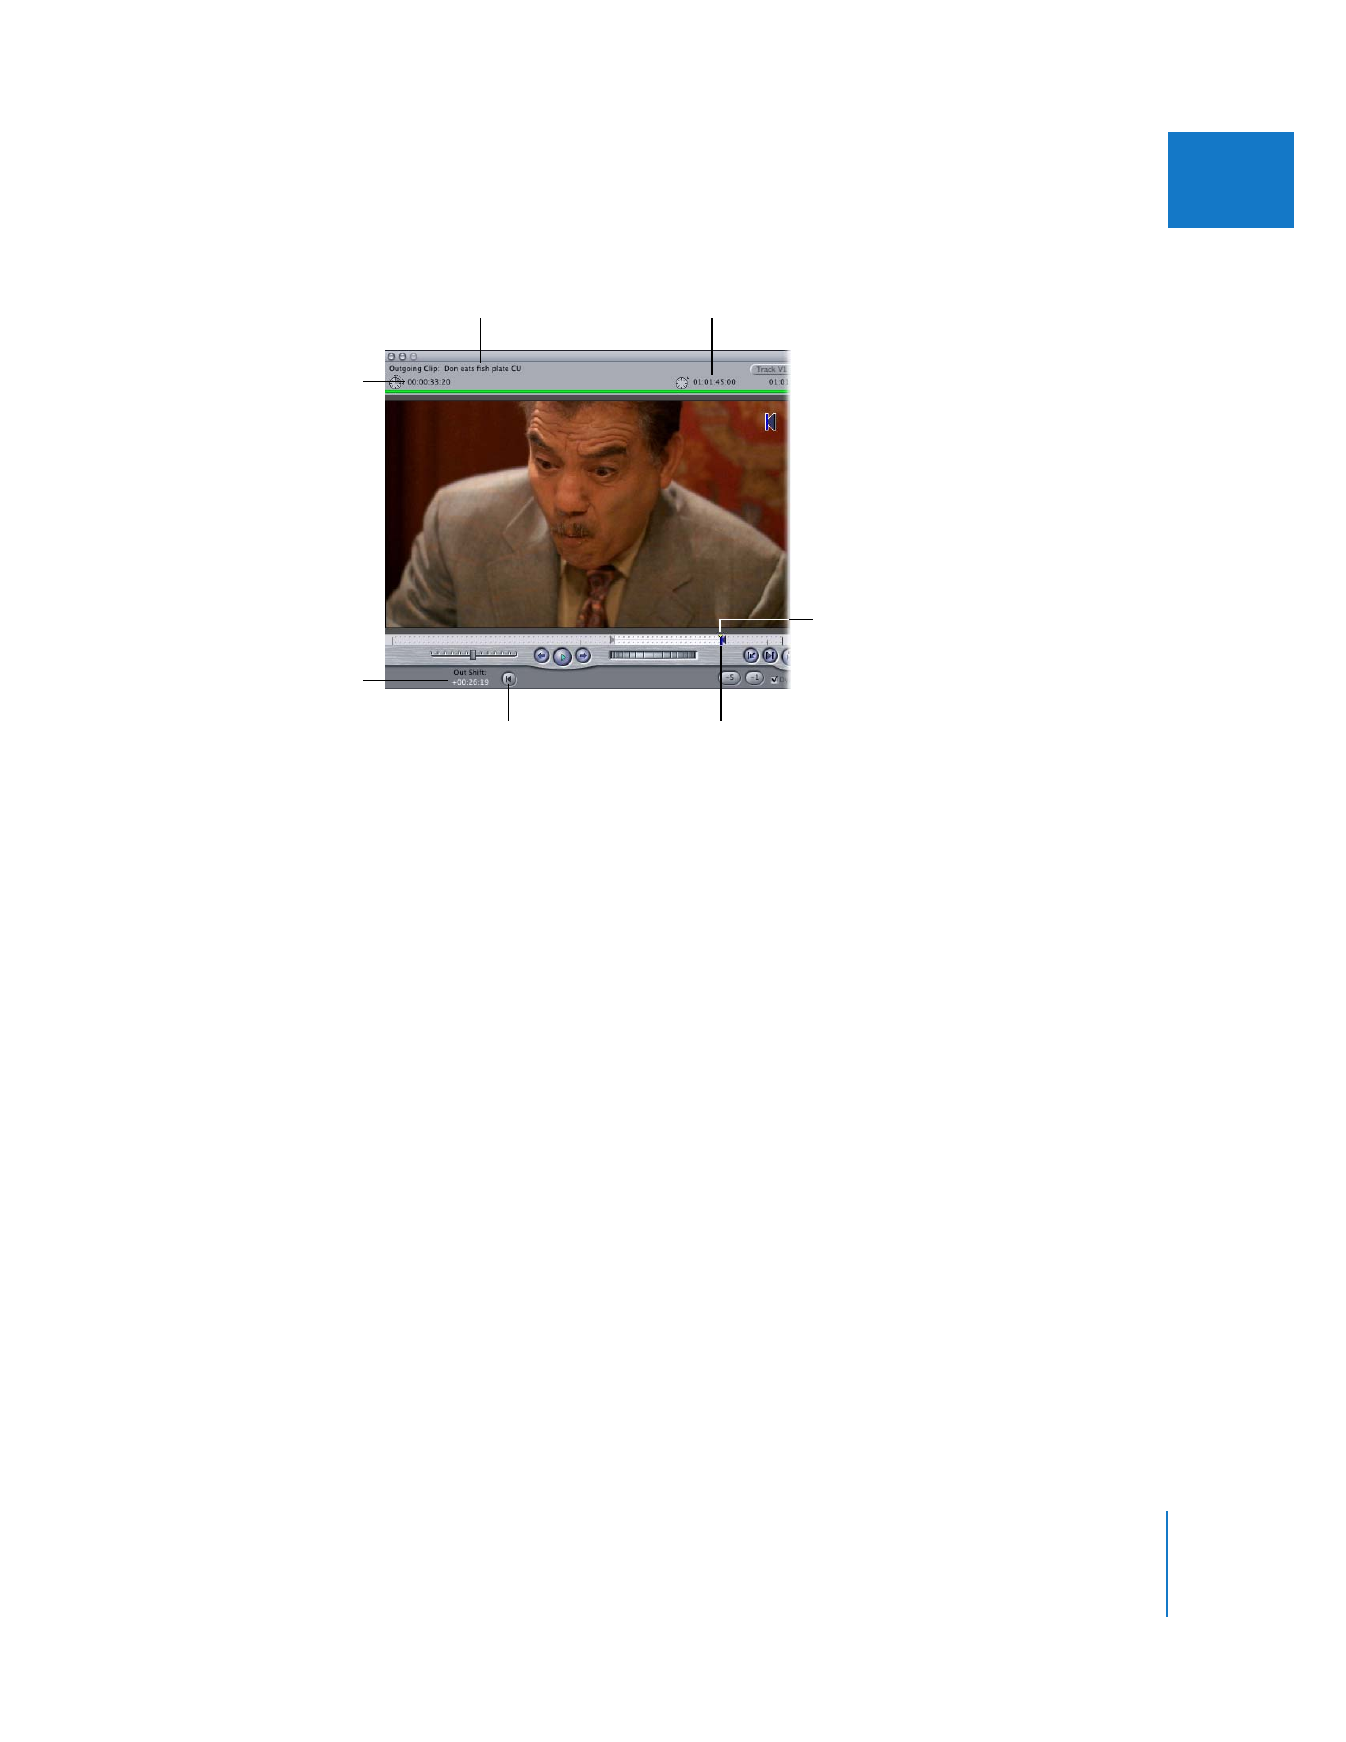
Outgoing Clip Area
 Outgoing clip duration: Displays the total time between the current In and Out points
for the outgoing clip. This value changes to reflect any trim edits.
 Current timecode for the outgoing clip: Displays the clip’s source timecode for the
current position of the playhead.
 Out Shift: Indicates the number of frames the Out point has been adjusted.
 Mark Out button: Click this to set a new Out point for the outgoing clip at the current
playhead position. This will perform a trim edit using the current mode (ripple
or roll).
 Out point: Displays the current Out point for the outgoing clip.
 Playhead: The playhead for the outgoing clip lets you locate and jump to different
parts of the clip quickly.
Outgoing clip
name
Outgoing clip duration
Current timecode
for the outgoing clip
Out Shift
Mark Out button
Out point
Playhead
364
Part III
Fine-Tuning Your Edit
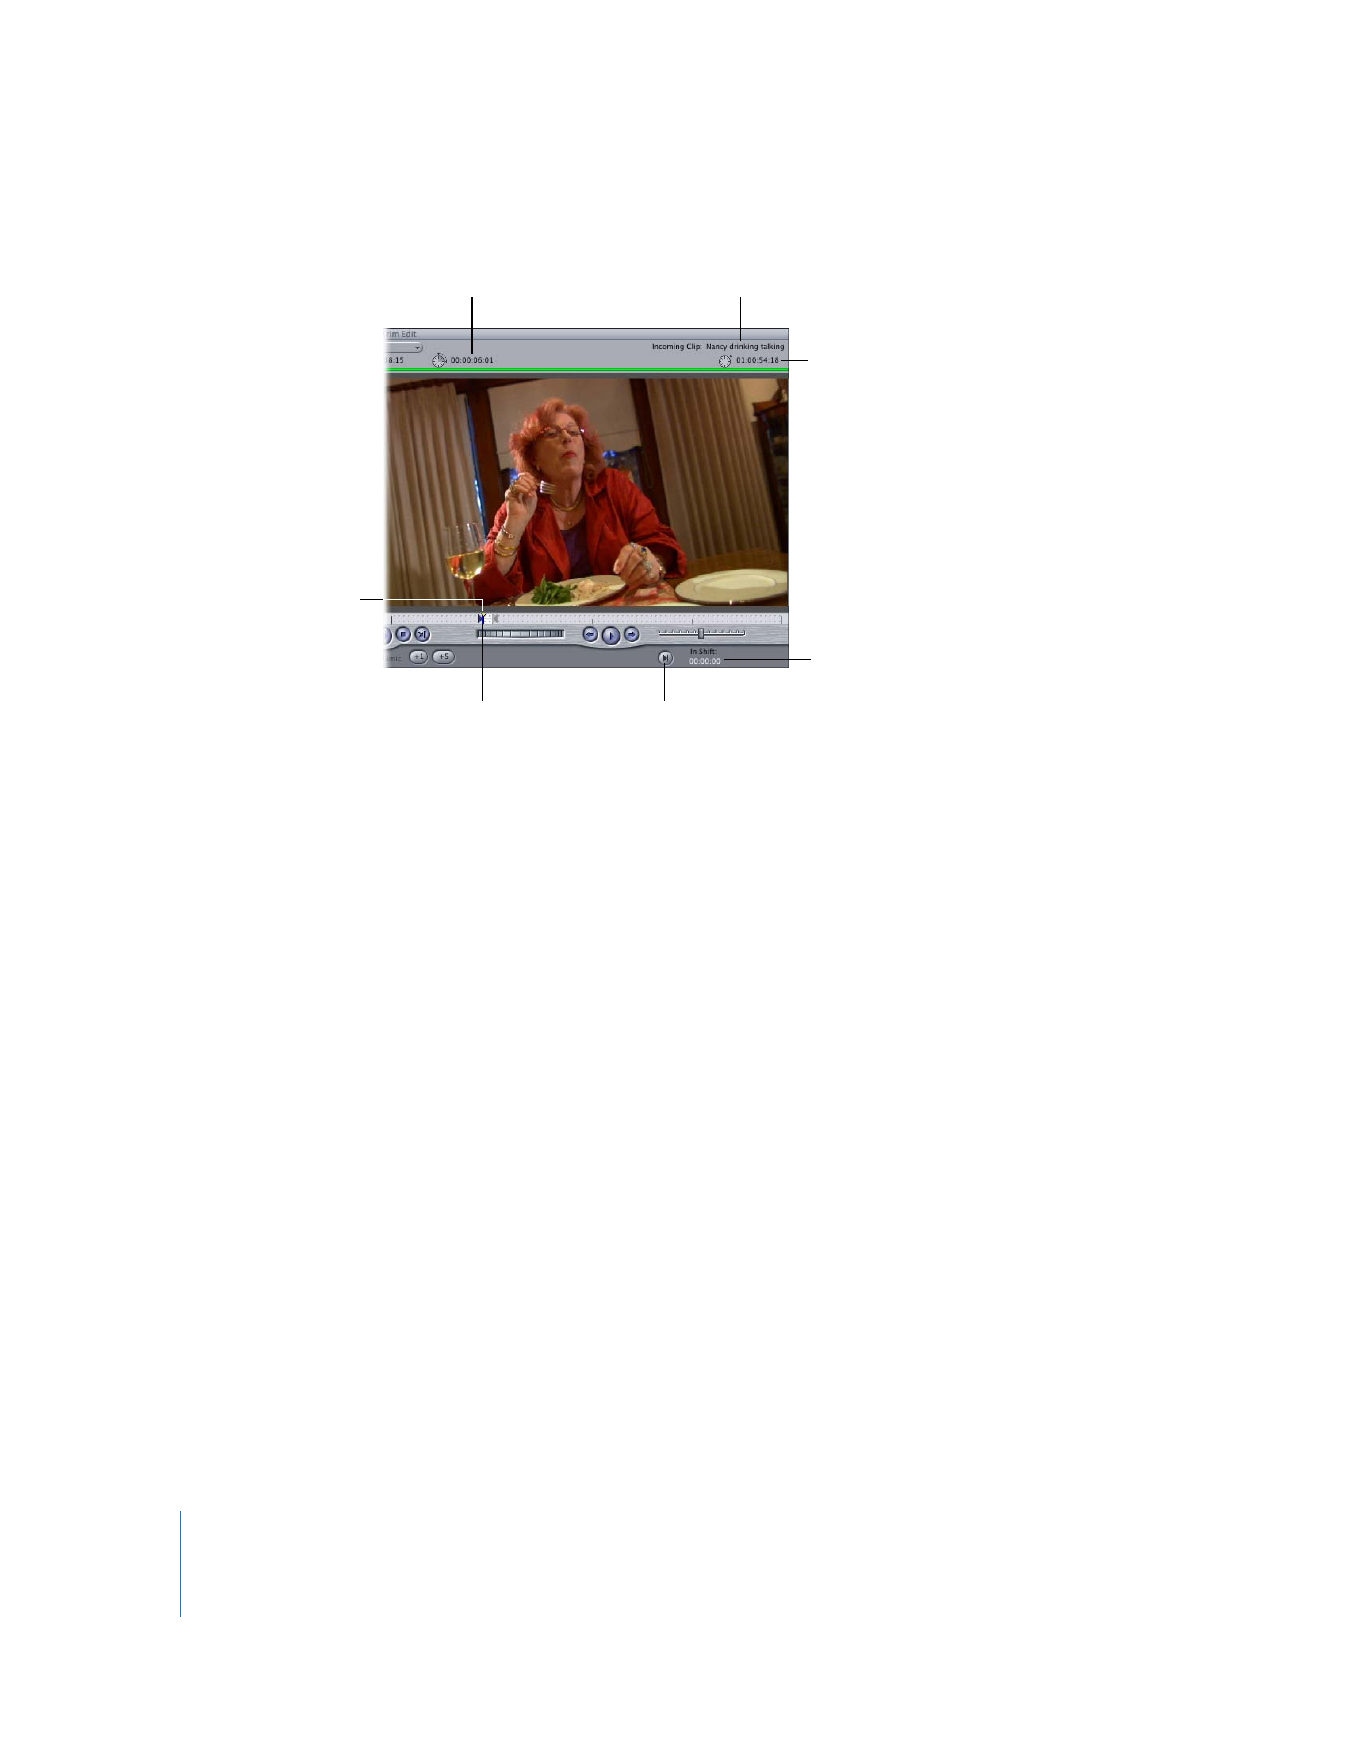
Incoming Clip Area
 Incoming clip duration: Displays the total time between the current In and Out points
for the incoming clip. This value changes to reflect any trim edits.
 Current timecode for the incoming clip: Displays the clip’s source timecode for the
current position of the playhead.
 In Shift: Indicates the number of frames the In point has been adjusted.
 Mark In button: Click this to set a new In point for the incoming clip at the current
playhead position. This will perform a trim edit using the current mode (ripple
or roll).
 In point: Displays the current In point for the incoming clip.
 Playhead: The playhead for the incoming clip lets you locate and move or jump to
different parts of the clip quickly.