Controls in the Voice Over Tool
The Voice Over tool appears as a tab in the Tool Bench window.
To open the Voice Over tool:
m
Choose Tools > Voice Over.
The Tool Bench appears with the Voice Over tab.
∏
Tip: If you want to organize the arrangement of windows, choose Window > Arrange >
Color Correction. This places the Viewer, Canvas, and Tool Bench on the top part of the
screen as windows of equal size, and the Browser and Timeline on the bottom part of
the screen.
Clip length
Memory required (approximate)
30 seconds
3 MB
1 minute
6 MB
5 minutes
30 MB
10 minutes
60 MB
30 minutes
180 MB
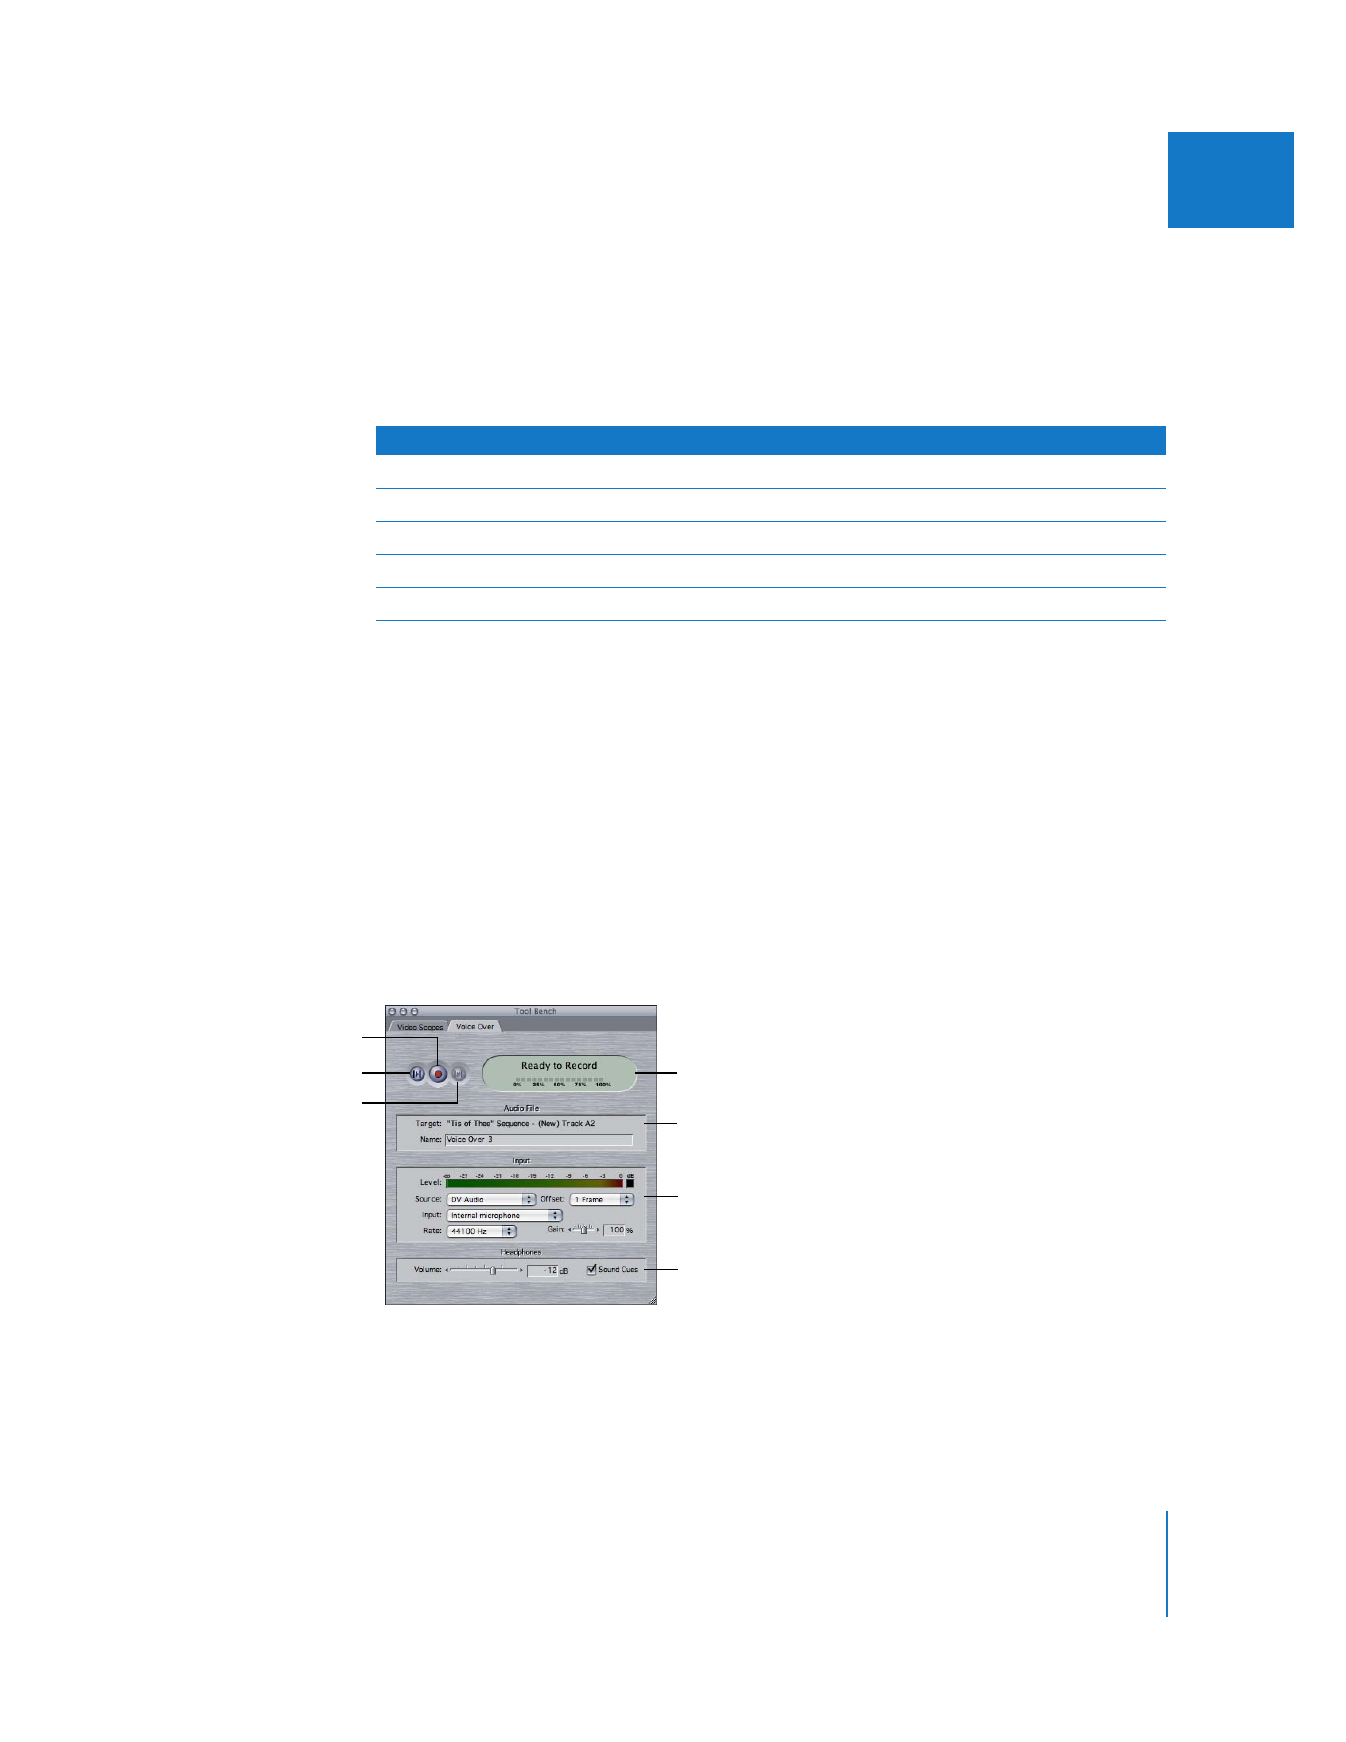
Status area
Audio destination track
and audio clip name
Input area
Record/Stop button
Review button
Discard Last
Recording button
Headphones area

142
Part I
Audio Mixing
Playback and Recording Controls and Status Area
 Record/Stop: Click this button to begin the audio recording and Timeline playback.
While you’re recording, the button functions as a Stop button. Recording can also be
stopped by pressing the Escape key. If recording is stopped, the partial audio clip
that was recorded is saved to disk and placed in the Timeline.
 Review: Click this button to play back the section of the sequence you’ve defined,
using the sequence In and Out points or the position of the playhead and the end of
your sequence. This lets you preview the defined range of the Timeline while you
practice your voiceover.
 Discard Last Recording: Click this button to delete the previously recorded voiceover
clip. (This button is available only after you’ve used the Voice Over tool once.)
Important:
Discarding cannot be undone.
 Status area: Displays the recording status of the Voice Over tool, along with a
progress bar that indicates the percentage of the recording that has been completed,
based on the defined area of the Timeline. There are five states:
 Ready to Record: Indicates that the Voice Over tool is ready and waiting to be
activated.
 Starting: Appears along with a progressive change in color from yellow to red
during the 5-second countdown that occurs when you first click the Record
button. Audio is actually recorded during the countdown, and the resulting clip
has a 5-second handle at the beginning.
 Recording: Appears once you’ve started recording in the Timeline. While you’re
recording, the status area is red. Fifteen seconds before the end of your recording,
you are cued with a single audible beep. During the last 5 seconds of recording,
the status area displays a countdown from 5 to 0, accompanied by five beeps, to
let you know when the recording time is up.
 Finishing: Appears once playback comes to the end of the defined area of the
Timeline. Recording continues 2 seconds past the end of your specified Out point
to prevent your last word from being cut off.
 Saving: Appears after recording, when your clip is being saved from RAM to the
currently specified scratch disk.
Chapter 7
Using the Voice Over Tool
143
I
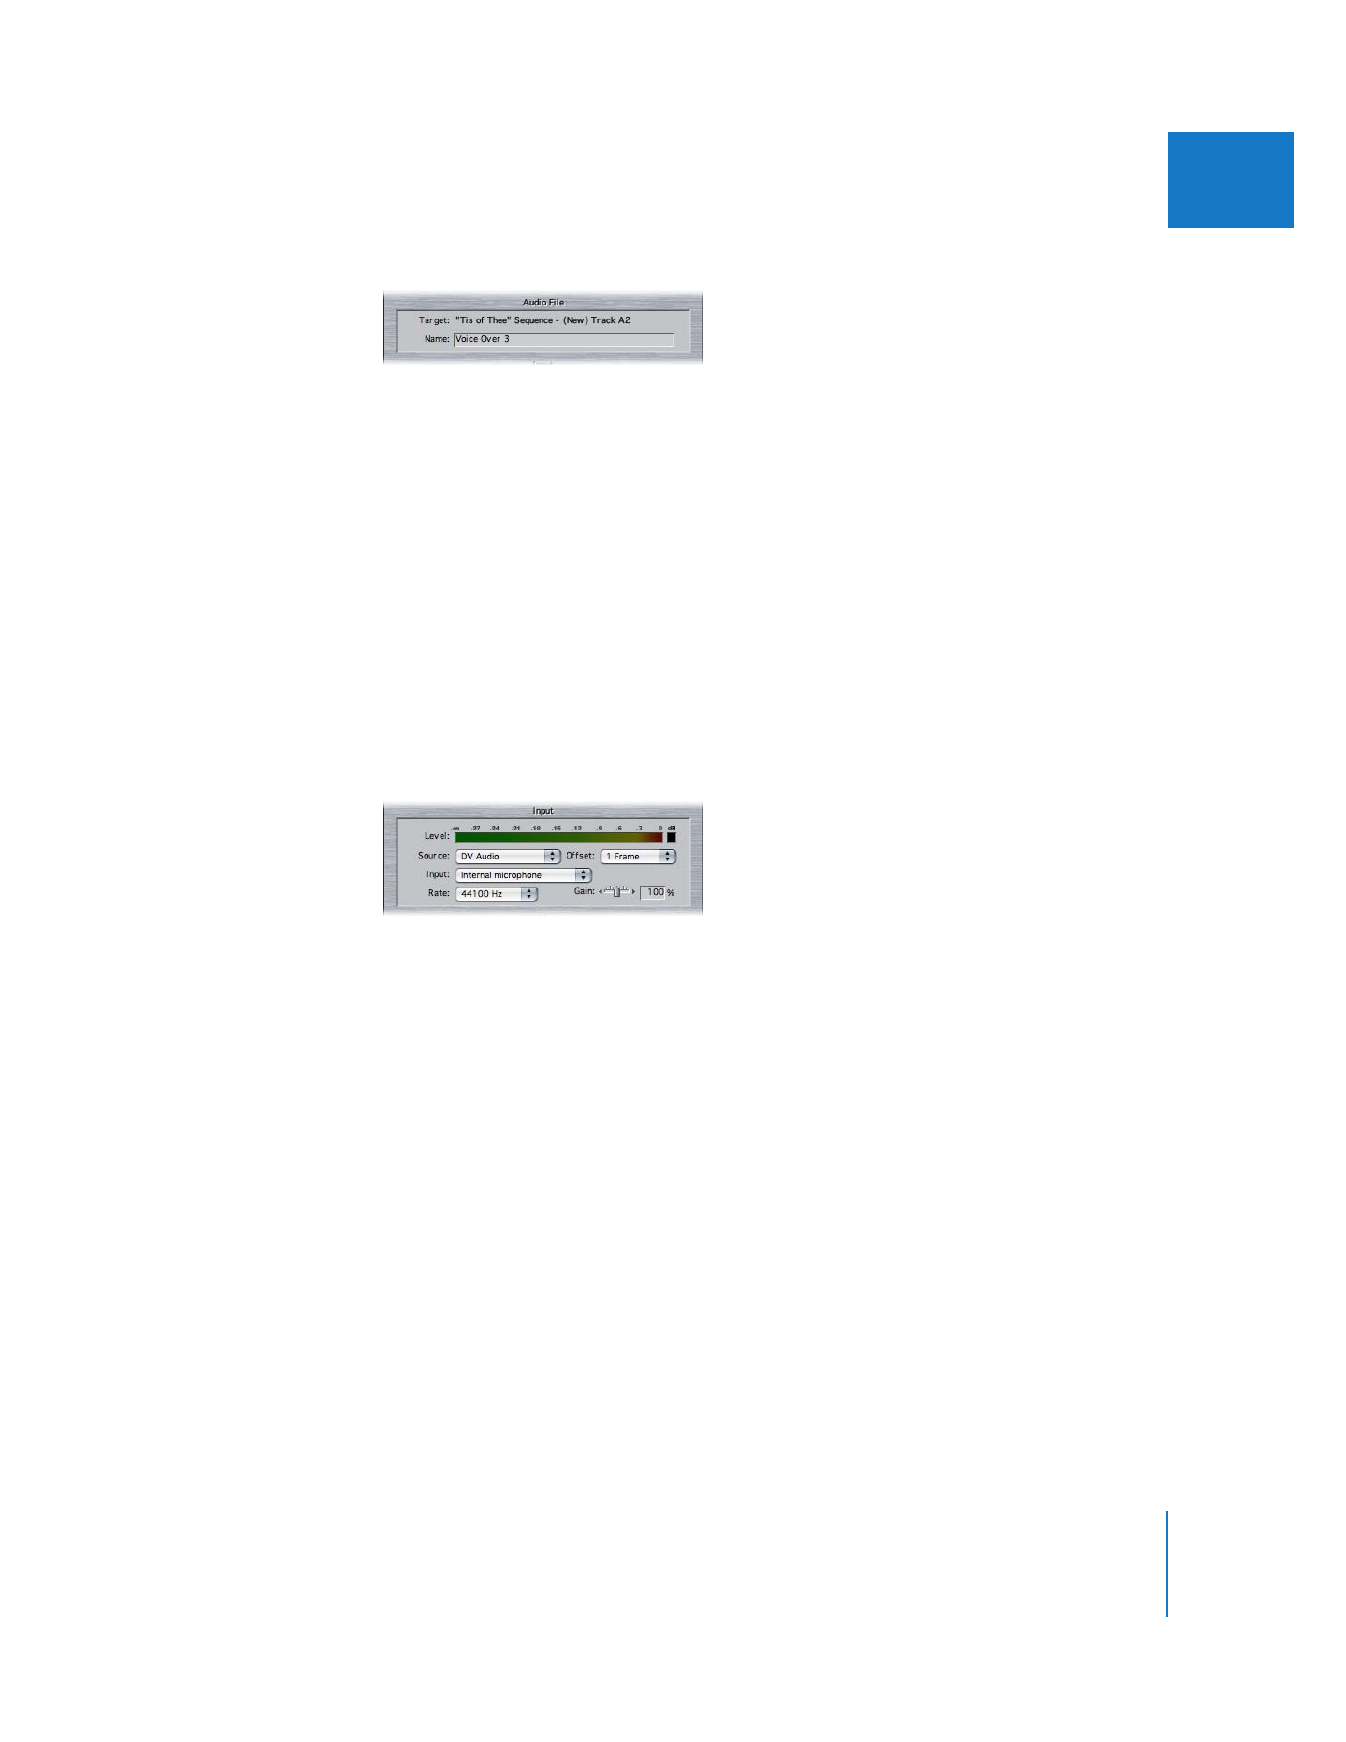
Audio File Area
 Target: This line displays the sequence name and track number where audio
recorded with the Voice Over tool will be placed. As subsequent takes are recorded,
the audio destination track automatically moves down to the next available track.
 Name: This text field displays the name that will be used for the recorded media file on
disk. To change the audio clip name, click in this field, then enter the desired name.
As subsequent takes are recorded, this name is automatically appended with
numbers. For example, the default name of Voice Over changes to Voice Over 1 after
you record your first voiceover clip.
If the name in this field is already in use by another clip on the selected scratch disk,
an appropriate take number is automatically appended to the name. For example,
Narration is changed to Narration 1.
Input Area
 Level: This audio meter displays the input audio levels coming in via the chosen
audio interface device.
 Source: This pop-up menu lets you choose a connected Mac OS X–compatible audio
device to record your audio. For example, if you’re using a microphone connected to
an audio interface, you choose the audio interface here.
 Offset: This pop-up menu allows you to correct for audio signal latency (delay),
which is inherent in all digital audio interfaces. Even though your voiceover
performance may be perfect, latency can cause the recorded audio to be slightly
offset from the video. Different digital audio capture devices have different amounts
of latency. Typically, most USB capture devices have a latency of one frame; most
DV camcorders have a latency of three frames.

144
Part I
Audio Mixing
 Input: If the audio input device you’re using has multiple inputs, this pop-up menu
lets you choose which one you use to record. If there are multiple audio devices you
can use, Final Cut Pro remembers the input you choose for each device, if you
change devices.
 Rate: This pop-up menu lets you choose an audio sample rate supported by the
audio device selected to record your voiceover clips. It’s best to use the same audio
sample rate used in your sequence. If the selected audio device cannot support your
sequence’s sample rate, choose the next closest available sample rate. For example, if
your sequence is set to 48 kHz but your audio device doesn’t support that sample
rate, choose 44.1 kHz.
 Gain: This slider allows you to adjust the recording level used by the Voice Over tool.
Note: Audio input selections made in the Voice Over tool do not affect your selected
capture preset.
Headphones Area
 Volume: Use this slider to adjust the level of audio that plays through the headphone
port while the Voice Over tool is recording. You can also enter a value, in decibels
(dB), in the field next to the slider.
 Sound Cues: Select this checkbox to hear audible beeps that indicate the status of
recording. These include a beep at the 5-second starting phase of recording with the
Voice Over tool, and at 15 seconds prior to the end of the defined range for
recording. These sound cues play through the headphone port and are not recorded
as part of the voiceover clip.
Note: To prevent the recording microphone from picking up audio from your program,
use a pair of headphones to monitor your program’s audio when using the Voice Over
tool. Otherwise, set the Volume slider to –60 dB and deselect the Sound Cues checkbox.
Chapter 7
Using the Voice Over Tool
145
I