
Example: Adding Camera Motion to Still Images
You’ve probably seen documentaries that show a graceful camera pan or tilt across a
still image, sometimes slowly zooming in or out. These kinds of effects are traditionally
done with a motion control camera, which is a device that consists of a static camera
and a mobile, programmable photo table. The photo table can be programmed to
move slowly past the camera in several directions and rotate around a pivot point.
These sorts of camera moves bring life to otherwise static images, greatly enhancing
movies that must rely on archival photographs and documents to create a meaningful
visual narrative.
Final Cut Pro can achieve similar effects by animating the motion parameters of a
high-resolution still image.
Important:
To create moving graphics with acceptable quality, the horizontal and
vertical dimensions of your still image must be greater than the frame size of the
sequence that contains it. If you need to set the Scale parameter of your image over
100 percent to achieve a particular effect, your still image wasn’t created with high
enough resolution.
Follow these steps to learn how to create slow zooming and panning effects with a still
image in Final Cut Pro.
Note: For more information about learning to use keyframes, see Chapter 15, “
Adjusting
Parameters for Keyframed Effects
,” on page 287.
Enter a new duration here.

380
Part II
Effects
Step 1:
Prepare and import your still image into Final Cut Pro
There are two key things to be aware of before you import the image:
 Frame size: The still-image dimensions need to be significantly larger than the frame
size of your sequence, so that the still image can move about the frame without
displaying any edges.
For example, a DV NTSC (4:3 aspect ratio) sequence has a frame size of 720 x 480
pixels, so any stills used for this effect in a DV NTSC (4:3) sequence should be larger
than 720 x 480. The longer you want the pan to last and the more detail you want to
show, the larger the still-image dimensions should be. Check the frame size of your
sequence and the size of the imported still image by looking at the Frame Size
column in the Browser. A good rule of thumb is to make your still image with twice
the horizontal and vertical dimensions. Using exact multiples makes it easier to make
precise, predictable adjustments to your image within the Canvas.
If the final destination of your sequence will be SD video, then any scanned images,
digital photographs, and HD video images with higher resolution work well. Still
images from SD video aren’t recommended because you’d have to increase the size
of the still image by scaling it up, which would degrade the image quality
considerably and create artifacts in the picture.
If you’re creating graphics for camera motion effects in an HD sequence, the image
dimensions will have be quite high. For example, doubling 1920 x 1080 results in a
graphic that is 3840 x 2160. Depending on the speed of your processor, the real-time
effects playback may be limited for these high-resolution effects.
 Flattened layers: If the still image you want to use is a layered Photoshop file, do not
import it as a layered Photoshop file because it will appear as a sequence on multiple
tracks. Instead, flatten and save the image in your graphics application before you
import it into Final Cut Pro. Make sure you save the flattened image as a copy in case
you want to make changes to the original layered graphics file.
Note: Store any imported still images on your scratch disk so that all your media files
(video, audio, and still-image) are located in one place. This makes it much easier to
locate and move or copy all the project media at once.
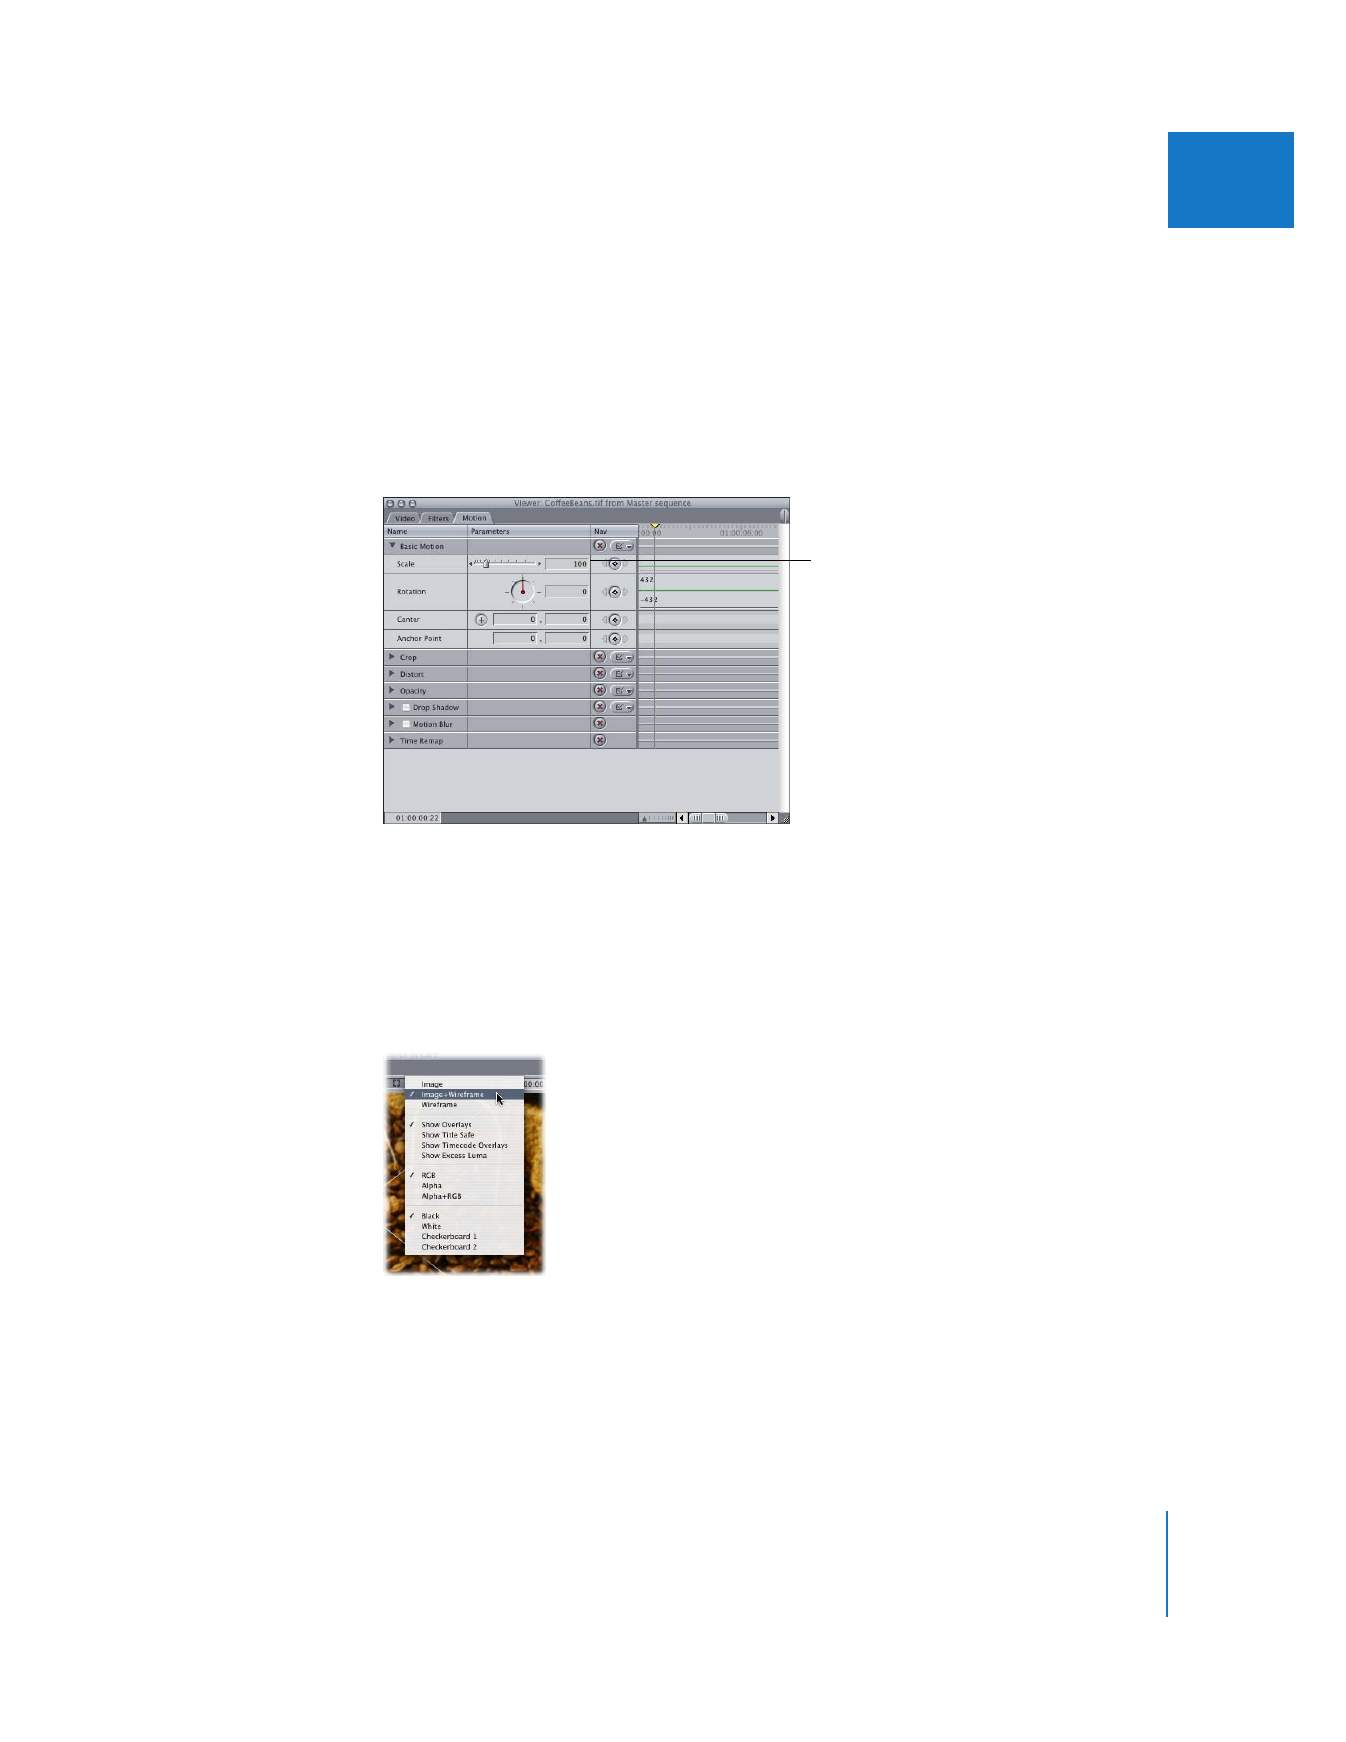
4000 x 3000
Canvas
720 x 480
Still image
Chapter 18
Working with Freeze Frames and Still Images
381
II
Step 2:
Edit the still image into your sequence
The still image appears as a clip in the Timeline.
Step 3:
Open the image clip in the Motion tab of the Viewer
1
Double-click the clip in the Timeline to open it in the Viewer.
2
Click the Motion tab in the Viewer, then click the Basic Motion disclosure triangle to
reveal parameters such as Scale, Rotation, and Center.
3
In the Motion tab of the Viewer, enter 100 in the Scale field.
Step 4:
Prepare the Viewer and Canvas settings
To see the image as it will appear within the frame during playback, you need to make
a couple of adjustments. (Otherwise you may, for example, see the frame background
where you didn’t mean to show it.) You also need to switch to the wireframe view to
position the image visually.
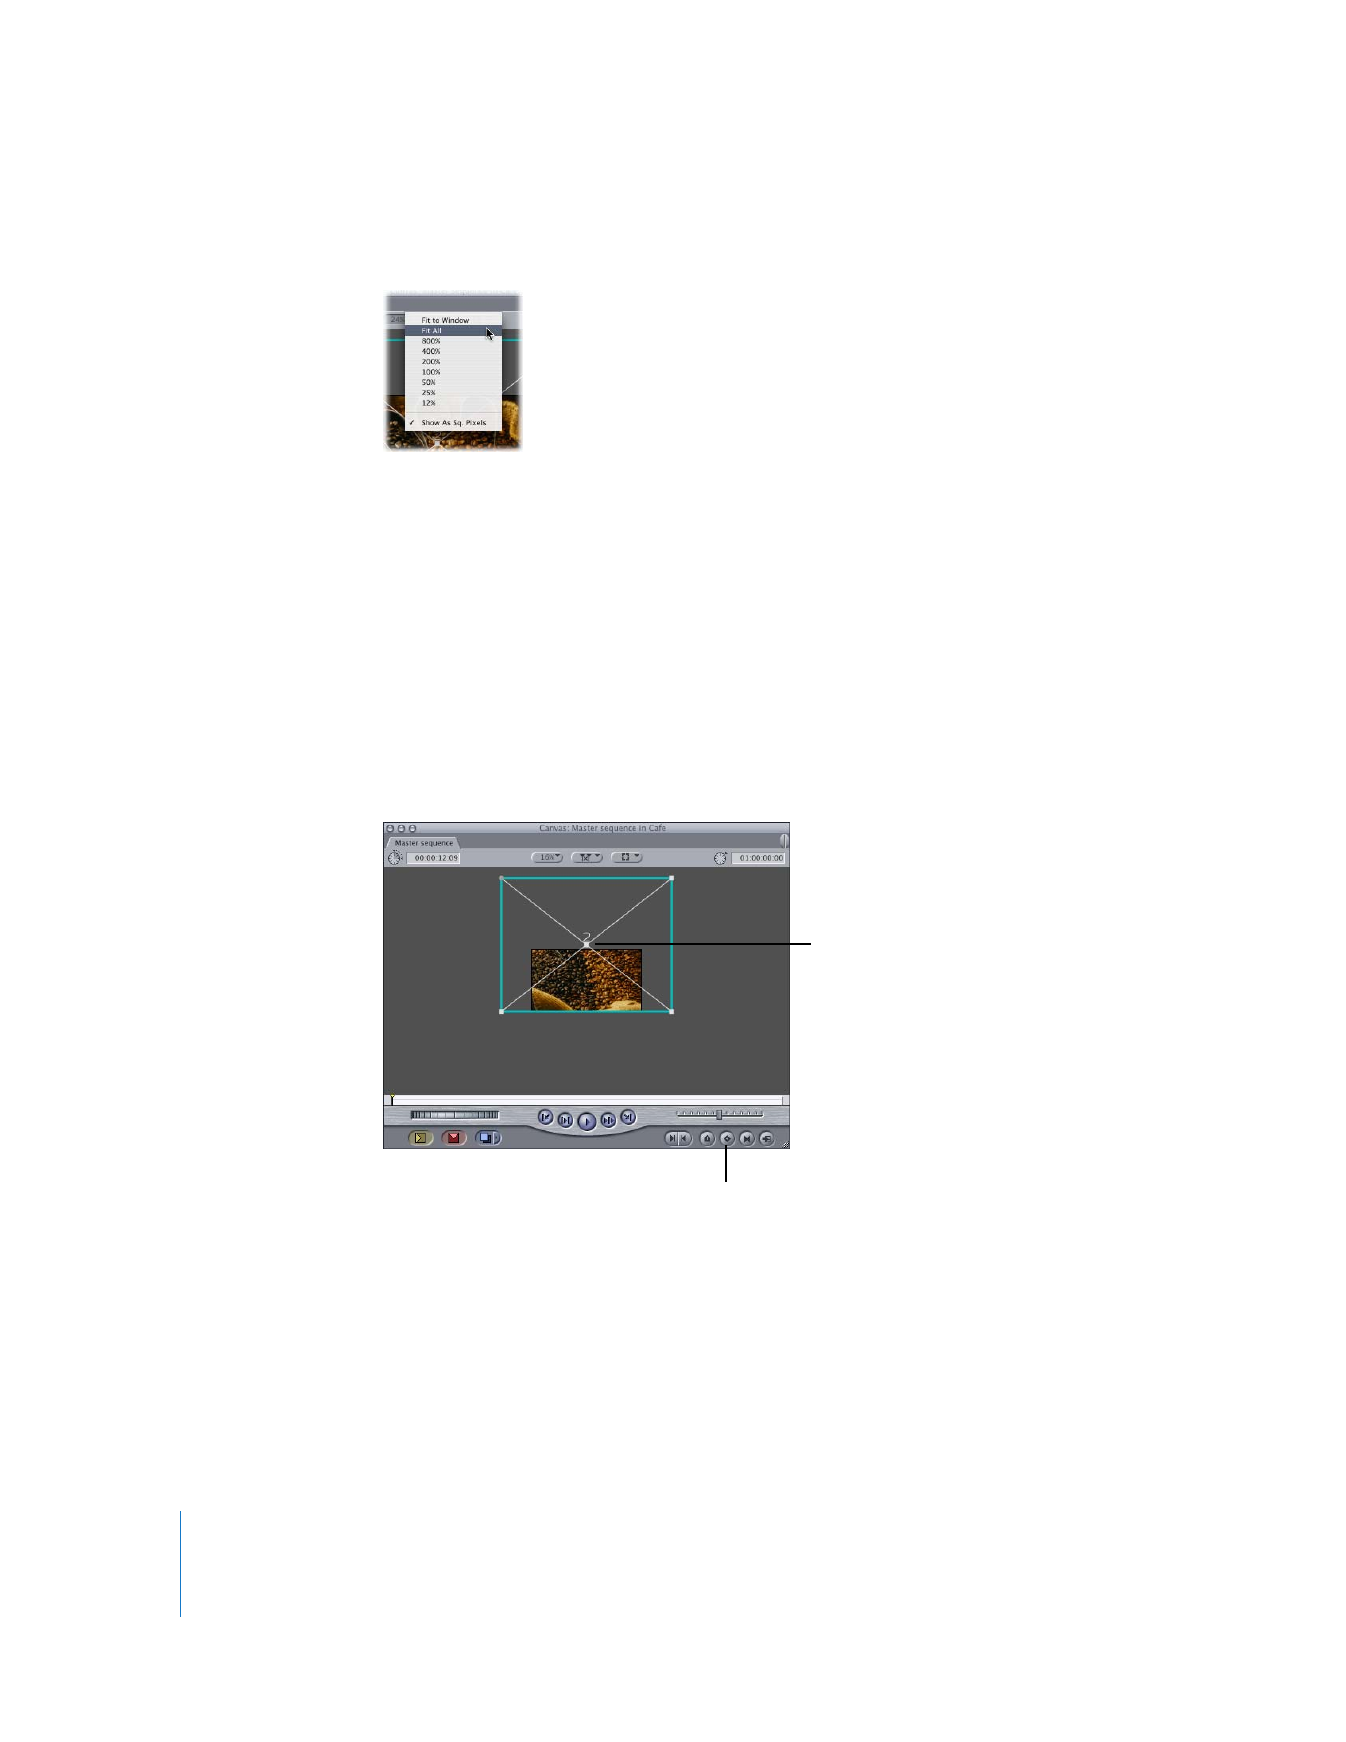
1
In the Canvas, choose Image+Wireframe from the View pop-up menu.
Set the Scale
parameter to 100.
382
Part II
Effects
2
Choose Fit All from the Zoom pop-up menu.
Note: If your final movie will be shown on a television monitor, it’s a good idea to turn
on the Title Safe indicators as well so that you can see what will actually be visible on
the television monitor. (Choose Show Title Safe from the View pop-up menu.)
Step 5:
Position and keyframe the image at the pan starting and ending points
The Center parameter determines where the image appears (or doesn’t appear)
onscreen. You’ll create the image movement by setting a starting and ending Center
location with keyframes. To generate the movement path for you, Final Cut Pro
interpolates the position of the image between these two points
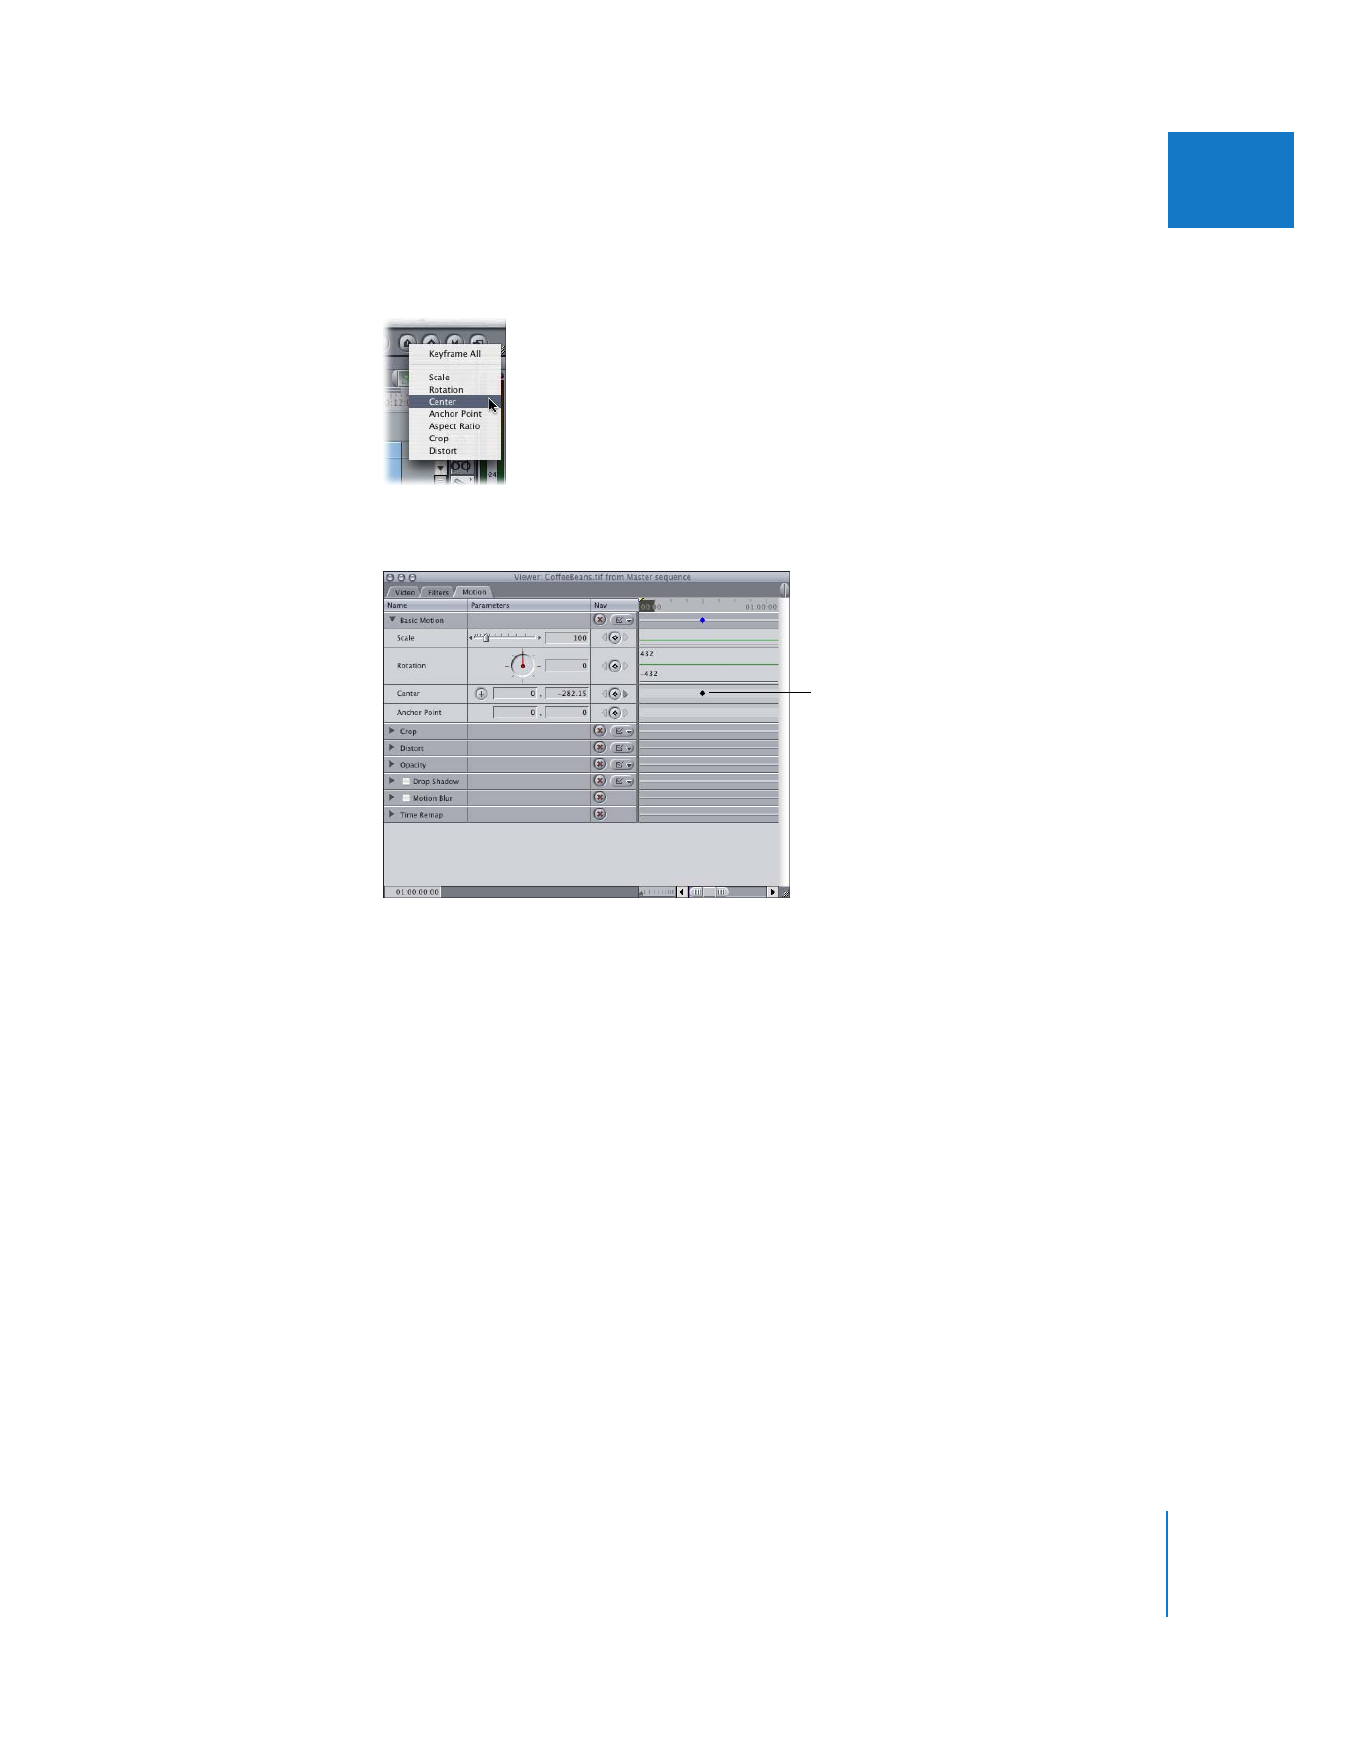
1
Move the playhead to the time when you want the image pan to start.
2
Move the position of the image in the Canvas to the starting position of the pan.
Starting position
Add Motion
Keyframe button
Chapter 18
Working with Freeze Frames and Still Images
383
II
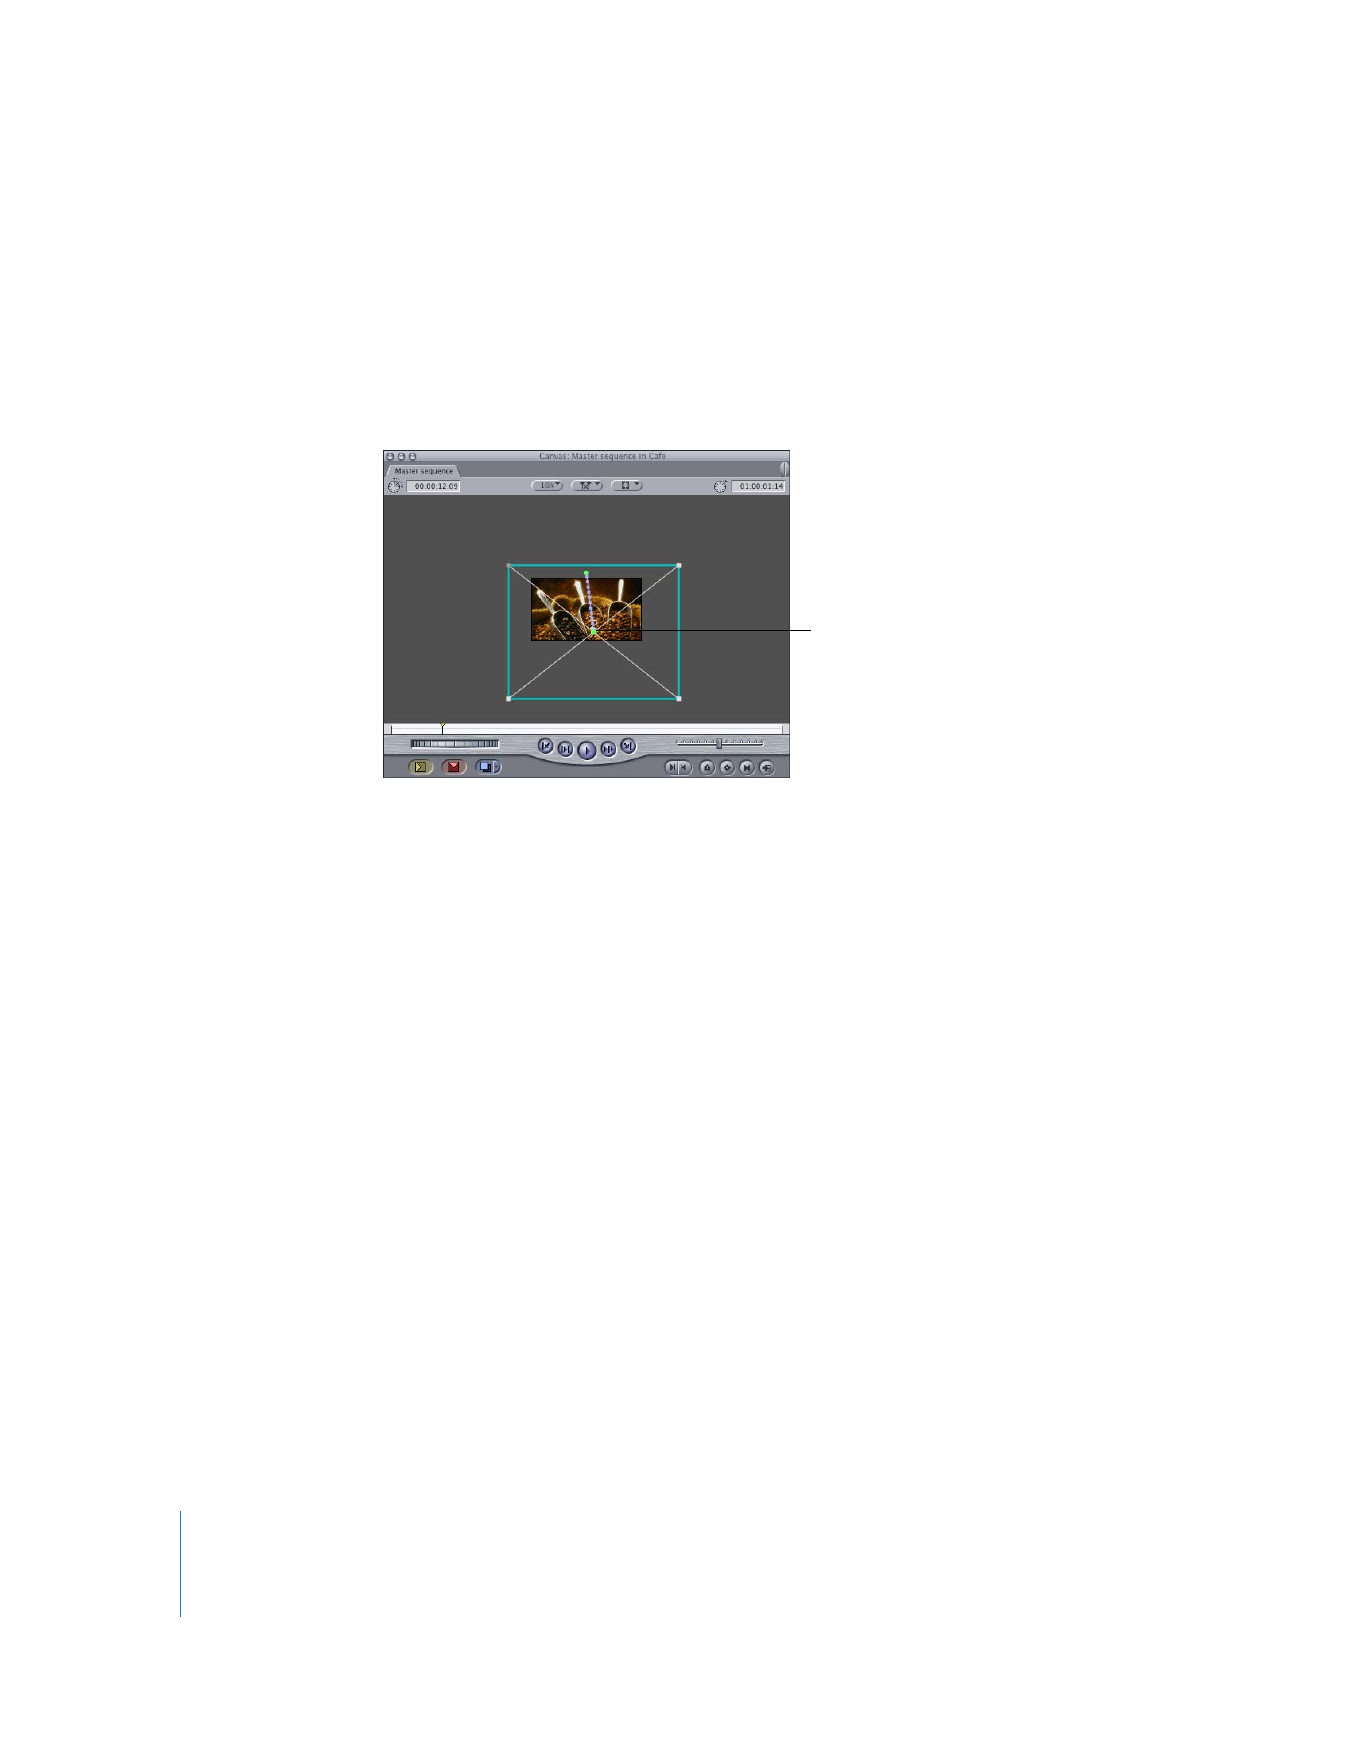
3
Control-click the Add Motion Keyframe button in the Canvas, then choose Center from
the shortcut menu.
A keyframe appears in the Motion tab, next to the Center parameter.
4
Move the playhead to the time when you want the pan to end.
Center parameter
keyframe
384
Part II
Effects
5
Move the image in the Canvas to the ending position.
You don’t need to add a keyframe this time because, once a single keyframe has been
added to a parameter, new keyframes are automatically added each time you move the
clip to a new position.
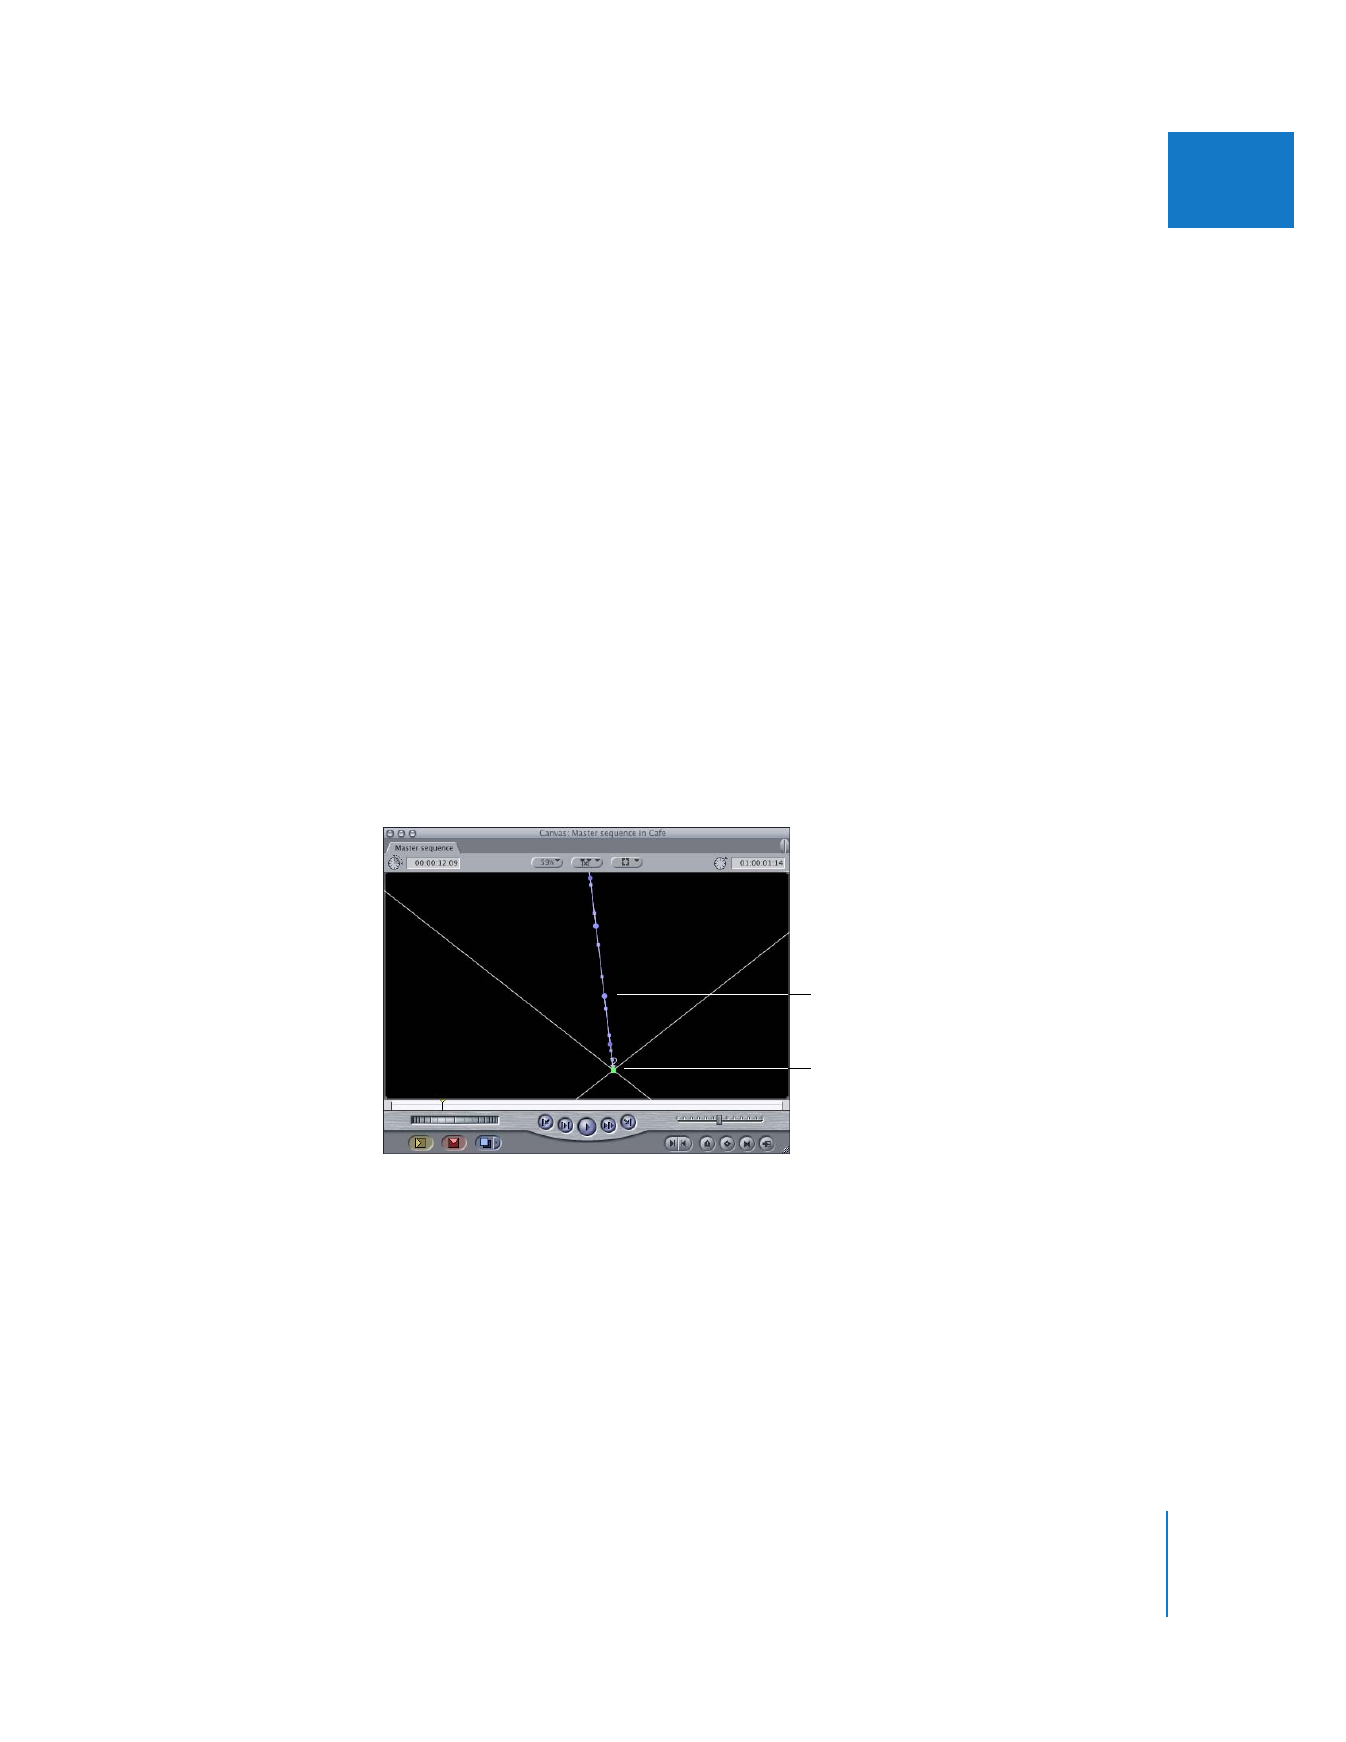
You should see a line in the Canvas indicating the interpolated motion path between
the starting and ending keyframes.
6
To see the effect, remove the wireframe in the Canvas by choosing Image from the View
pop-up menu, move the playhead to the beginning of the clip, then play the sequence.
While you may see only a rough approximation of the final motion effect, you can still
see it without rendering. To see the effect at higher resolution, render it and then play
the sequence.
∏
Tip: If the image looks “blocky” after rendering, choose High from the RT pop-up menu
in the Timeline and render the clip again.
To create a more realistic camera move, you may also want to smooth the motion at
the beginning and the end of the motion path, so that the camera starts slowly,
reaches full speed, and then slows down as it reaches the second keyframe.
Ending keyframe
Chapter 18
Working with Freeze Frames and Still Images
385
II
To smooth the speed at the starting and ending points of a motion path:
1
Choose Mark > Previous > Keyframe until the playhead is over the starting keyframe of
your clip. (You can also press Option-K.)
If you navigate too far past the starting keyframe, you can navigate back by choosing
Mark > Next > Keyframe (or pressing Shift-K).
2
In the Canvas, Control-click the starting keyframe and choose Ease In/Ease Out from
the shortcut menu.
The keyframe now has a velocity handle.
3
Drag the velocity handle away from the starting keyframe to adjust the acceleration at
the beginning of the motion path.
This causes the clip to start moving slowly and then ramp up to full speed.
4
Choose Mark > Next > Keyframe (or press Shift-K) to navigate to the ending keyframe
of your motion path.
5
In the Canvas, Control-click the ending keyframe and choose Ease In/Ease Out from the
shortcut menu.
6
Drag the velocity handle of the ending keyframe toward the keyframe.
This causes the clip to decelerate as it approaches the ending keyframe of the motion path.
For more information about velocity handles and creating smooth motion curves, see
“
Controlling Speed Along a Motion Path
” on page 317.
Drag the velocity
handle toward the
ending keyframe.
Ending keyframe

19
387
19