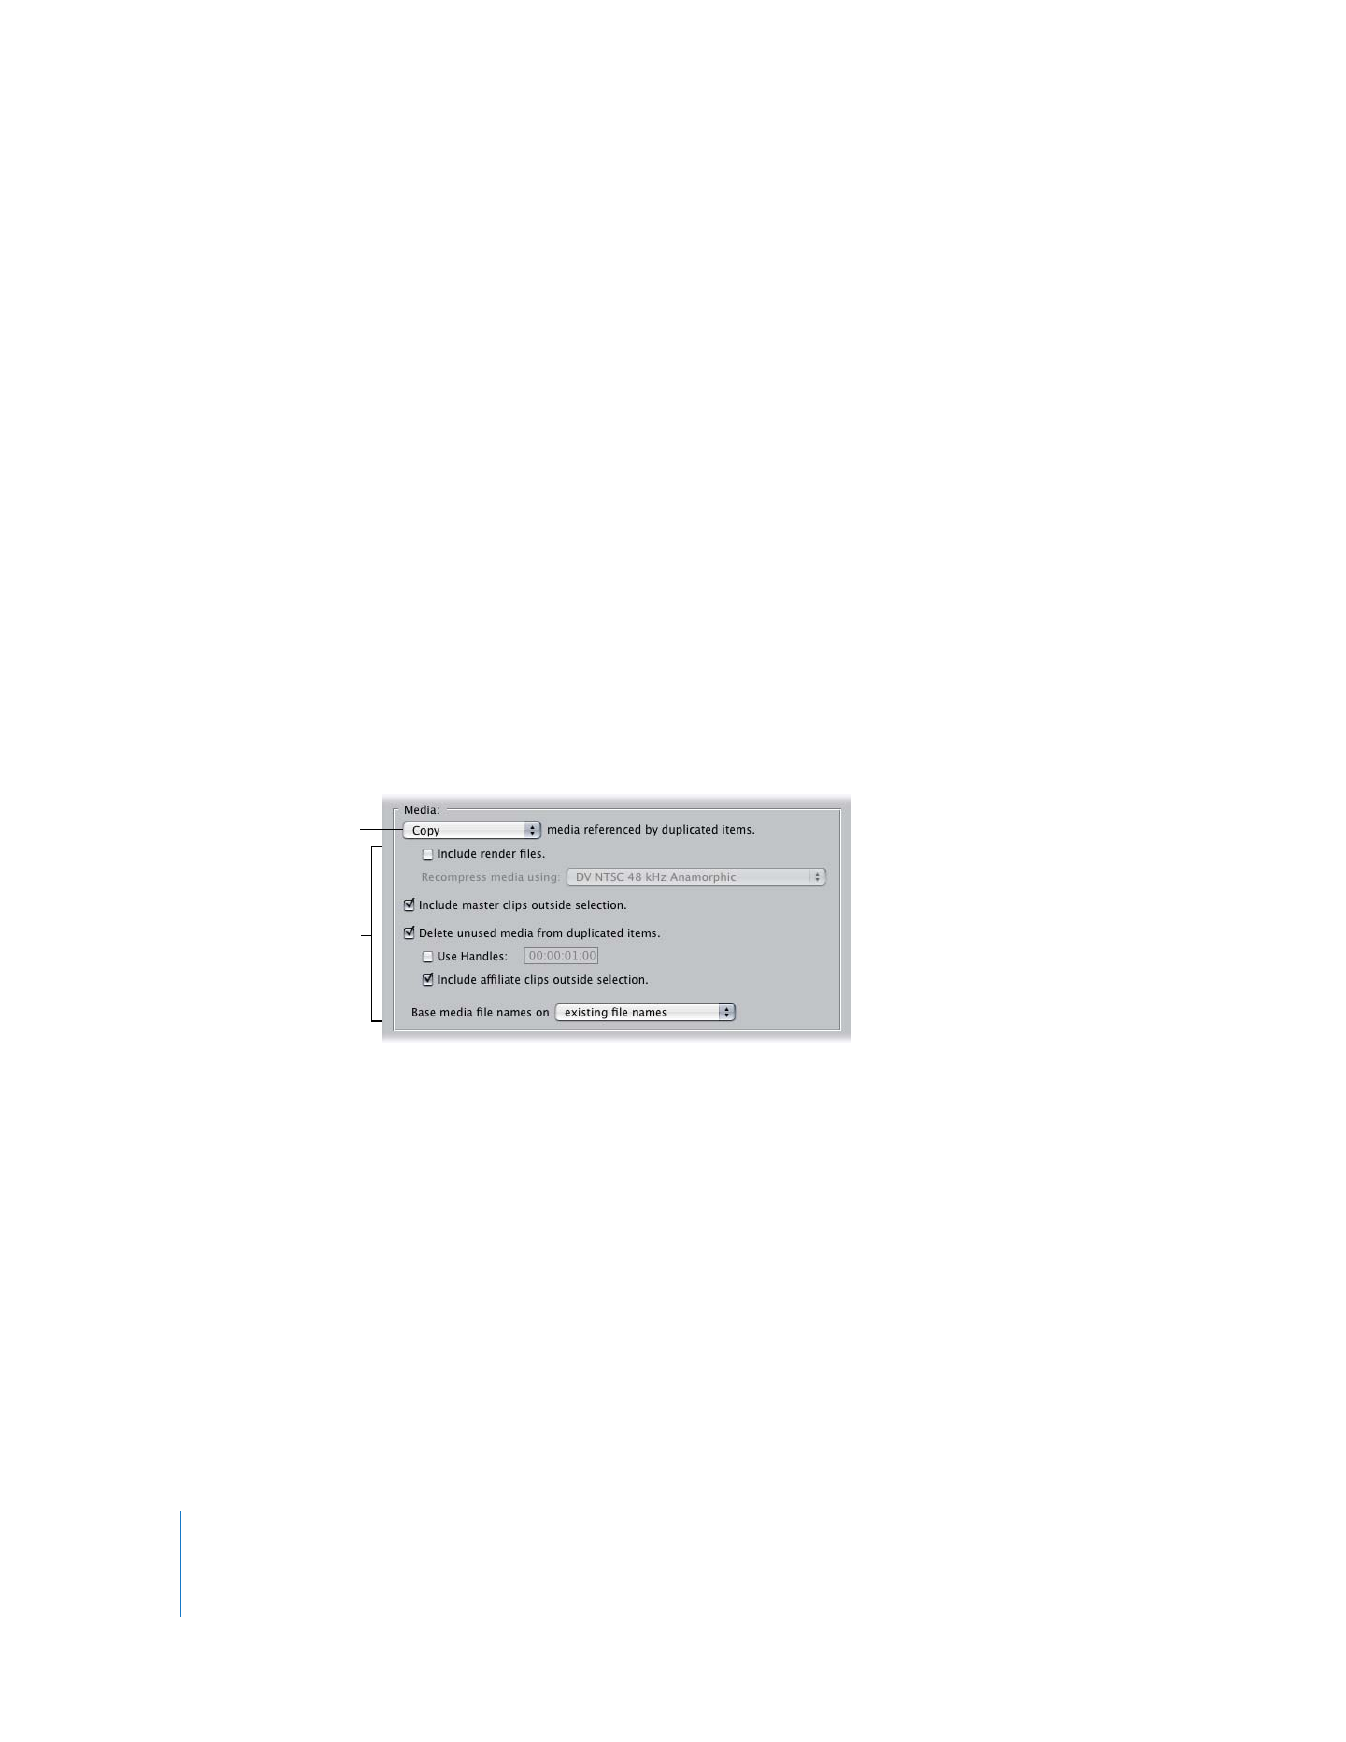
Media Area
This area is where you choose what you want to do to the media files on disk that are
referenced by your selection—copy, move, recompress at a specified sequence preset,
process only existing media, or create offline clips (creates a copy of clips or sequences
with no associated media). You can also choose to include render files, delete unused
media, and add handles.
Specify additional
options here.
Choose what you
want to do with the
selected media.

Chapter 7
Overview of the Media Manager
93
I
Media Pop-Up Menu
The choices in this pop-up menu represent the main Media Manager tasks. All other
options in the Media Manager follow from the choice you make here.
 Copy: This option copies all the selected items’ media files to the folder or disk
specified in the Media Destination path.
 Move: This option moves selected items’ media files to the location specified in the
Media Destination path.
 Recompress: This is nearly the same as the Copy option, but it allows you to
recompress the selected items’ media files using a codec different from the one
they were captured with and place them at a specified location. You choose the
recompression settings used from the “Recompress media using” pop-up menu,
which lists all sequence presets in Final Cut Pro. If no preset suits your needs, you can
choose Custom and specify your own settings in the Sequence Preset Editor window
that appears. These settings cannot be saved as a sequence preset; they are used
only for the immediate operation.
Note: The “Recompress media using” pop-up menu is available only when the
Recompress option is chosen.
When using the Recompress option, clips’ motion attributes are changed to match
the new dimensions of the sequence preset you chose. Only QuickTime movies
are recompressed; other types of files (such as Photoshop and AIFF files) are
simply copied.
Note: The Recompress option may fail with clips using codecs that rely upon
temporal compression, such as Sorenson and Cinepak. To recompress these files in
these codecs, you may want to use the Batch Export feature instead.
Important:
You cannot use the Recompress option to convert NTSC media to PAL, PAL
media to NTSC, or any other frame rate conversion. If you try, the frame size will change
to the new size, but the frame rate will remain the same as in the original media.
 Use Existing: This option allows you to use the currently existing media that’s linked
to the selected items. If you delete unused media using this option, the unused
media is actually deleted from your original media files, with or without handles,
as specified.
Important:
Be extremely careful when choosing the “Use existing” option; the Media
Manager deletes each media file as soon as it finishes processing it. Canceling this
operation may restore the media file currently being processed, but media files that
have already been processed cannot be restored.

94
Part I
Media and Project Management
 Create Offline: This option is very different from the others because no media files are
created or processed, and your selection is always copied to a new project. This option is
used to make a copy of a sequence with different settings, not to copy actual media. The
main reason for this option is to copy a sequence with low-resolution settings to a
sequence with full-resolution settings which you can then use to recapture full-resolution
media. This prepares you for an online editing session.
Note: If the duplicated sequence has a different frame size than the original, the
sequence clips’ motion attributes are adjusted proportionally so they match the
new frame size.
You can choose the new settings for the copied sequence in the “Set sequences to”
pop-up menu, which lists all sequence presets in Final Cut Pro, as well as an option to
use “Current Sequence Settings.” You can also choose Custom to specify your own
settings in the Sequence Preset Editor window that appears. These settings cannot
be saved as a sequence preset; they are used only for the immediate operation.
Note: This pop-up menu appears only when the “Create offline” option is chosen. It
replaces the “Recompress media using” pop-up menu.
Include Render Files Checkbox
Select this checkbox to include render files when using the Copy or Move operation. This
option is not available with the Recompress, “Use existing”, or “Create offline” operations.
 Available with: Copy or Move
 Always enabled with: “Use existing”
 Always disabled with: Recompress or “Create offline”
Include Master Clips Outside Selection Checkbox
When you choose the “Duplicate selected items and place into a new project” option,
a bin of master clips is created for all of the clips used in the new project. This means
the new project has master-affiliate relationships, not just independent clips.
The “Include master clips outside selection” option determines how much media is
retained in the master clips of the new project.
 When this option is selected, the master clips in the new project are based on the
master clips in your current project. This means that the following media is retained
when new master clips and media files are created:
 The media defined by the items you selected before opening the Media
Manager window
 The media defined by the In and Out points of your original master clips
 When this option is deselected, the master clips in the new project are based only on the
media used by the items you selected before opening the Media Manager window.

Chapter 7
Overview of the Media Manager
95
I
Selecting this option allows you to retain not only the media for clips in your sequences,
but also media defined by your original master clip In and Out points. When combined
with the “Include Affiliate Clips Outside Selection” option, you can retain media for all
clips affiliated with your original selection, even if you did not explicitly select all of the
affiliated items.
 Available with: Copy, Recompress, or “Create offline”
 Always enabled with: Move or “Use existing”
Delete Unused Media Checkbox
This option allows you to delete (or not include) any media files, or portions of media
files, that aren’t referenced by your selected items.
Note: The name of this checkbox changes depending on whether you are creating a
duplicate project.
When you delete portions of media files, Final Cut Pro actually creates new media files,
one for each segment of the original media file defined by the clips or subclips you
selected. The new media files are named according to the option chosen in the “Base
media file names on” pop-up menu, and the resulting clips in your project are properly
connected to these new media files. You can use this option when you are removing
unused media files toward the end of your project, or when you want to break up a
long media file that you have broken into several subclips.
The main purpose of deleting media from your hard disk is to save space or to transfer
a consolidated version of your project to another system. However, deleting media
from your media files can be risky, because you may decide later that you want a few
extra frames to trim an edit, or you may have deleted portions of a media file that was
actually used by a clip in another sequence. To avoid deleting too much media, the
“Deleted unused media” option has several related suboptions—Use Handles and
“Include affiliate clips outside selection”—which further refine exactly what media is
deleted. These options are described below.
Note: This option works only on QuickTime files that have timecode tracks and reel
names. If you have AIFF and WAVE files in your selection, they are copied in their entirety.
Important:
You must be extremely careful when using this option with the “Use
existing” option in the Media pop-up menu. Once media is deleted, it cannot be
restored, and this operation cannot be undone.

96
Part I
Media and Project Management
Use Handles Checkbox
This option modifies the “Delete unused media” option described above so that less
media is deleted from a media file. Handles are additional footage at the beginning
and end of a clip that you keep just in case you need a few extra frames for trimming,
or you need extra footage beyond your planned In and Out points to create a
transition, such as a dissolve, to another shot.
 Available only with: Delete unused media
Note: This option works only on QuickTime files that have timecode tracks and reel
names. If you have AIFF and Wave files in your selection, they are copied in their entirety.
Include Affiliate Clips Outside Selection Checkbox
This option allows you to retain media used by all clips affiliated with your currently
selected items, not just media for the selected items. Whenever you choose a Media
Manager option that can potentially delete media, this option is automatically enabled.
Important:
Because clips are affiliated by way of a master clip, you need to make sure
you also select the “Include master clips outside selection” option to retain affiliated
clips’ media.
When you select this option, the following additional media is included by the operation:
 A selected clip’s master clip media marked by an In point and Out point (or Media
Start and End points if no In or Out point is set)
 Media between affiliated clips’ In and Out points. For example, if a clip in Sequence A
refers to the first 10 seconds of a media file, and an affiliate clip in Sequence B refers
to the last 10 seconds of the same media file, none of the media file is deleted.
 Media referenced by any affiliate clips in other sequences, even if those sequences
weren’t originally selected
For example, if you have two affiliated clips, one in Sequence A and one in Sequence B,
they both refer to the same media file via their common master clip in the Browser. If
you select Sequence A to copy media using the Media Manager, only the media
referred to by the clip in Sequence A is copied. However, if you select the “Include
master clips outside selection” option and the “Include affiliate clips outside selection”
option, the media referred to by the affiliate clip in Sequence B is also copied, even
though you selected Sequence A for processing. Any media between the master clip’s
In and Out points is also retained.
For more information on using this option, see “
Limiting How Much Media Is Copied or
Deleted
” on page 101.
 Available with: Copy, Recompress, or “Create offline”
 Always enabled with: Move or “Use existing”

Chapter 7
Overview of the Media Manager
97
I
“Base Media File Names on” Pop-Up Menu
This pop-up menu determines how clips are named when they’re segmented as a result of
the “Delete unused media” option. The following media filenaming options are available:
 Existing file names: Filenames of clips created by the Media Manager are based on
the source media files on disk. The first new media file created is named the same as
the original media file, and additional media files are named with a numerical suffix.
For example, if three new media files were created, they would be named “Media
File”, “Media File-1”, and “Media File-2.”
 Clip names: Filenames of clips created by the Media Manager are based on the
names you’ve given the clips in your project.
If you have created subclips from a long media file (such as an entire tape captured to
one media file), you may have given the subclips meaningful names. In this case, you
would want to name newly created media files based on the clip names.