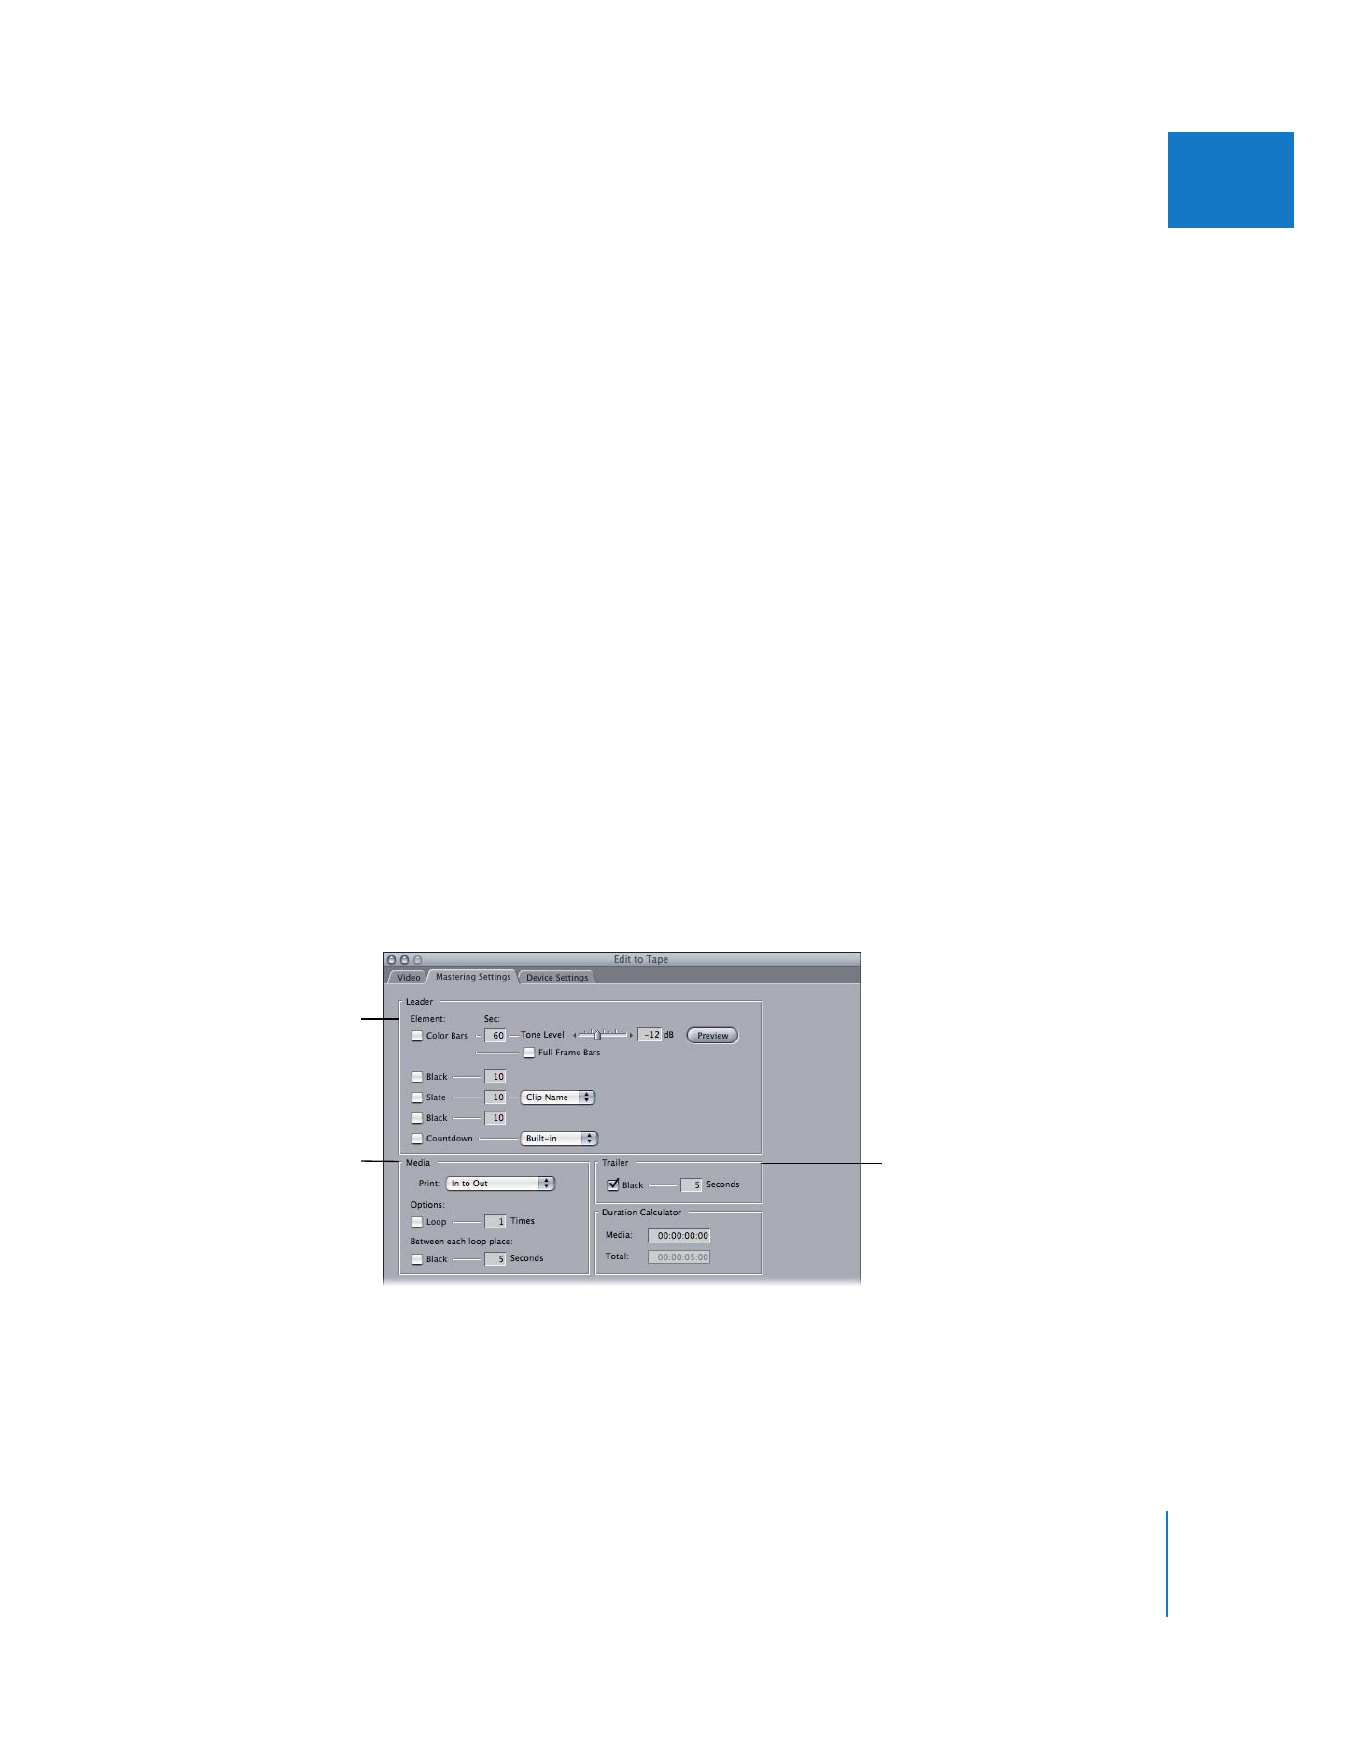
Mastering Settings Tab
You can add leader and trailer elements during both the Edit to Tape and Print to
Video operations:
To add leader or trailer elements when editing to tape:
m
Choose Mastering mode and specify settings in the Mastering Settings tab of the Edit
to Tape window.
To add leader or trailer elements when using the Print to Video command:
m
Select leader and trailer elements directly in the Print to Video dialog.
For more information about using leader and trailer elements, see “
Adding Standard
Leader and Trailer Elements
” on page 208.
All selected elements are output to tape in the order listed. Make sure to deselect
elements you don’t need. All element durations are specified in whole seconds.
Note: Some of these items may require rendering before you can start recording.
Select all of the elements
you want to add before
the clip or sequence.
Select trailer elements to
be added at the end of
the clip or sequence.
Choose how much of
your sequence or clip
you want to output, and
select looping options.

206
Part III
Output
Leader Elements
 Color Bars: Adds color bars and a 1 kilohertz (kHz) reference tone, preset to
–12 decibels (dB). Color bars at the beginning of your tape allow the recipients to
calibrate their equipment to match the color levels and values that your system used
when outputting your program. The reference tone lets the recipients properly adjust
audio levels during playback.
For more information on creating a mix with proper levels, see Volume III, Chapter 3,
“Evaluating Levels with Audio Meters.”
When the current device control preset has a frame rate of 25 fps (PAL), you can
select the Full Frame Bars option. When you select this option, full-frame bars are
output to tape. When this option is not selected, SMPTE bars are output.
Note: If the current device control preset does not have a frame rate of 25 fps, this
option is unavailable.
 Black: Adds the specified number of seconds of black between the color bars and
slate, or at the beginning of the clip or sequence if you aren’t adding color bars.
 Slate: Adds a slate with information about your movie. Choose the slate source from
the pop-up menu. The slate can be the clip or sequence name, text you type in a
field, or a specified text, PICT, or QuickTime file on disk. A slate should contain
information such as:
 The title of your program
 Relevant production credits indicating ownership of the content (such as the
producer, director, editor, and post-production facility)
 The total run time (TRT) of your program
 The starting timecode number. This is useful if you’re using a high-end video deck to
do an insert edit of your program onto a tape with pre-striped timecode. In this case,
also indicate whether drop frame (DF) or non-drop frame (NDF) timecode is used.
 The date on which the tape is output
 Black: Adds the specified number of seconds of black between the slate and countdown.
 Countdown: Adds a countdown before your movie. You can use the 10-second
built-in SMPTE standard countdown or choose a custom countdown. Countdowns
are generally used when you deliver a tape to a television or cable station for
broadcast, or to an audio post-production facility doing your final audio mix.
Note: If you choose a custom QuickTime file as your countdown, its duration should
conform to SMPTE specifications.

Chapter 14
Assemble and Insert Editing Using Edit to Tape
207
III
Media Elements and Options
These are options for the clip or sequence you are outputting to tape.
 Print: You can choose to output the entire clip or sequence or just the part specified
between the In and Out points.
 Loop: Repeats the selected media for the specified number of times. A value of 1
plays the selected media once; a value of 2 plays the selected media twice, and so on.
 Black: Adds black after each loop of your sequence or clip.
Trailer
 Trailer: Adds a black trailer at the end of your sequence or clip or at the end of the
last loop of your clip or sequence. It’s good practice to put a 30-second black trailer
at the end of your tape so viewers don’t see noise as soon as your movie ends. It’s
also helpful to add a few seconds of black at the end of each edit when you are
assemble editing. This provides timecode and control track after the last frame of
your output sequence to set a new In point for a new edit.
Duration Calculator
The Duration Calculator displays the total duration of the program you are outputting,
including all of the selected leader and trailer elements and their durations. Make sure
there is sufficient time on your tape before proceeding.
 Media: Displays the duration of your source media to be output, not including leader
and trailer elements. The duration shown here depends on whether the sequence or
clip you are outputting has In or Out points set, and the choice you made in the Print
pop-up menu.
 Total: Displays the total duration of the program you are outputting, including
additional time created by looping and the duration of all selected leader and
trailer elements.
208
Part III
Output