
What Is a Device Control Protocol?
A device control protocol defines the rules and syntax for how two devices
communicate with each other. The two connected devices must negotiate and agree
upon the speed of communication (often measured in bits per second or baud, much
like a modem), the length of each binary word, and how different commands—such
as play, rewind, and fast-forward—are coded. Once the two devices have successfully
established communication via a remote control protocol, navigational commands,
timecode, and so on can be transferred between the device and Final Cut Pro.

352
Part IV
Settings and Preferences
 Time Source: Some tape formats can have more than one kind of timecode track. You
can choose which track you want Final Cut Pro to read timecode from, and in the
case of LTC and VITC, you can let Final Cut Pro read either one depending on what’s
available:
 LTC: Because LTC is audio, it can be interpreted by a timecode reader even when
the tape is fast-forwarding, but it can’t be read when the tape is paused or moving
extremely slowly.
 VITC: VITC can be read at very slow speeds, but it breaks up when fast-forwarding
or rewinding.
 LTC+VITC: This setting is best if your tape has both VITC and LTC. If you choose this
setting, Final Cut Pro looks at both timecodes so that accurate timecode can be
read no matter what speed the tape is playing (LTC is used for normal and high
speed playback; VITC is used for slow motion and pause).
 Timer: A clock-based counter. This option is useful for decks that support device
control but not timecode, such as some VHS decks.
 DV Time: Choose this when capturing or outputting to a DV device.
 Port: Choose the port to which your device control cable is connected. If you’re using
DV timecode, this option is not available, because FireWire is used automatically. If
you’re using serial device control rather than DV device control, choose the port that
you have connected your serial device control. This may be your built-in modem
port, or a USB-to-serial adapter connected to a USB port.
 Frame Rate: Choose the timecode frame rate of the video you’ll be capturing, such
as 29.97 fps for NTSC, 25 fps for PAL, 59.94 fps for DVCPRO HD 720p, and so on.
 Default Timecode: This option affects the timecode mode (drop frame or non-drop
frame) of fields in the Log and Capture window when no device is connected, or
before a tape begins playing. Once a tape is playing, Final Cut Pro determines the
timecode mode from the tape, not this pop-up menu.
The timecode mode chosen here is useful when you log clips without a tape in your
VTR. Before you press play on the deck, Final Cut Pro doesn’t know what the
timecode mode is on the tape, so it uses the default timecode.
When no device is connected, you can change the timecode mode of the In and Out
point and Timecode Duration fields by Control-clicking these fields in the Log and
Capture window and choosing a default timecode mode.
Chapter 26
Device Control Settings and Presets
353
IV
 Use Deck Search Mechanism: Select this option to use a deck’s internal search
mechanism to cue a tape to a specific timecode value, if available. Decks with serial
device control may have this option. Do not select this option if your deck has
problems moving the playhead to a specified timecode value during capture. For
more information, see the documentation that came with your video equipment.
This option is not available for DV devices.
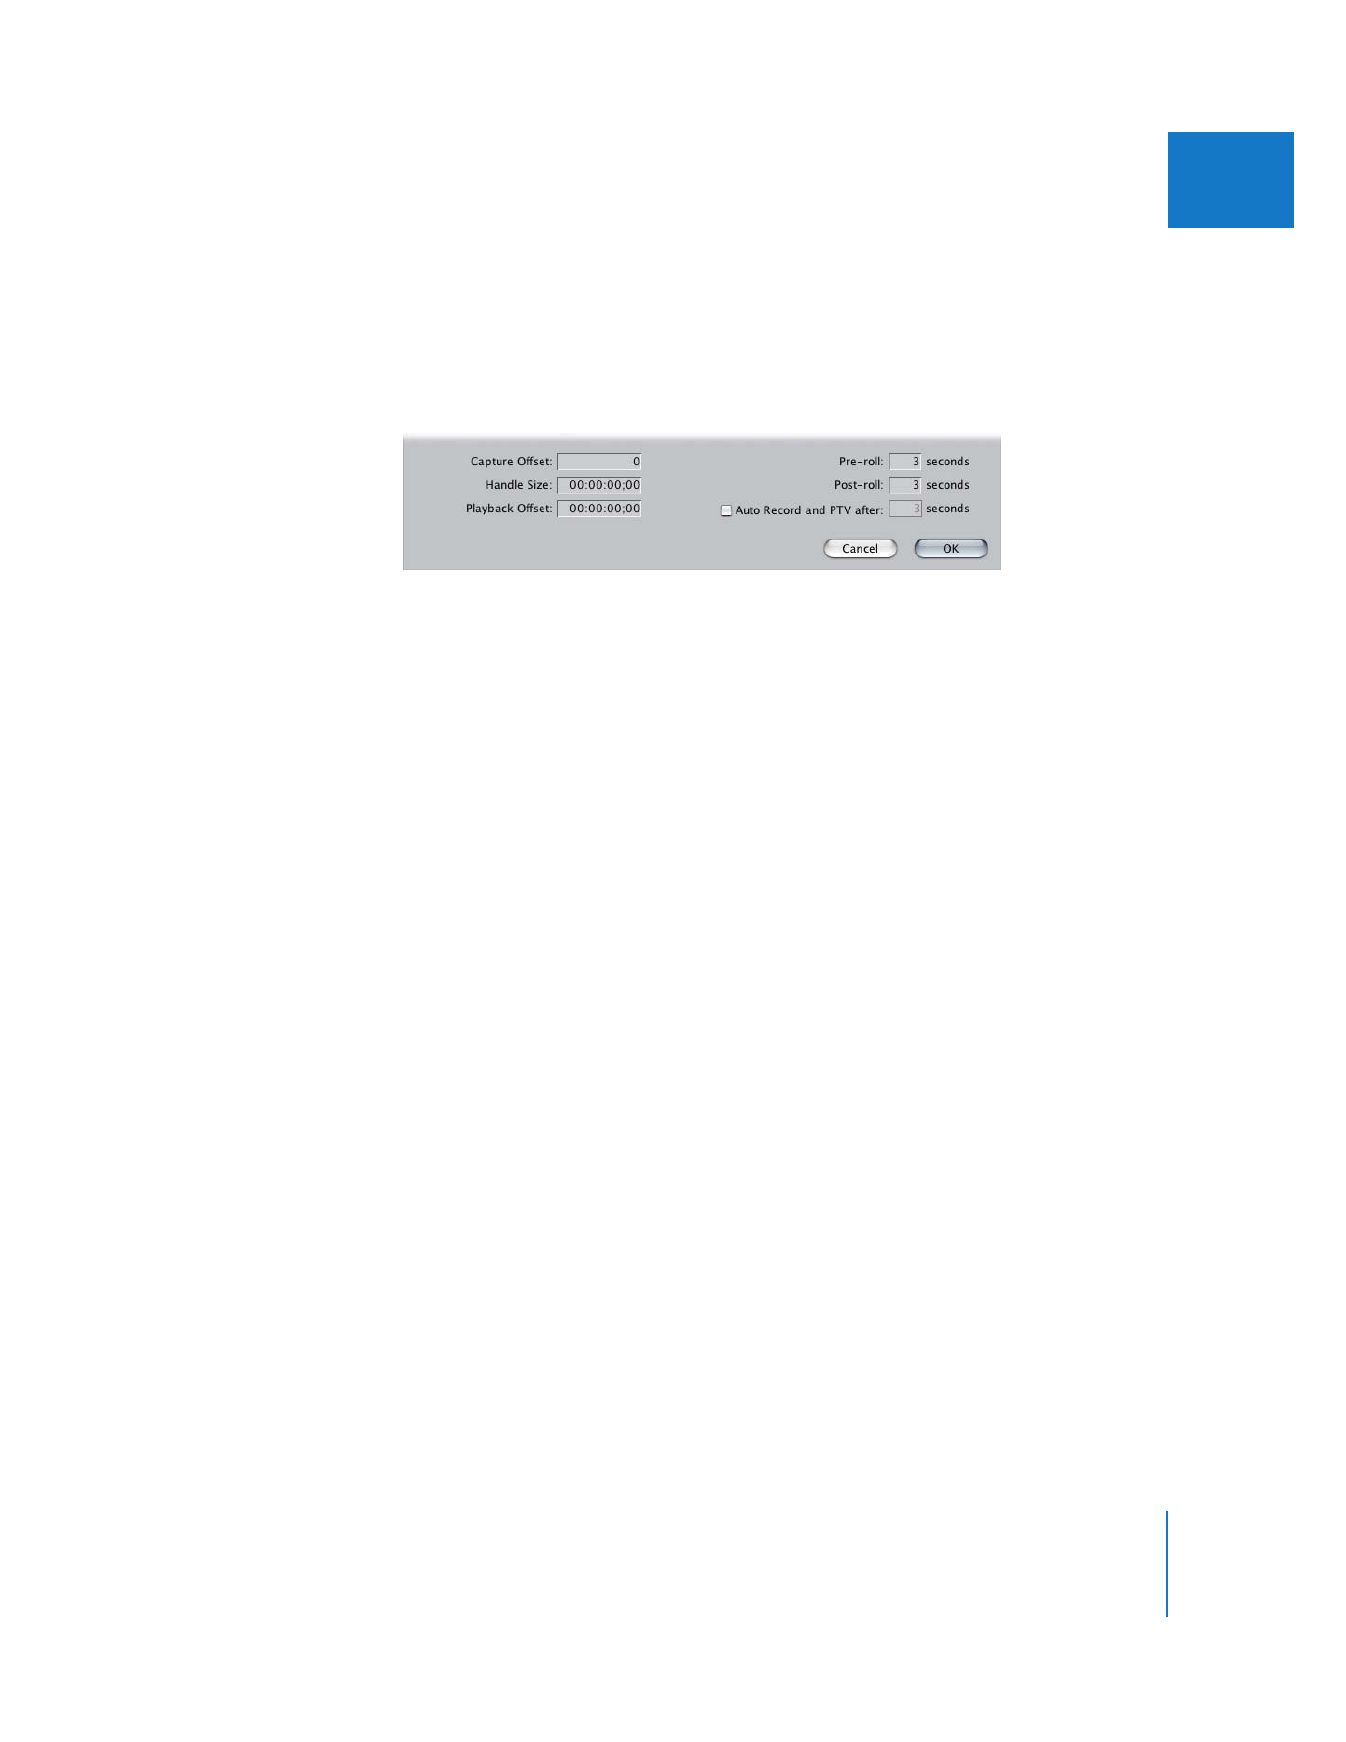
 Capture Offset: Because timecode and video are often captured by Final Cut Pro via
two separate channels (device control connection and video input, respectively),
there may be a small, but consistent, offset between when a video frame and a
timecode number are captured to a media file. You must calibrate your timecode by
determining its frame offset from the video and entering it in this field. For more
information, see “
Determining and Entering the Timecode Offset
” on page 357.
Note: This is not an issue when you capture DV video via FireWire, since both
timecode and video data are transferred via the same FireWire cable.
 Handle Size: This setting only has an affect when you batch capture clips. The value
in this field tells Final Cut Pro to automatically capture additional footage, or handles,
at the head and tail of each batch-captured clip. For more information about batch
capturing, see Volume I, Chapter 17, “Capturing Your Footage to Disk.”
 Playback Offset: This option allows you to compensate for latency between
Final Cut Pro device control (the number in the Current Timecode field) and your
video interface output, since some video interfaces take some time to process the
video signal. This is only an issue when using separate connections for device control
and video output, such as serial RS-422 device control and a PCI video card.
Enter a number to compensate for delays between the start of playback and the start
of recording on your deck when editing to tape. This is normally set to 0. Enter a
positive number to start playback before recording begins; enter a negative number
to start playback after recording begins.
Note: If the first frame is duplicated over several frames when you’re editing to tape,
enter the number of duplicated frames in this field to eliminate the problem.

354
Part IV
Settings and Preferences
 Pre-roll and Post-roll: Because VTRs and audio players are mechanical devices, it takes
a few seconds for the device’s motor to stabilize and reach a steady speed after
starting from a stopped or paused position. The pre-roll time sets how far in advance
your camcorder or deck starts playing back your source tape before capture or
output. In most cases, the 3 second default is sufficient. Both pre- and post-roll
values are used when you click the Play Around Current Frame button in the Log and
Capture window, and when you preview an insert edit in the Edit to Tape window
before committing the edit to tape.
 Auto Record and PTV after: Check this box to have Final Cut Pro automatically put
your DV camcorder or deck in Record mode when using the Print to Video
command. Specify the number of seconds you want Final Cut Pro to wait before
going into Record mode and printing to video (after you click OK in the Print to
Video dialog). If this option is not selected, when you print to tape, you’re prompted
to insert a tape and manually press record on the VTR. This checkbox is also available
in the Print to Video dialog.